
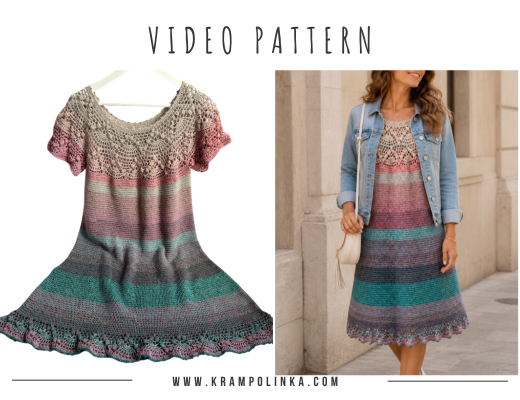
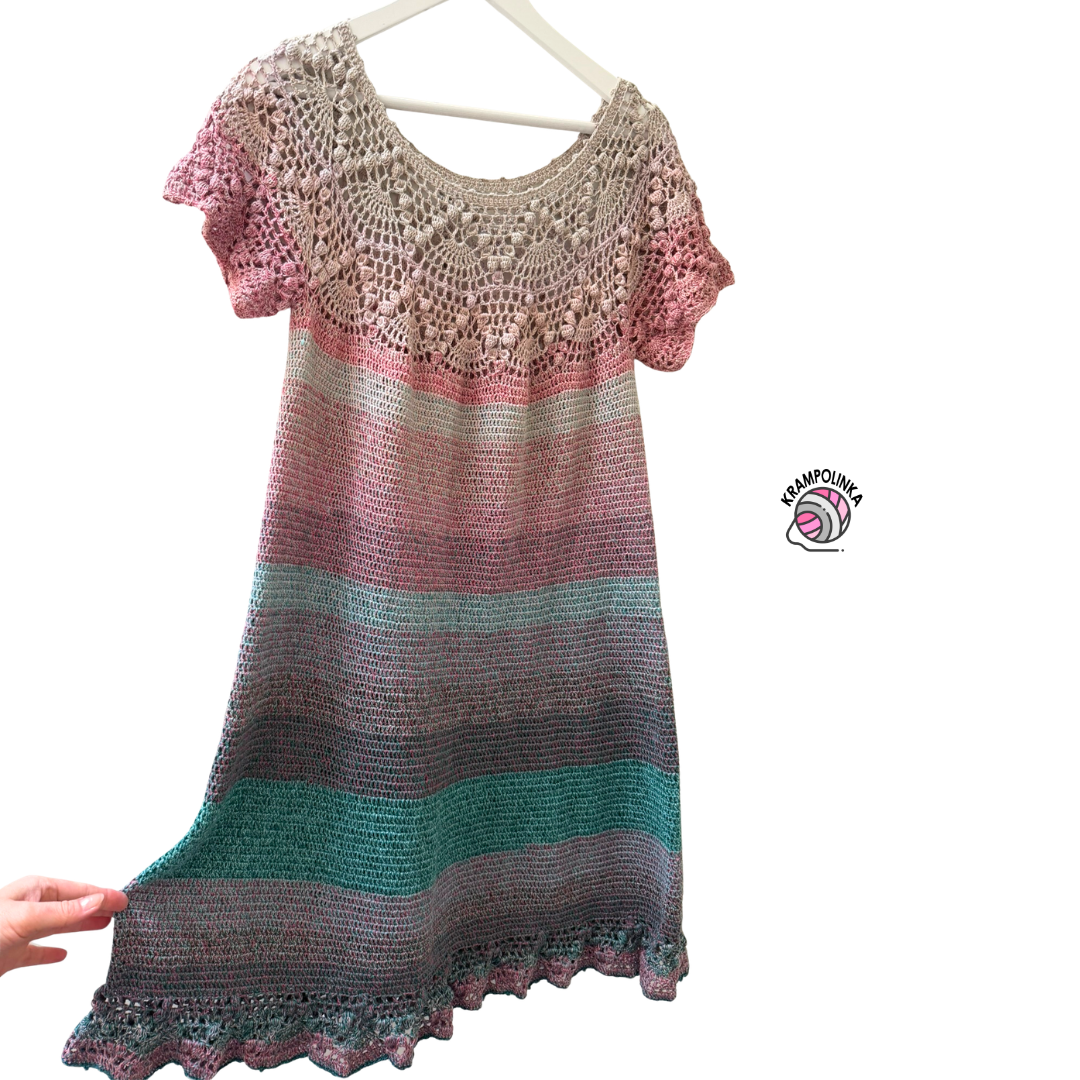
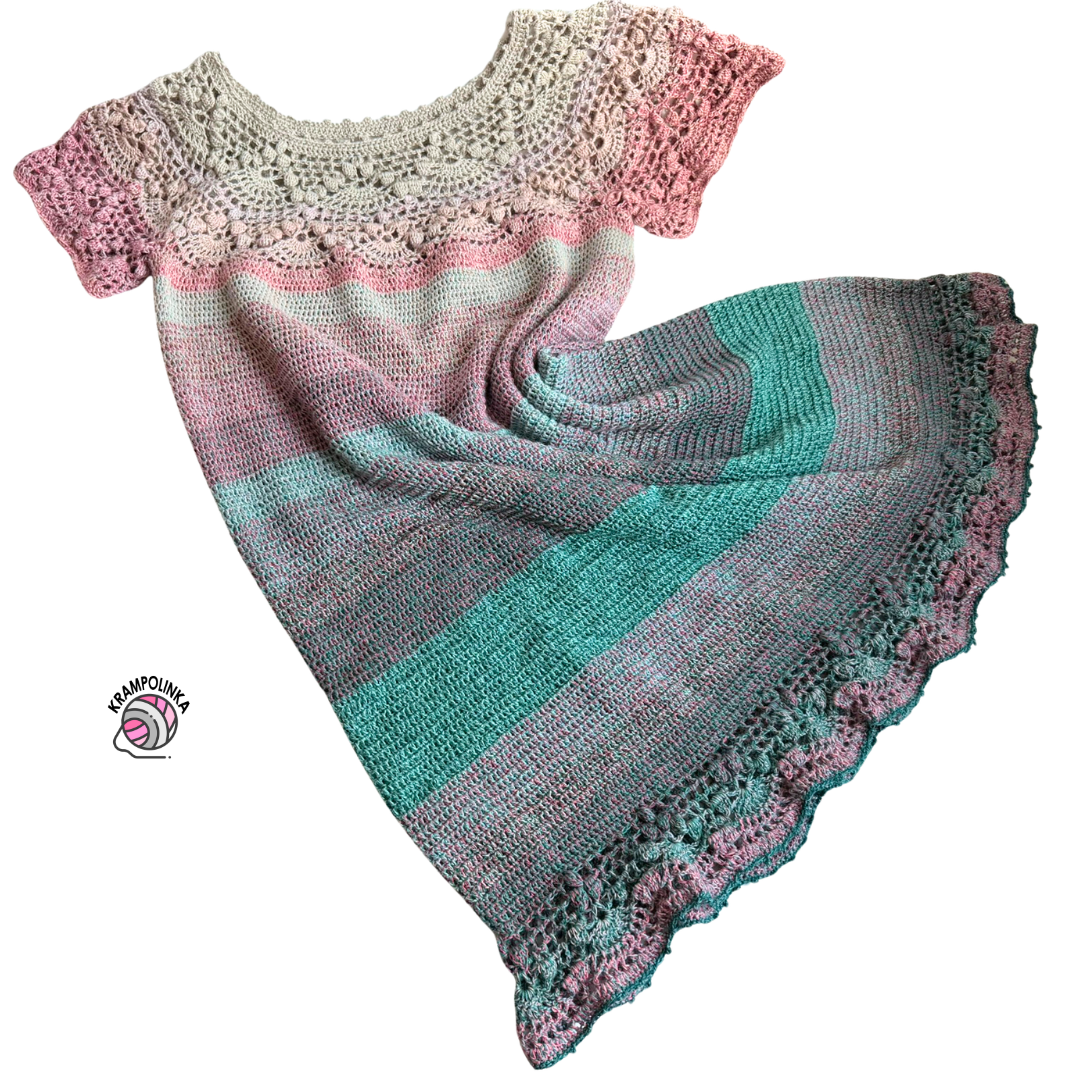
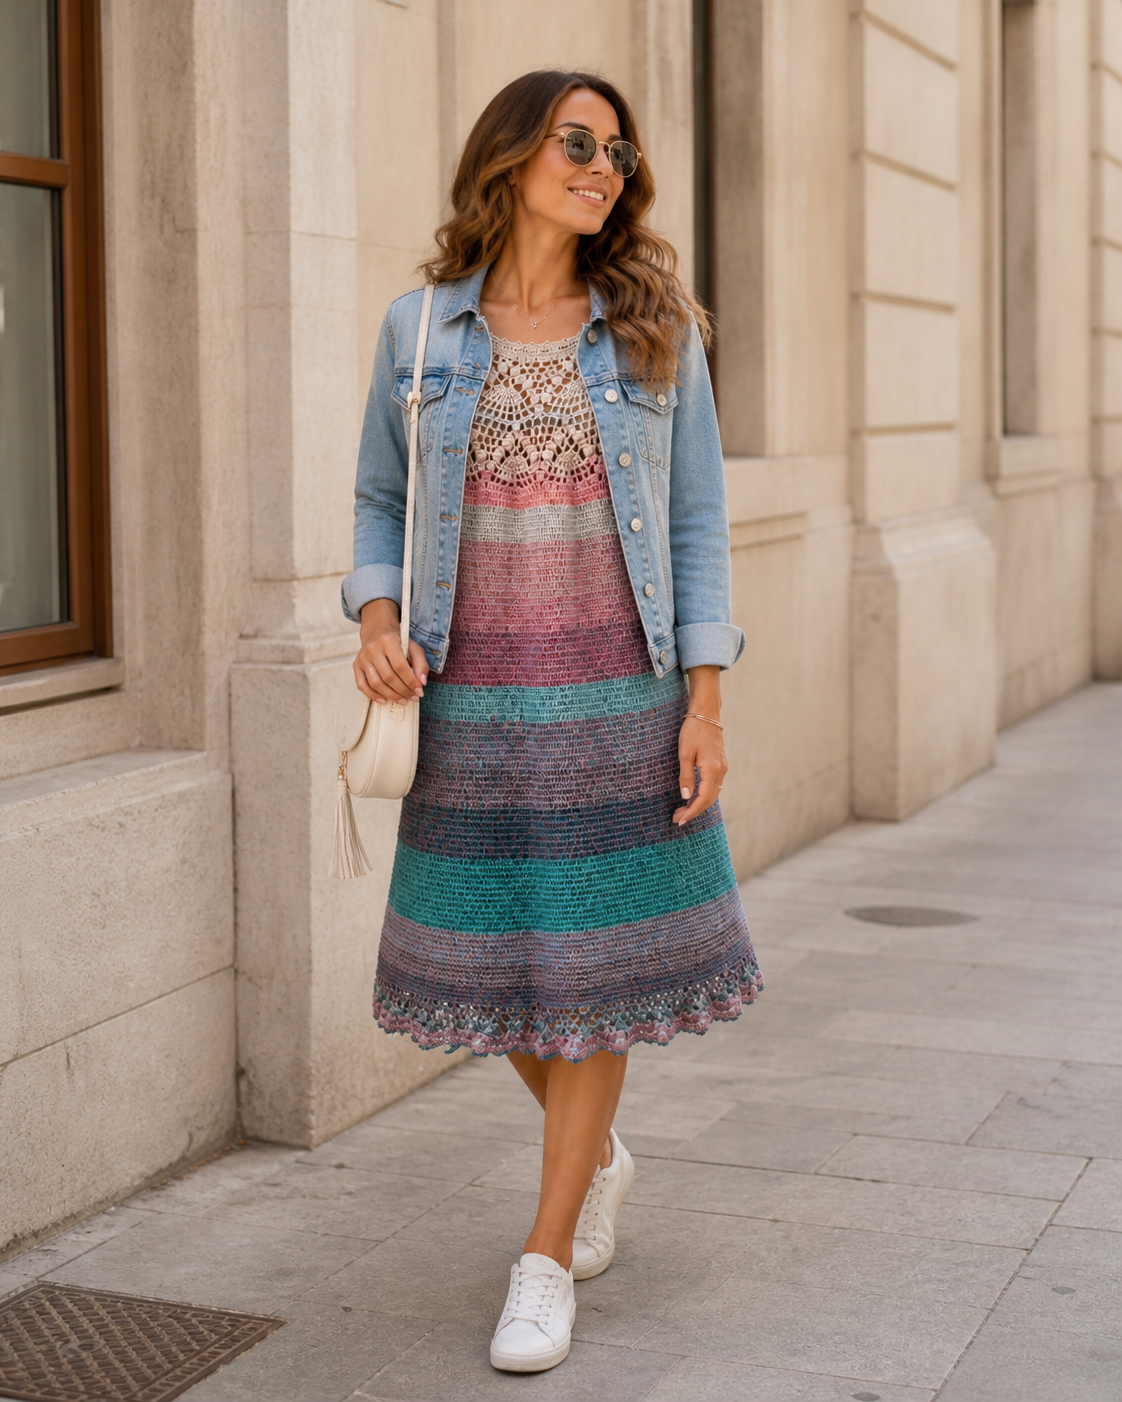
In today’s tutorial, we will crochet a dress, top, or blouse with a circular yoke. We will be using the Forest Dew gradient yarn cake.
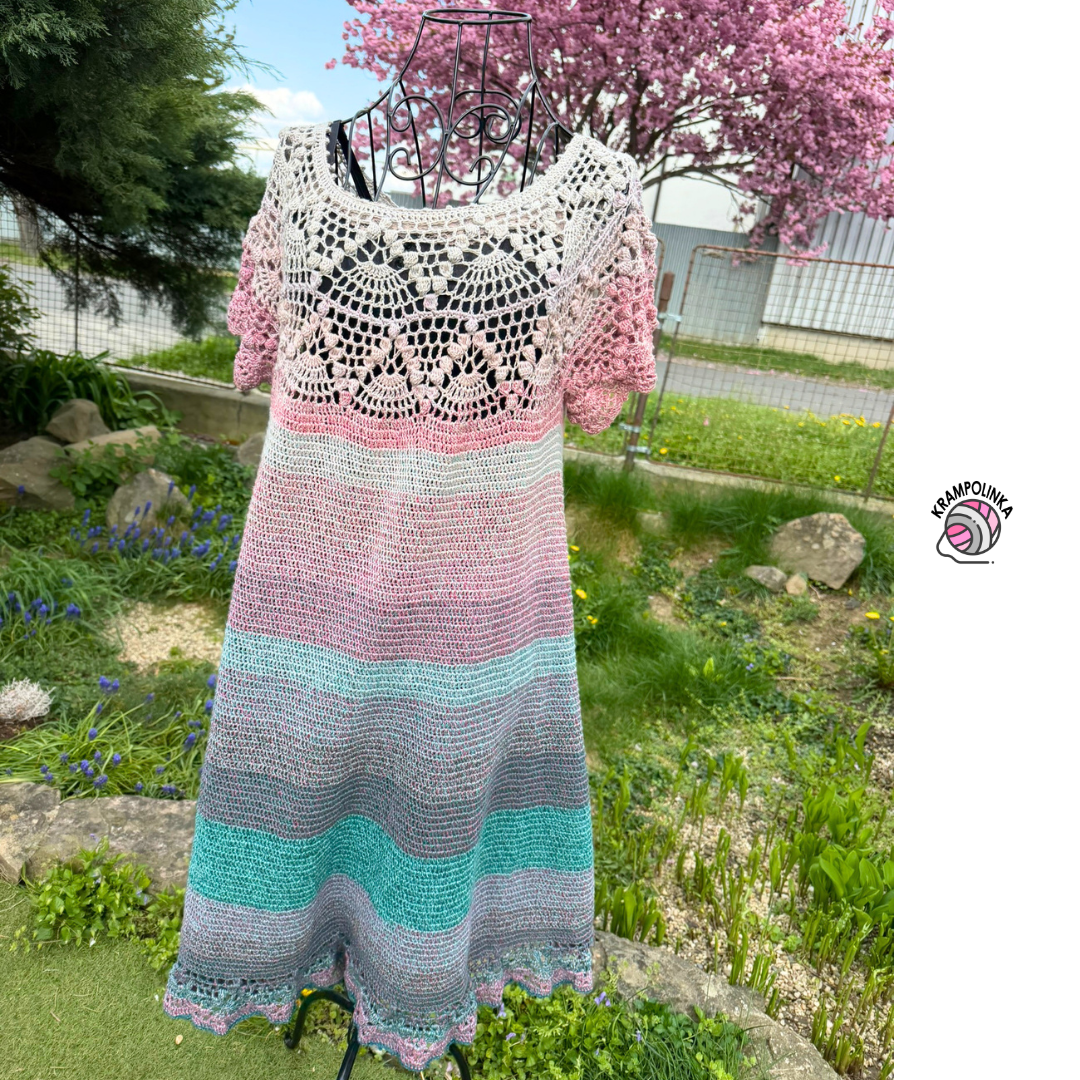
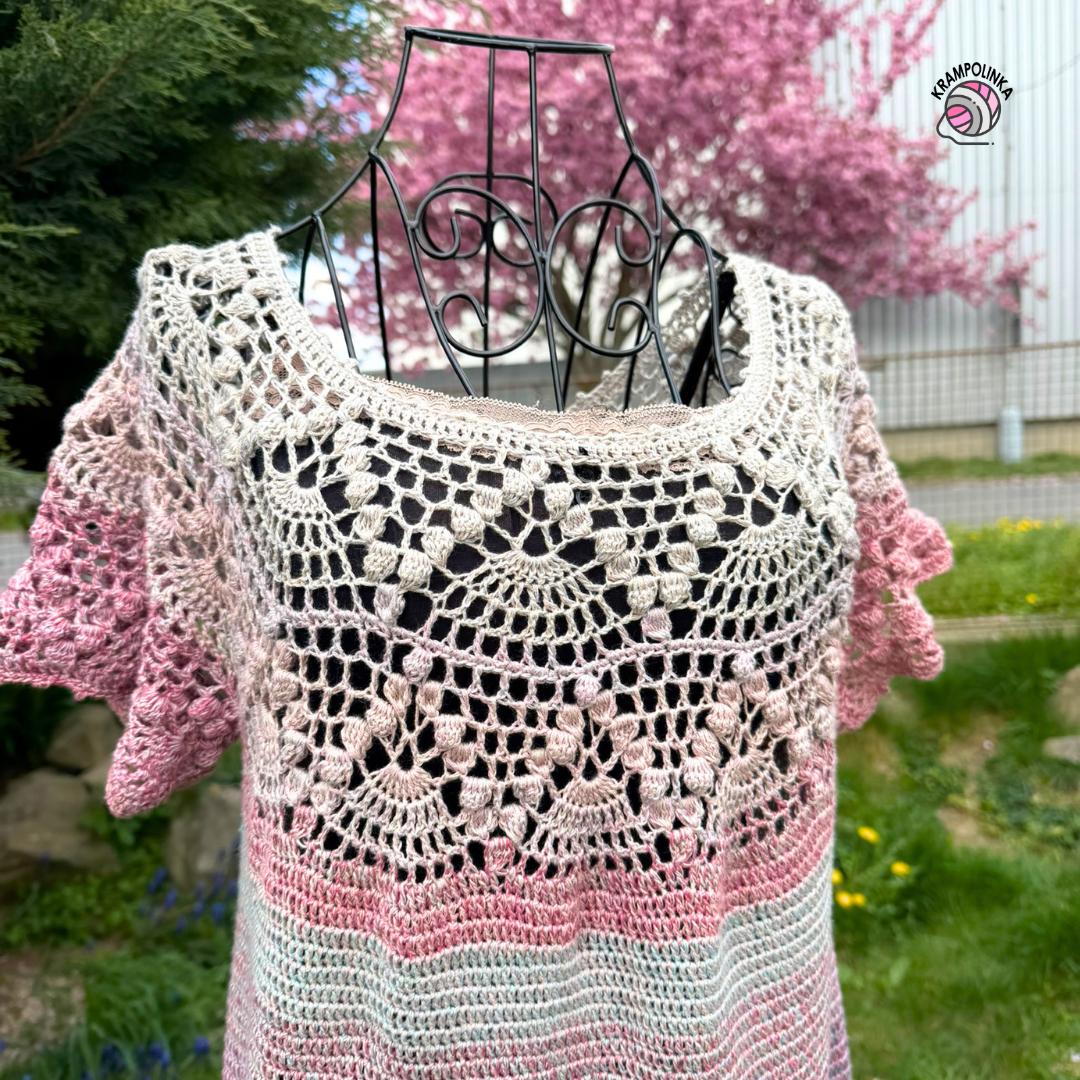
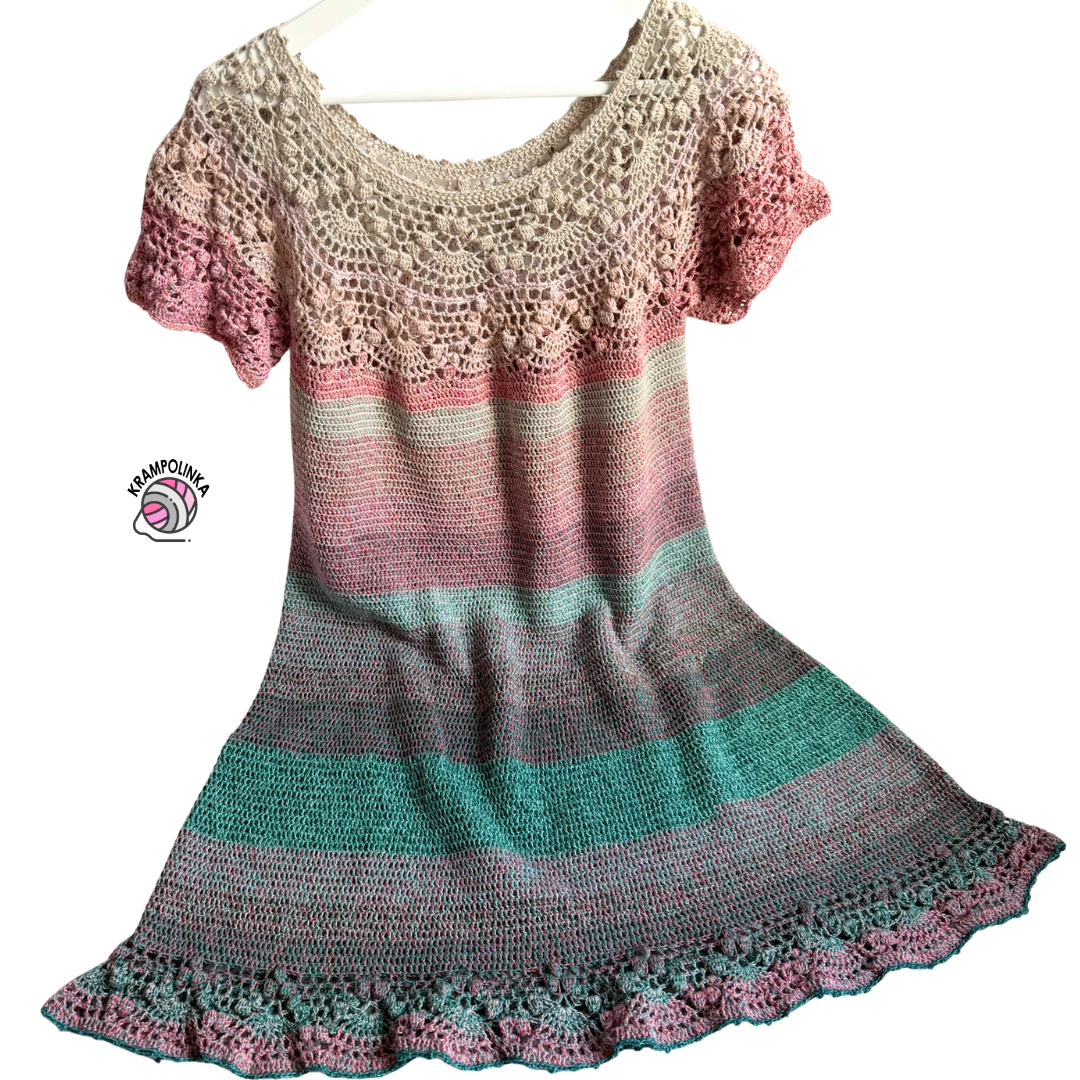
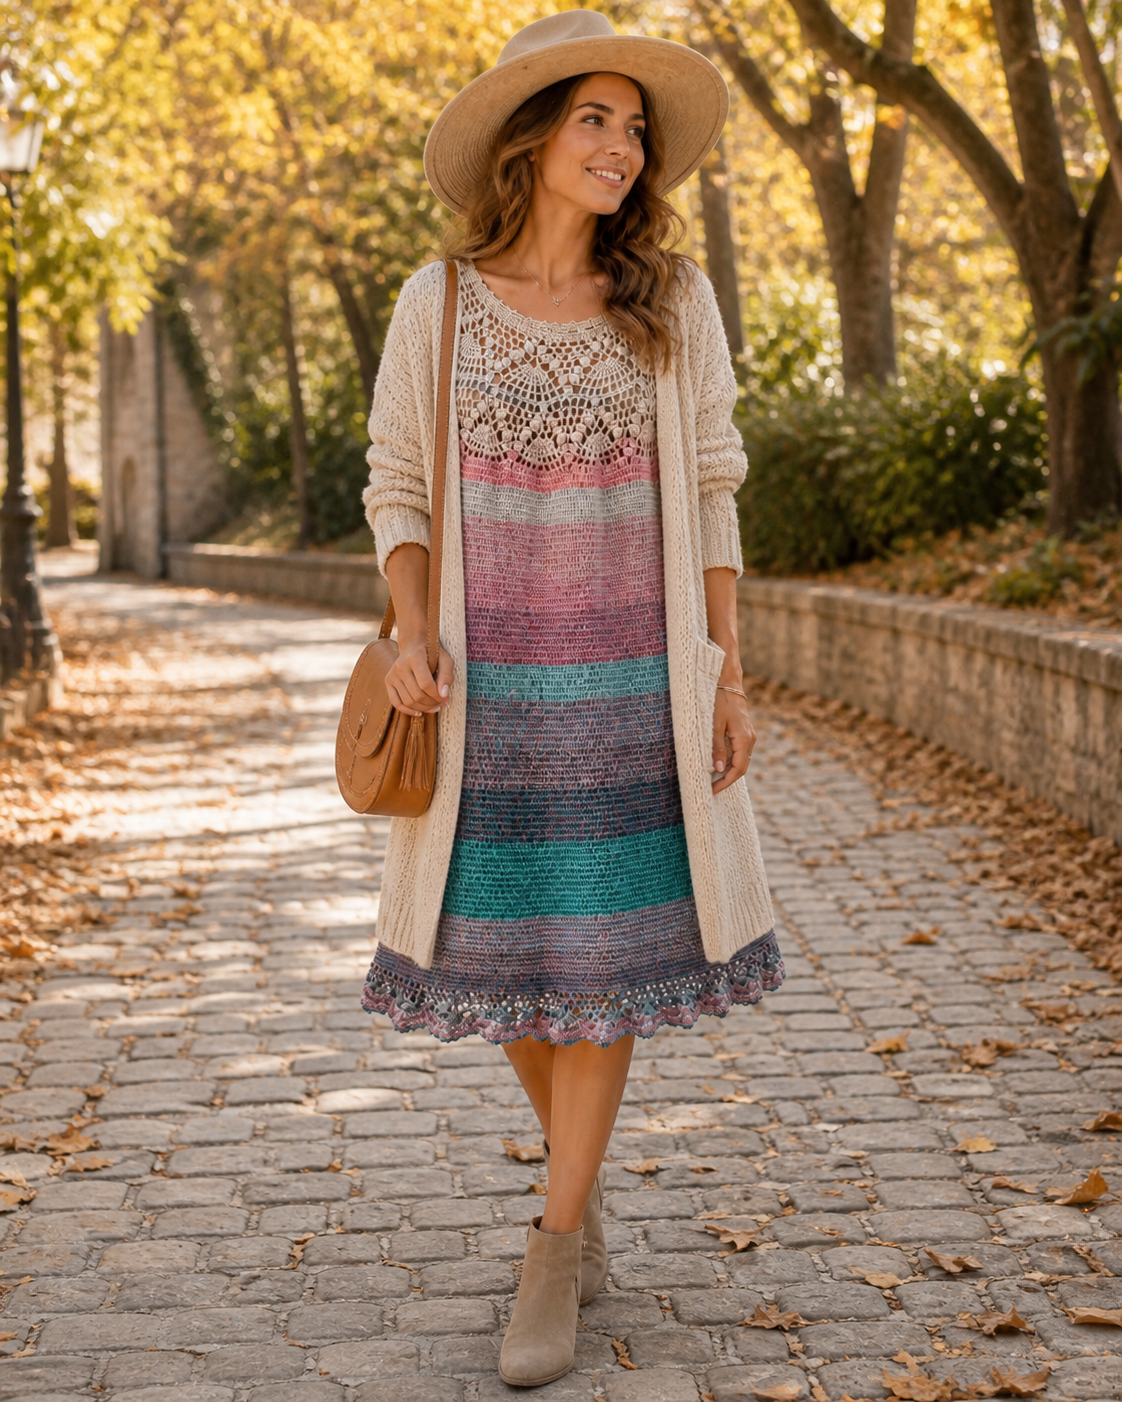
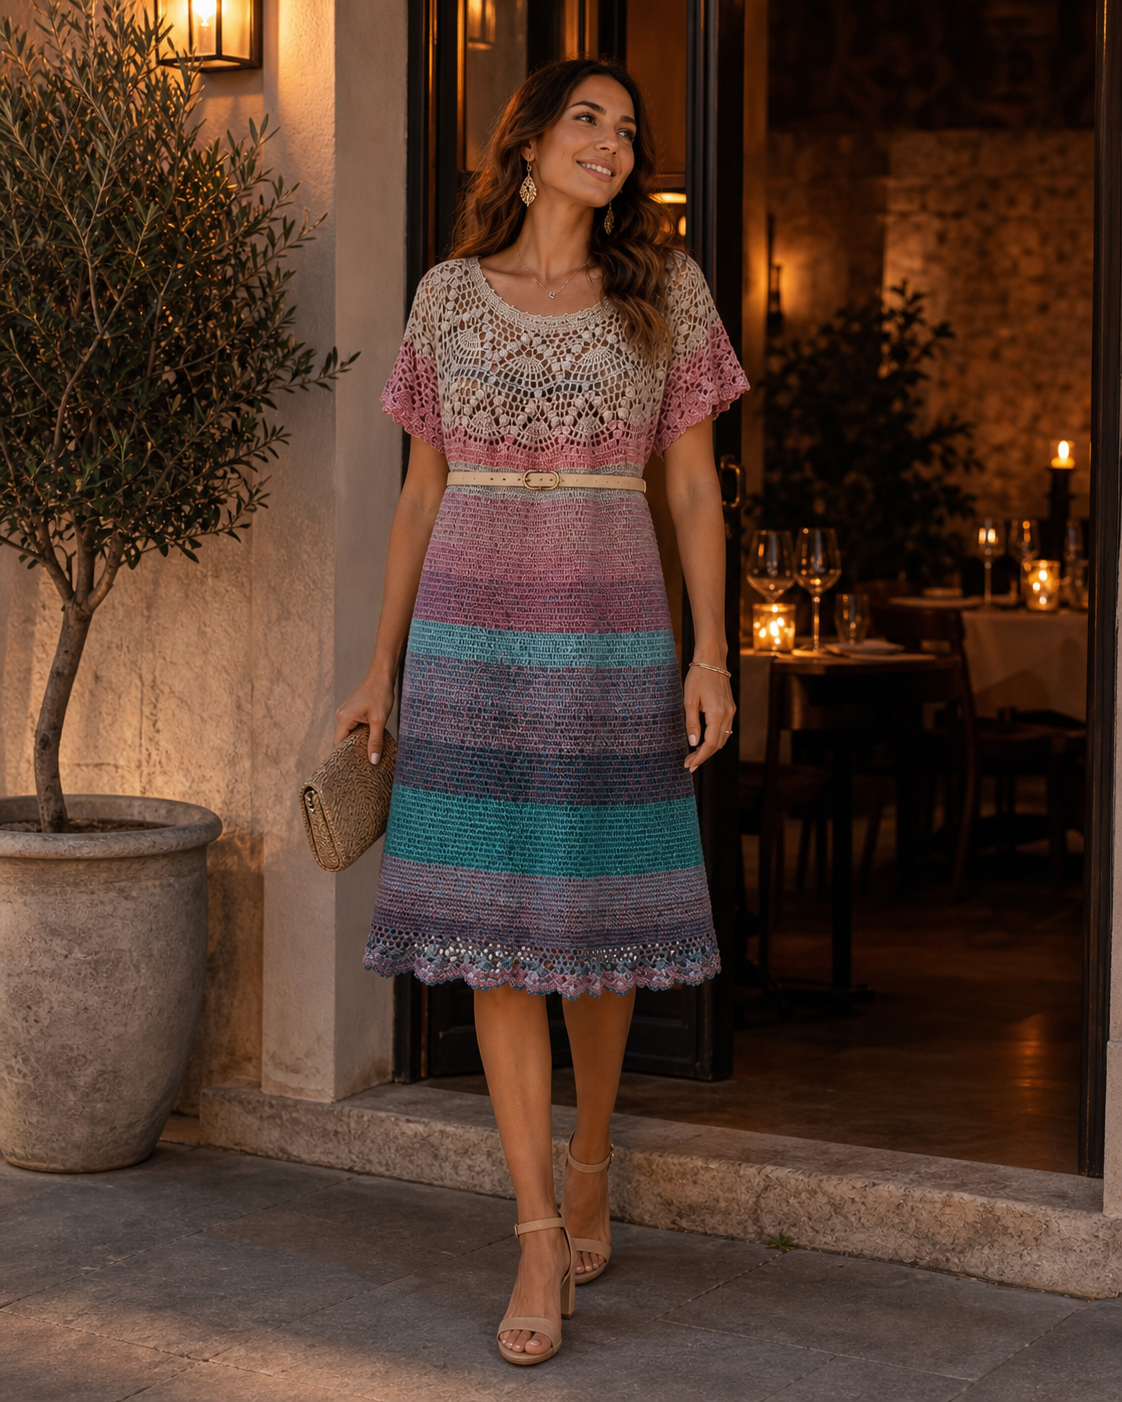
At the last Hravá klubka meet-up, the theme was crocheting dresses with a circular yoke. I chose the Design Yarn Forest Dew yarn cake, a 3-ply yarn made of 50% cotton and 50% acrylic. My idea was to create a lace circular yoke with extended short sleeves, a solid body section shaped into an A-line silhouette, and a bottom hem crocheted in the same pattern as the yoke. My first yarn cake had 1500 metres, which was enough for a size 42 blouse. For the dress, I used two yarn cakes, and the final consumption was almost 2300 metres.
We introduced the Forest Dew yarn cake in the podcast Povídání u klubíčka #120, and you can read the article here.
-
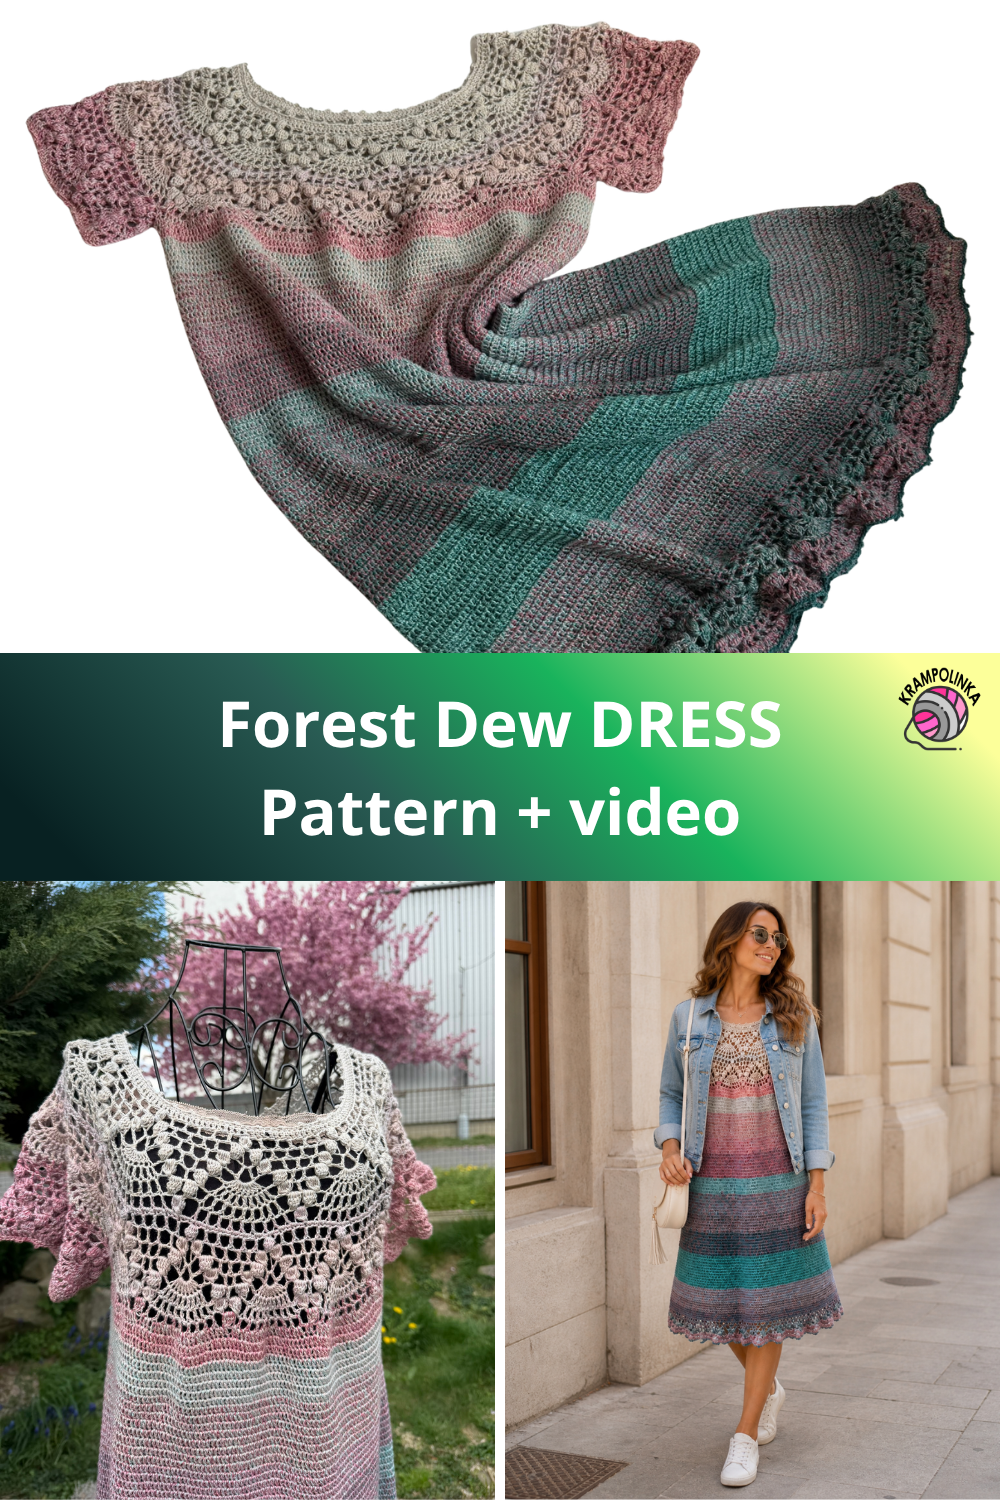
- SAVE the PIN for later Crochet Dress
PART I OF THE VIDEO TUTORIAL – CIRCULAR YOKE The video tutorial includes automatically generated English subtitles. Did you know that you can slow down YouTube videos and adjust them to your own crochet pace?
As for the dress, we crochet a number of chains divisible by 15, i.e. 135, 150, or 165 stitches. Into the foundation chain, we first crochet a picot edging. Then we continue by crocheting the circular yoke. We work in rows, back and forth.
There are two pattern repeats on the circular yoke. Please note that because of the increases, the pattern does not sit directly “on top of itself”. Once the circular yoke reaches a sufficient diameter, we divide it into four parts. We move the front section forward and crochet short rows on the back, i.e. we crochet the back section only, for example 4–5 rows, and only then do we join the circular yoke under the arms. This helps move the front neckline forward and makes the dress fit better.
After joining the yoke, we crochet double crochets on the right side, working continuously in the round without closing each round. The dress has no seam. We crochet until the next colour transition. Then we fasten off the yarn and crochet the sleeve edging first, so that the colour transitions continue smoothly.
After finishing the sleeves, we join the yarn again — I recommend doing this at the side — and continue crocheting the body of the dress. Around the lower rib area, we gradually start increasing every 40th double crochet. I increased in every fourth round. If you prefer a straighter shape, continue crocheting without increases until approximately the waist, and then start increasing gradually.
Once the dress reaches about mid-thigh length, we switch to crocheting the lace hem. For the increases, we use the same principle as for increasing the circular yoke.
PART II OF THE VIDEO TUTORIAL – Short rows, joining the yoke, sleeves, dress body, bottom hem The video tutorial includes automatically generated English subtitles. Did you know that you can slow down YouTube videos and adjust them to your own crochet pace?
I hope your Forest Dew Dress turns out beautifully and that you wear your handmade piece with joy. If you would like to inspire others or share your own experience with crocheting or styling the dress, I would be very happy to see your photos. You can share your photos in the Krampolinka Facebook group. On Instagram, please use the hashtag #satylesnirosa so they are easy to find. If you tag me in projects made from my patterns, I may reshare them in my Instastories to inspire others.
FOREST DEW DRESS
Yarn: Forest Dew gradient yarn cake
Consumption: approx. 2300 metres, 3-ply yarn, 380 g
Hook: 3 mm Tulip, 2.5 mm Tulip
Measurements: 91 cm front length, 120 cm around the hips, 100 cm around the bust
Size: 42–44, body height 168 cm, hips 120 cm
Other materials: tapestry needle, decorative label
Time needed: approx. 40 hours
Skill level: for brave beginners
Abbreviations
ch – chain
dc – double crochet
sl st – slip stitch
sc – single crochet
PUFF – make 5 unfinished double crochets, keep them on the hook, then crochet them together into one stitch with the last loop and make 1 chain
PICOT – 3 chains and 1 slip stitch
-
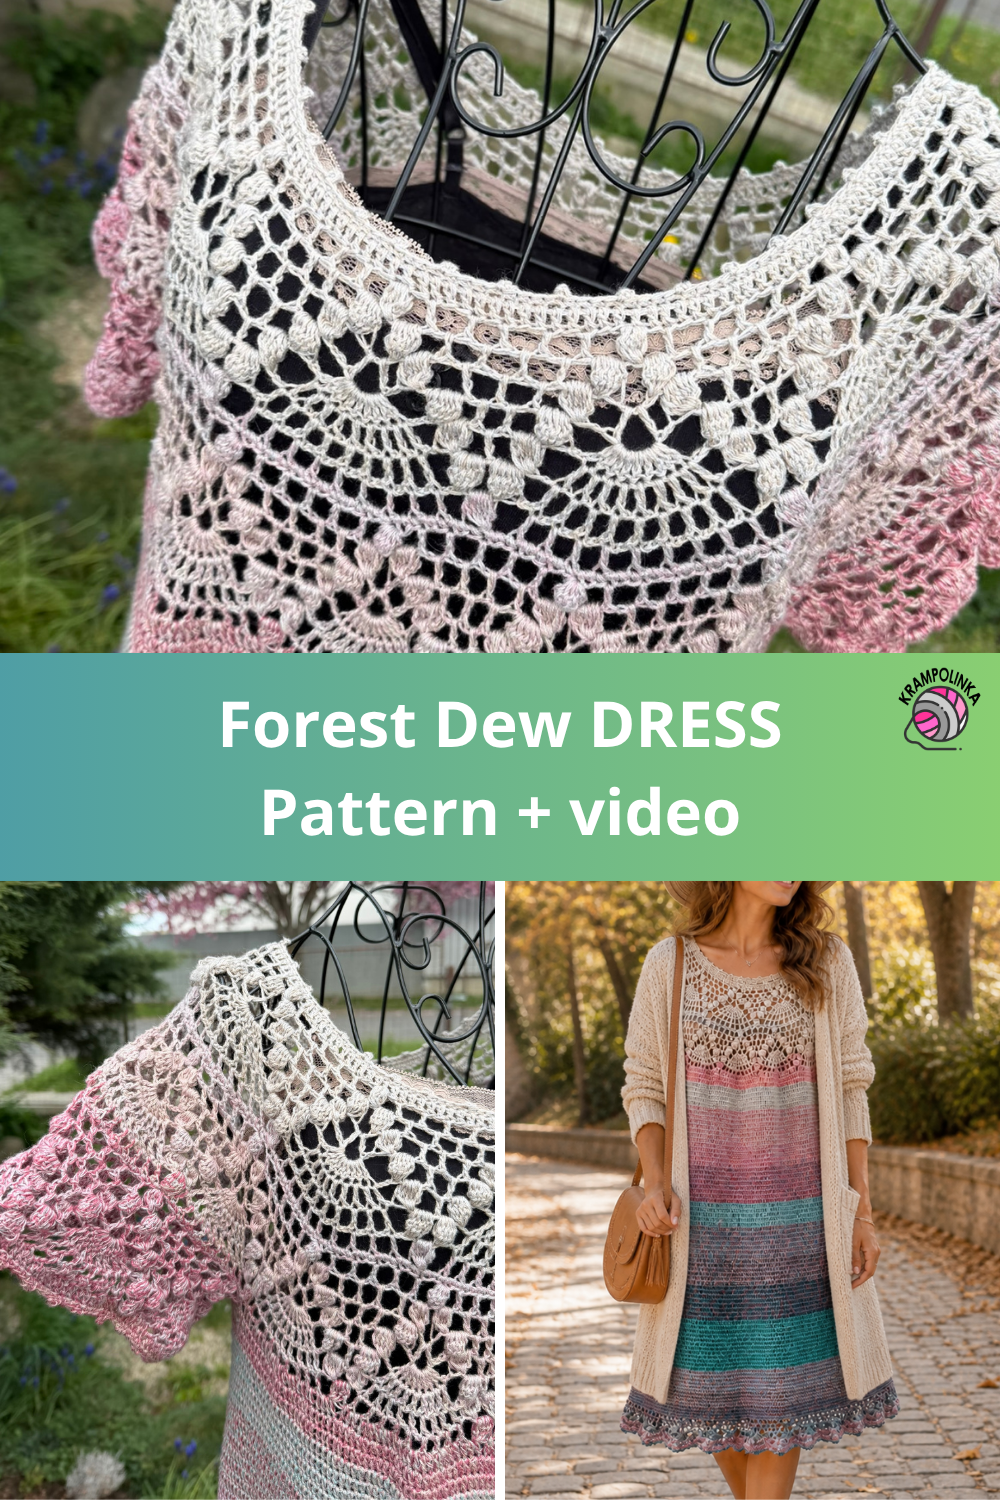
- PIN it for Later! Crochet Dress Free Pattern
CIRCULAR YOKE EDGING Hook: 3 mm or 2.5 mm, depending on your tension
Round 1: Chain 165 and join with a slip stitch.
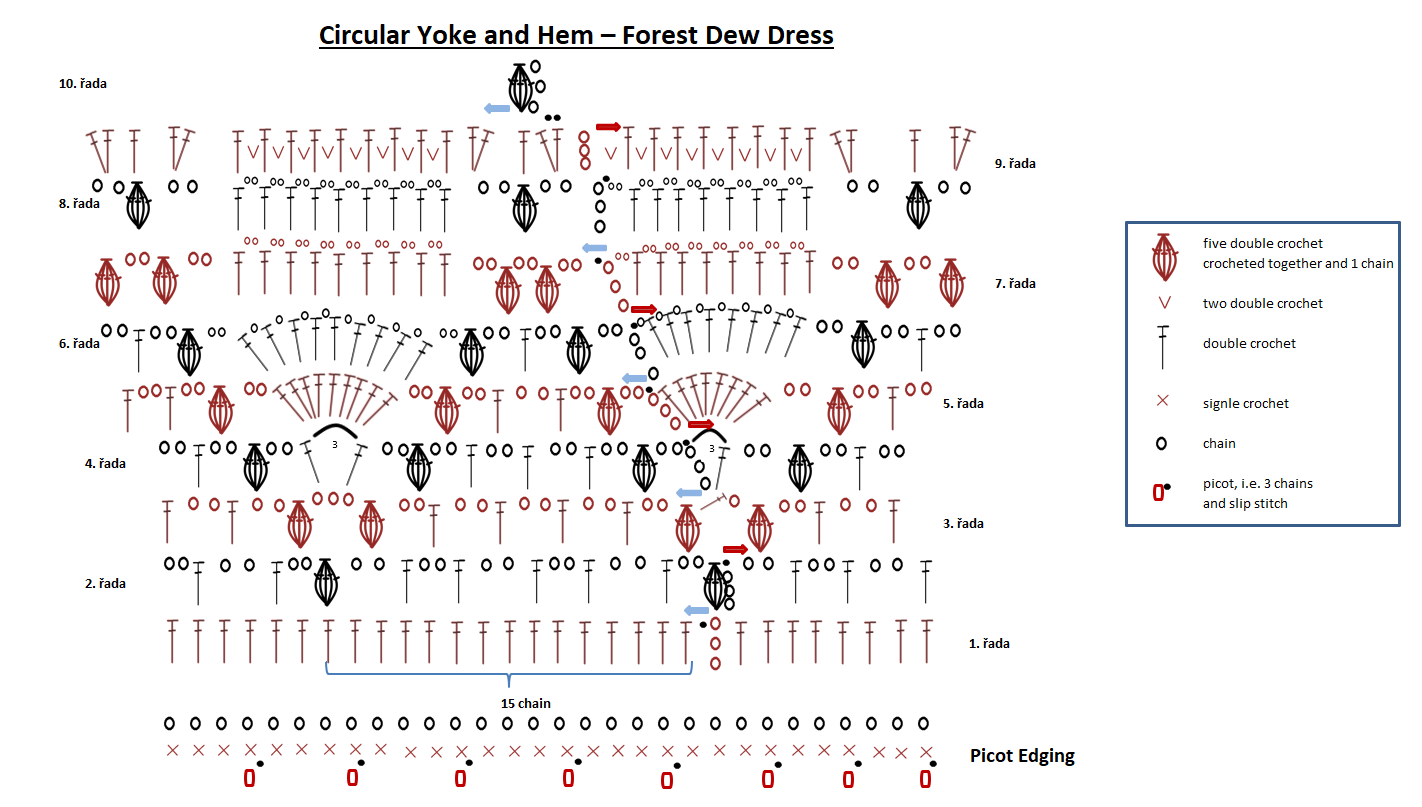
Round 2: Chain 1 instead of the first single crochet, sc, sc, picot – 3 ch and sl st. Repeat: 3 sc, picot. Finish the round with a slip stitch. Using slip stitches, move to the first chain stitch.
CIRCULAR YOKE – first pattern repeat Hook: 3 mm
Round 1: Chain 2 instead of the first double crochet, then work 1 dc into each stitch. Join with a slip stitch. (165)
Round 2: Chain 3 and make 4 unfinished dc, then crochet them together into one stitch with the last loop and make 1 ch.
The pattern in this round is: 2 ch, skip 1 ch, dc into the next stitch, 2 ch, skip 2 stitches, dc into the next stitch, 2 ch, skip 1 stitch, dc into the next stitch, 2 ch, skip 2 stitches, dc into the next stitch, 2 ch, skip 1 stitch, dc into the next stitch, 2 ch, skip 2 stitches, and finish with a puff, i.e. make 5 unfinished dc, keep them on the hook, then crochet them together into one stitch with the last loop and make 1 ch.
Repeat the pattern to the end of the round. With the given stitch count, I have 11 pattern repeats. Finish the round with 2 ch and sl st into the joined stitch. TURN.
Round 3: Slip stitch under the chain space in the first frame. Chain 3 and make 4 unfinished dc, then crochet them together into one stitch with the last loop and make 1 ch.
Pattern: 2 ch and dc under the chain space 4 times, 2 ch, puff into the last space, 3 ch, puff into the first space. Repeat this pattern to the end of the round. At the end, crochet 1 ch and dc into the joined stitch, finishing in the centre of the arch. TURN.
Round 4: Start with half of the pattern. Chain 3 instead of the first dc, 2 ch into the pattern above the puff.
The pattern for this round is: puff into the first space, 2 ch, dc 3 times, 2 ch, puff into the last space, 2 ch, dc-3 ch-dc under the chain space between the puffs, and 2 ch. Repeat the pattern to the end of the round. Finish the round with dc under the arch between the puffs, 3 ch, and sl st into the second chain of the turning chain. TURN.
Round 5: Start with a fan. Chain 3 instead of the first dc and work 8 dc under the chain space, 2 ch.
The pattern is: puff into the first space, 2 ch and dc under the chain space 2 times, 2 ch, puff into the last space. 2 ch, fan of 9 dc, 2 ch. Repeat the pattern to the end of the round. Finish the round with sl st into the second chain of the turning chain. TURN.
Round 6: Chain 3 instead of the first dc, 2 ch into the pattern.
Work the pattern: puff into the first frame, 2 ch, dc under the chain space, 2 ch, puff into the last frame. 2 ch, and in the fan work dc into dc, ch 8 times, dc and 2 ch. Repeat the pattern to the end of the round. Finish with sl st into the second chain of the turning chain. TURN.
Round 7: Chain 3 instead of the first dc, 2 ch into the pattern, and in the fan work dc into dc, 2 ch.
The pattern for this round is: puff into the first frame, 2 ch, puff into the last frame, 2 ch, and in the fan work dc into dc, 2 ch 9 times. Repeat the pattern to the end of the round. Finish with sl st into the second chain of the turning chain. TURN.
Round 8: Chain 3 instead of the first dc, 2 ch.
The pattern for this round is: puff under the chain space between the puffs, creating a small pyramid, then 2 ch and dc into dc 9 times. Repeat the pattern to the end of the round. Finish with 2 ch and sl st into the second chain of the turning chain. TURN.
Round 9: Chain 1 and sc into the stitch, then continue with 2 sc under the chain space, sc into the dc or into the joined top of the puff stitch. Finish the round with a slip stitch.
Note: If the work starts to ripple, it means there are too many stitches and you need to reduce the number of single crochets in Round 9. If the work starts to curl into a bowl shape, it means there are too few stitches and you need to increase the number of stitches in Round 9. In both cases, you can also try replacing the single crochets with double crochets.
CIRCULAR YOKE – second pattern repeat Hook: 3 mm
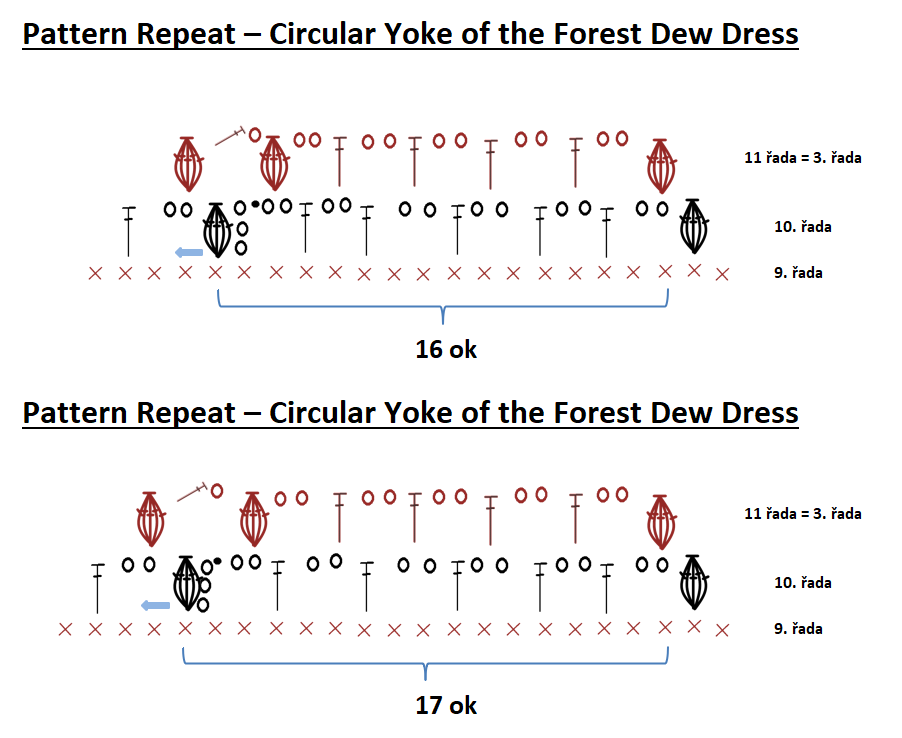
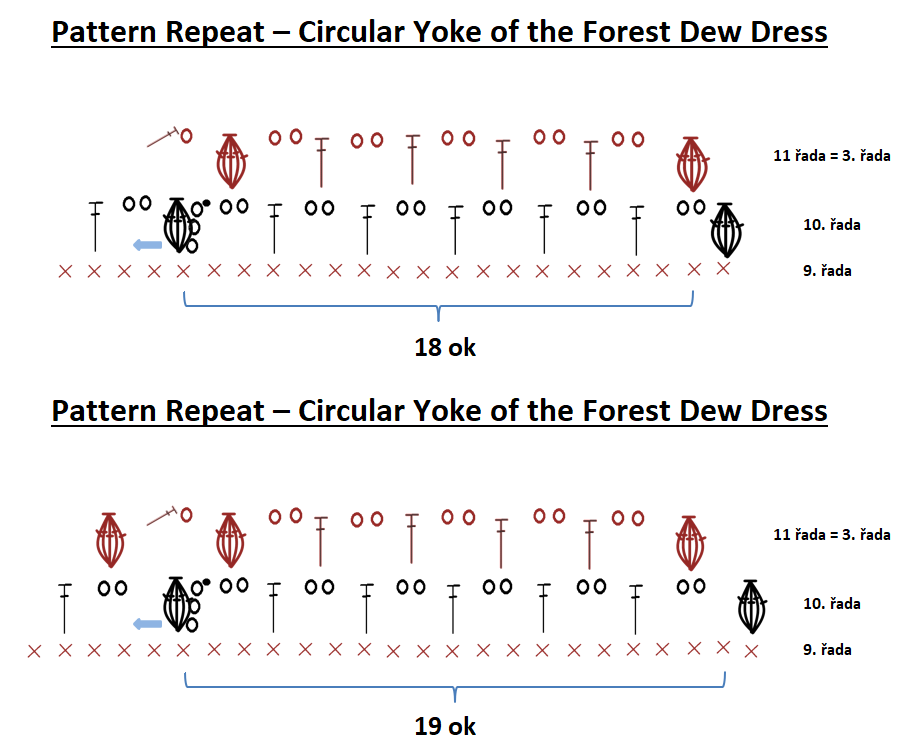
Round 10: Using two slip stitches, move to the joined top of the puff stitch. Then repeat the pattern from Rounds 2 to 9, but this time over 19 and 18 stitches, following this layout:
19–18–18–19–18–18–19–18–18–19–18–18–19–18–18–19–18–18
This gives a total of 18 pattern repeats. We alternate both versions, i.e. 6 repeats over 19 stitches and 12 repeats over 18 stitches.
Chain 3 and make 4 unfinished dc, then crochet them together into one stitch with the last loop and make 1 ch.
The pattern in this round is: 2 ch, skip 2/3 ch, dc into the next stitch, then 2 ch, skip 2 stitches, dc into the next stitch 5 times, 2 ch, skip 2 stitches, puff into the third stitch.
Finish the round with 2 ch and sl st into the joined stitch. TURN.
Note: For this size and my tension, 18 pattern repeats were enough for the circular yoke to lie nicely flat without twisting or rippling.
Rounds 11–16: Repeat the pattern from Rounds 2 to 9. Finish with the mesh/window round.
DIVIDING THE YOKE AND SHORT ROWS ON THE BACK PANEL
Hook: 2.5 mm
Divide the yoke as follows: front panel — 5 pattern repeats, sleeve — 4 pattern repeats, back panel — 5 pattern repeats, sleeve — 4 pattern repeats. In total, there are 18 pattern repeats.
Work short rows only across the back section, crocheting back and forth between the puffs that form the top of the “pyramid”.
Row 1: Into the joined top of the puff stitch, crochet 3 ch instead of the first dc.
The pattern for this row is: dc under the chain space, dc into dc, dc under the chain space, dc into dc, 2 dc under the chain space, dc into dc, dc under the chain space, dc into dc, 2 dc under the chain space, dc into dc, dc under the chain space, dc into dc, 2 dc under the chain space, dc into dc, dc under the chain space, dc into dc, 2 dc under the chain space, dc into dc, dc under the chain space, and dc into the joined top of the puff stitch.
(24 dc per pattern repeat)
Repeat this over five pattern repeats. (5 × 24 dc)
Finish with dc into the puff and turn.
Note: If the work on the back panel starts to ripple, reduce the number of dc worked under the chain spaces in the pattern so that you have fewer dc. On the back, this is actually desirable, as the back section should be slightly narrower.
Rows 2–5: Chain 2 instead of the first dc. Work dc into each dc. At the end of the row, crochet dc into the turning chain and turn.
Adjust the number of rows as needed. Do not fasten off the yarn.
JOINING THE YOKE
Hook: 2.5 mm
Row 1: Fold the yoke so that the neckline is formed. After the last dc on the back panel, crochet 3 stitches instead of a dc and 2 stitches of foundation chain. Skip 4 pattern repeats for the sleeve and work dc into the joined top of the puff stitch in the first pattern repeat of the front panel. This joins the back and front panels.
On the front panel, work the following scheme into the individual spaces: dc under the chain space, dc into dc, dc under the chain space, dc into dc, 2 dc under the chain space, dc into dc, dc under the chain space, dc into dc, 2 dc under the chain space, dc into dc, dc under the chain space, dc into dc, 2 dc under the chain space, dc into dc, dc under the chain space, dc into dc, 2 dc under the chain space, dc into dc, dc under the chain space, and dc into the joined top of the puff stitch.
(24 dc per pattern repeat)
Repeat the pattern over five pattern repeats. (5 × 24 dc)
Finish with dc into the puff, then crochet 2 stitches of foundation chain. Skip 4 pattern repeats for the sleeve and work dc into the turning chain on the back panel. This joins the front and back panels.
Continue across the back panel, working dc into dc.
Note: If the work on the front panel ripples slightly (only slightly), that is fine.
DRESS BODY – PART I
Hook: 2.5 mm
Row/Round 2: Move into the next round using the pattern, i.e. at the end, crochet sc into the second chain of the turning chain and continue working dc into dc. At the end of the round, crochet dc into the sc and continue crocheting continuously in the round until you reach the end of the colour transition — the knot. After the knot, fasten off the yarn and continue with the sleeves.
SLEEVE
Hook: 2.5 mm
Round 1: Join the yarn in a stitch of the foundation chain. Work on the right side. Chain 1 instead of the first sc and work sc into the same stitch.
Crochet around the sleeve using the same scheme as in the first row of the front panel, but with single crochets: sc under the chain space, sc into dc, sc under the chain space, sc into dc, 2 sc under the chain space, sc into dc, sc under the chain space, sc into dc, 2 sc under the chain space, sc into dc, sc under the chain space, sc into dc, 2 sc under the chain space, sc into dc, sc under the chain space, sc into sc, 2 sc under the chain space, sc into dc, sc under the chain space, and sc into the joined top of the puff stitch.
When you reach the horizontal rows of the back panel, work 2 sc into each horizontal row. Finish with sc into the foundation chain and sl st.
Round 2: Work on the right side. Repeat the pattern from Rounds 2 to 8, but over 24 stitches 4 times. In the underarm section, divide the remaining stitches — approx. 15–16 stitches — so that you create one additional pattern repeat.
Chain 3 and make 4 unfinished dc, then crochet them together into one stitch with the last loop and make 1 ch.
The pattern in this round is: 2 ch, skip 3 ch, repeat 5 times, 2 ch, skip 3 stitches, and finish with a puff, i.e. make 5 unfinished dc, keep them on the hook, then crochet them together into one stitch with the last loop and make 1 ch.
Repeat the pattern 4 times.
In the underarm section, work: 2 ch, skip 1 ch, dc into the next stitch, 2 ch, skip 2 stitches, dc into the next stitch, 2 ch, skip 1 stitch, dc into the next stitch, 2 ch, skip 2 stitches, dc into the next stitch, 2 ch, skip 1 stitch, dc into the next stitch, 2 ch, skip 2 stitches, and finish with sl st into the joined stitch. TURN.
Rounds 3–8: Repeat the pattern from Rounds 2 to 8. Finish each round with a slip stitch and turn. Finish with the mesh/window round.
SLEEVE EDGING
Hook: 2.5 mm
Round 9: Work on the right side. Chain 3 instead of the first dc. Around the sleeve, work dc under the chain space and dc into dc or into the joined top of the puff stitch. Finish the round with a slip stitch.
Round 10: Work on the right side. Chain 1 instead of the first sc, sc, sc, picot – 3 ch and sl st. Repeat: 3 sc, picot. Finish the round with a slip stitch. Fasten off the yarn and repeat the same process on the opposite sleeve. Then continue crocheting the body of the dress.
DRESS BODY – PART II AND INCREASES
Hook: 2.5 mm
Rounds 3–32: Join the yarn at the side. Continue with the remaining colour transition left after crocheting the sleeves. Work dc into dc.
Round 33: Increase round – work 2 dc into one stitch. Increase every 40th stitch in this way.
Rounds 34–36: Work dc into dc.
Rounds 37–65: Repeat Rounds 33–36. Increase every fourth round by working 2 dc into every 40th stitch.
Rounds 66–79: Work dc into dc without increasing. In the last round, when you are three stitches before the end of the round at the side of the dress, in the imaginary extension of the armhole, crochet one half double crochet, one single crochet, and one slip stitch. This finishes the continuous crocheting in the round.
Note: Adjust the number of rounds according to your body height. Adjust the number of increases according to your hip measurement. The dress should gradually widen into an A-line shape. The dress will stretch by approximately 3 cm under its own weight. I crocheted the double crochet section to a length of about 85 cm.
LACE HEM OF THE DRESS
Hook: 2.5 mm
Round 80: In this round, the stitch count needs to be divisible by 15. We will work one round on the right side and one round on the wrong side.
Chain 3 and make 4/5 unfinished dc, then crochet them together into one stitch with the last loop and make 1 ch.
The pattern in this round is: 2 ch, skip 2 stitches, dc into the next stitch, 2 ch, skip 1 stitch, dc into the next stitch, 2 ch, skip 2 stitches, dc into the next stitch, 2 ch, skip 1 stitch, dc into the next stitch, 2 ch, skip 2 stitches, dc into the next stitch, 2 ch, skip 1 stitch, and finish with a puff, i.e. make 5 unfinished dc, keep them on the hook, then crochet them together into one stitch with the last loop and make 1 ch.
Repeat the pattern to the end of the round. Finish the round with 2 ch and sl st into the joined stitch. TURN.
Rounds 81–86: Crochet in the same way as Rounds 3–8.
DRESS HEM
Hook: 2.5 mm
Round 87: Chain 3 instead of the first dc. Work dc under the chain space before the puff, dc into the joined stitch, and dc under the chain space after the puff. In the fan, work 2 dc under the chain space, dc into dc, dc under the chain space, and dc into dc. Finish the round with a slip stitch.
Round 88: Chain 1 instead of the first sc. Then work sc into dc. Crochet a picot above every fourth sc. Finish the round with a slip stitch.
FINISHING
Weave in all loose ends. Add a decorative label.
Copyright Notice
This pattern is for personal use only. For commercial use, please contact me directly. Always include the source credit: www.krampolinka.com. The pattern is designed specifically for this yarn, hook size, and my personal tension. If you use a different yarn, hook, or tension, your final product may vary in size or shape.
Enjoy this free pattern and you can follow my latest projects, tutorials, ideas, reviews, video podcasts, tips, and tricks:
- Krampolinka YouTube videos (subtitled since 2024)
- Krampolinka Instagram
- Krampolinka FB group
-
- Handmade crochet dress with a circular lace yoke.
-
- Soft pastel colours in a beautiful gradient yarn.
-
- A delicate lace yoke with short sleeves.
-
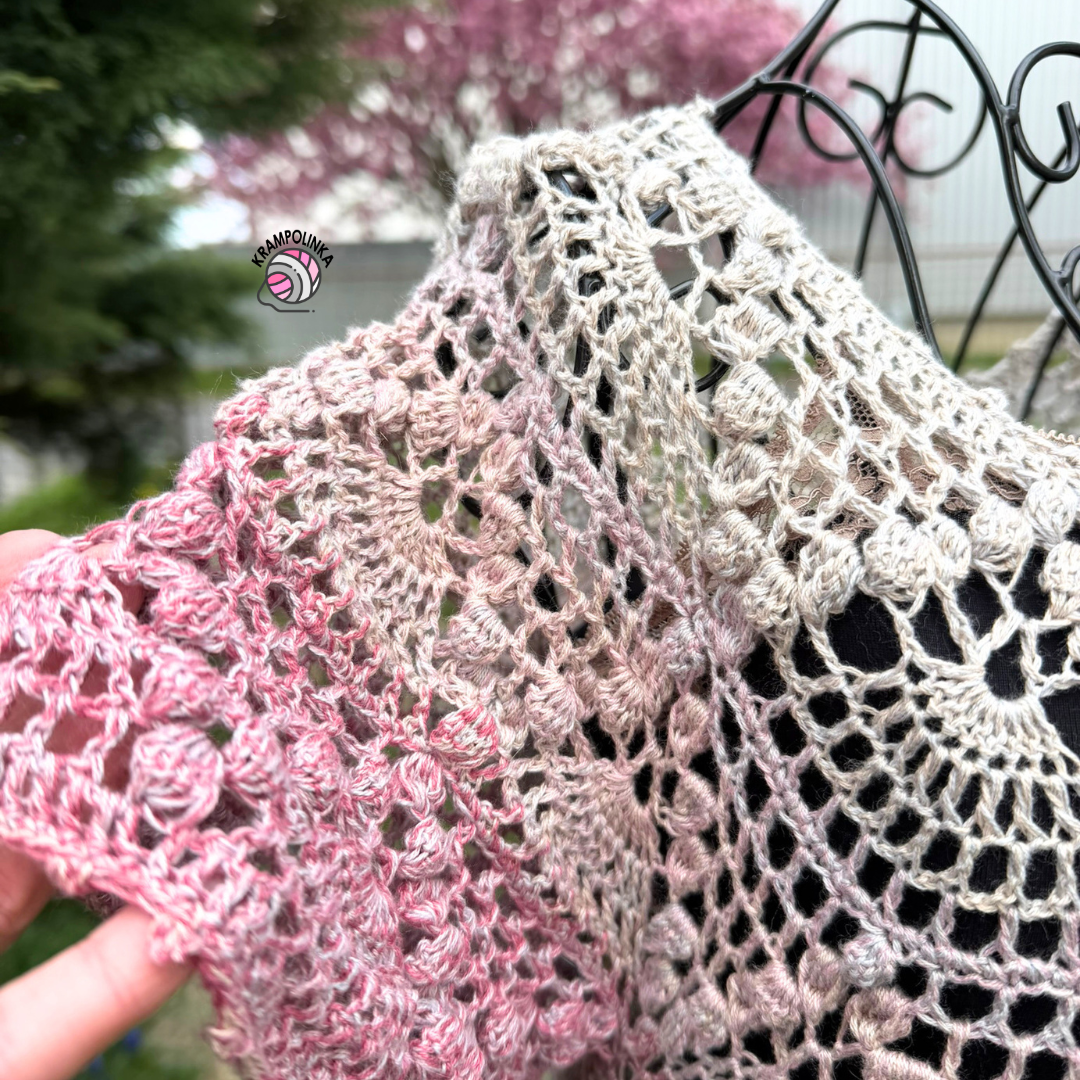
- Crochet texture and colour transitions in detail.
-
- A handmade dress designed with comfort and style.
-
- The dress gently widens into an A-line shape.
-
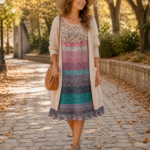
- The lower hem repeats the lace pattern from the yoke.
-
- A light crochet dress for warm days and special moments.
-
- Forest Dew yarn creates a soft romantic look.


No Comments