
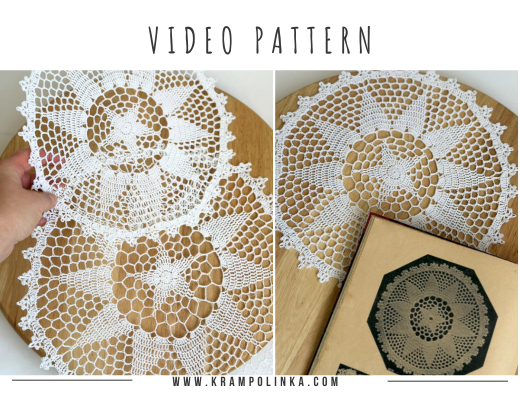
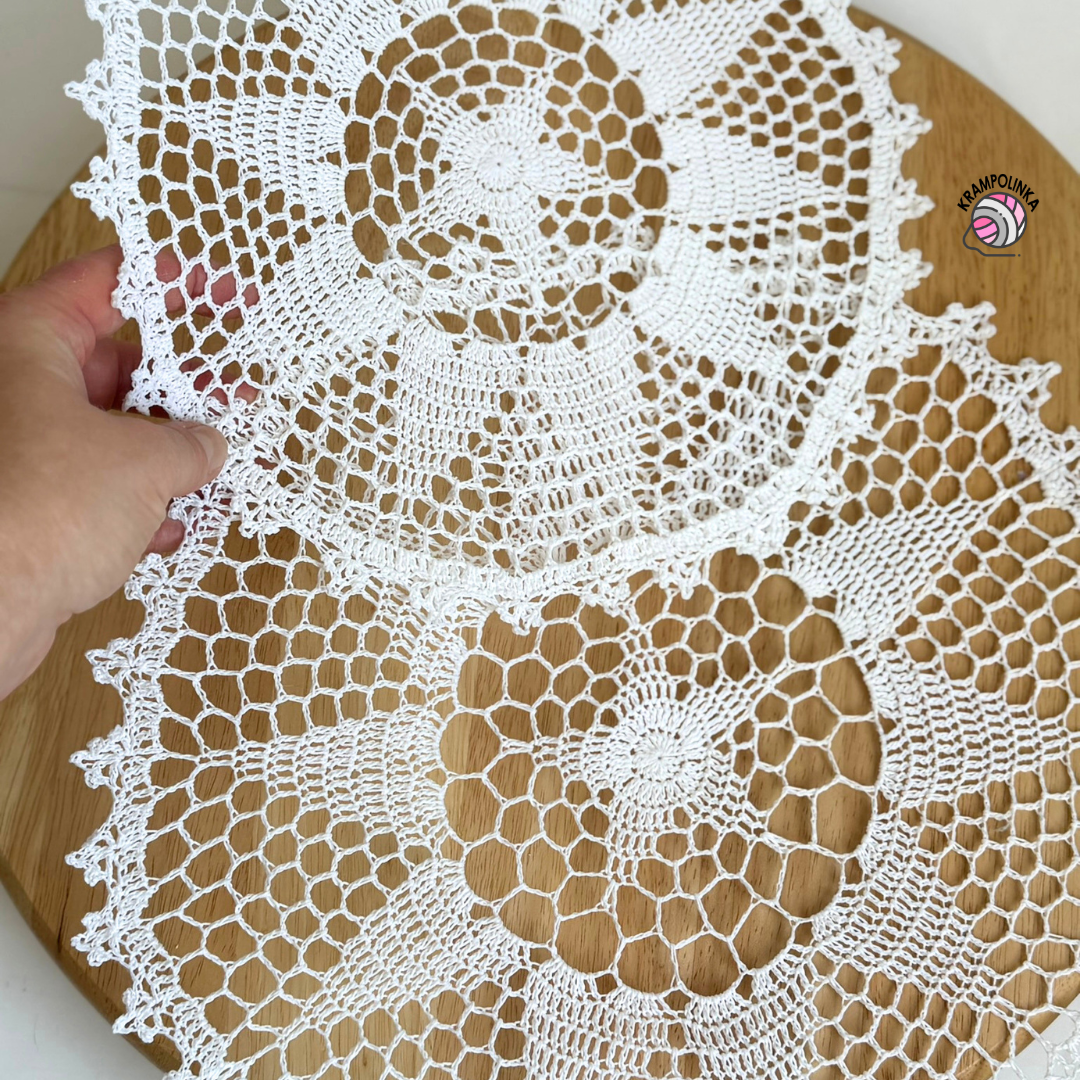
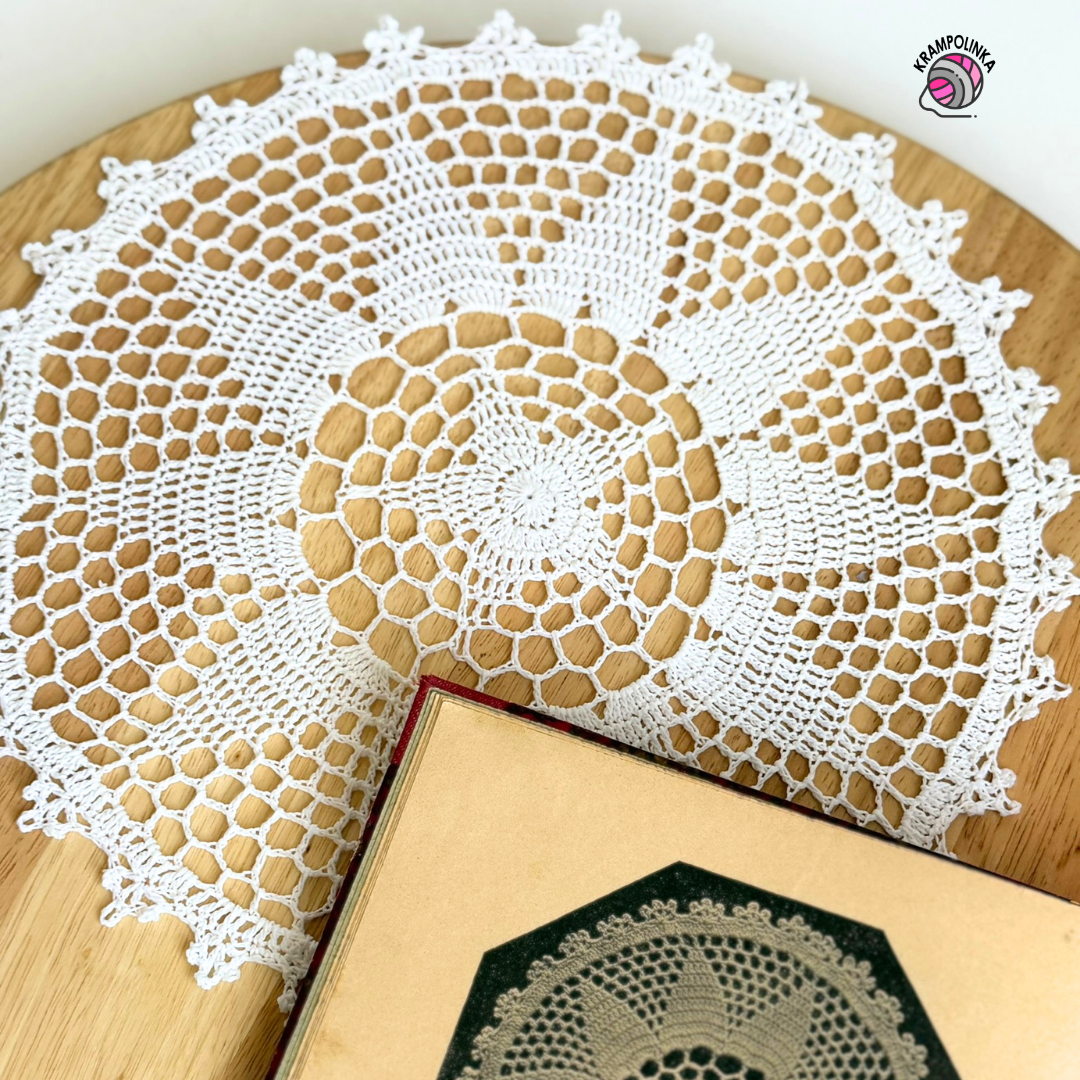
Crocheted doily inspired by history was created based on a single photograph from a book published in 1907. The motif immediately caught my attention, so I decided to try to reconstruct it.
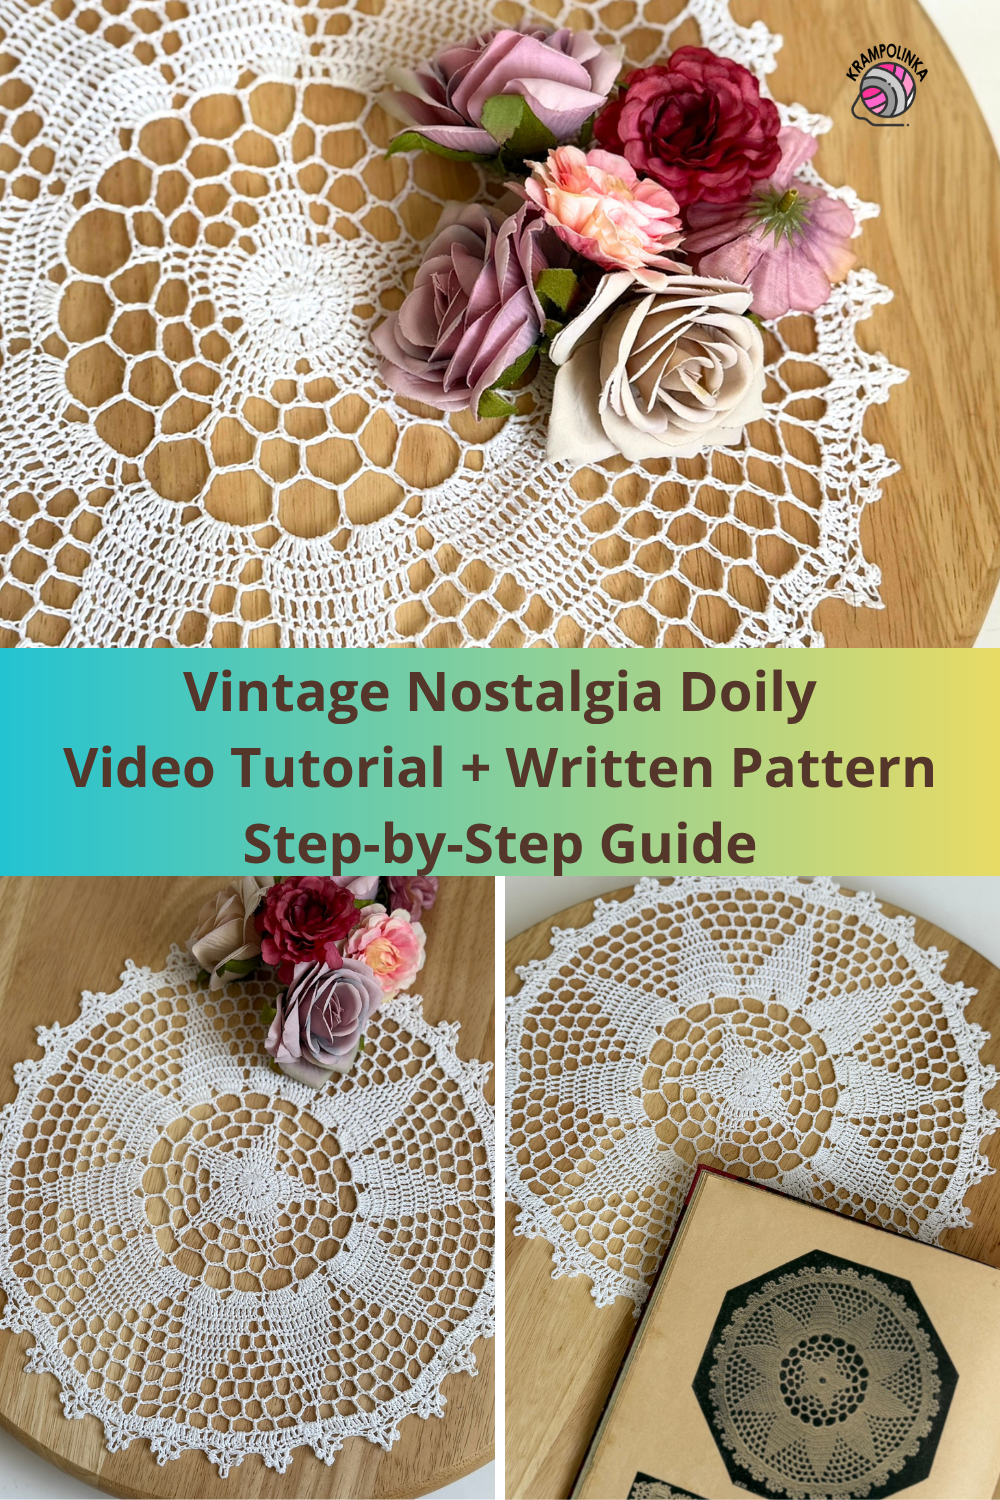
The result is a doily that we can crochet together again today – after more than one hundred years. I am truly happy to bring you a video tutorial for it and to return a small piece of crochet history back into our homes. For this project, I chose Puppets Eldorado No. 12 yarn (100 g / 570 m), a 100% mercerized cotton. The yarn is fine, holds its shape beautifully, and is very pleasant to work with. It is perfect for doilies, tablecloths, decorations, ornaments, and even lightweight summer garments. An alternative to this yarn is the high-quality Anchor Freccia yarn, which is also made from 100% mercerized cotton. One 50 g ball contains approximately 285 m and is available in a wide range of beautiful colors.
I used a 2 mm crochet hook by Tulip crochet hooks. We also took a closer look at the Puppets yarn in the podcast Povídání u klubíčka #119, and you can read the related article as well.
-
- PIN it for later – Vintage Crochet Doily Nostalgie
VIDEO TUTORIAL PREMIERE now includes automatically generated subtitles. Did you know you can slow down the video on YouTube and adjust it to your own crocheting pace?
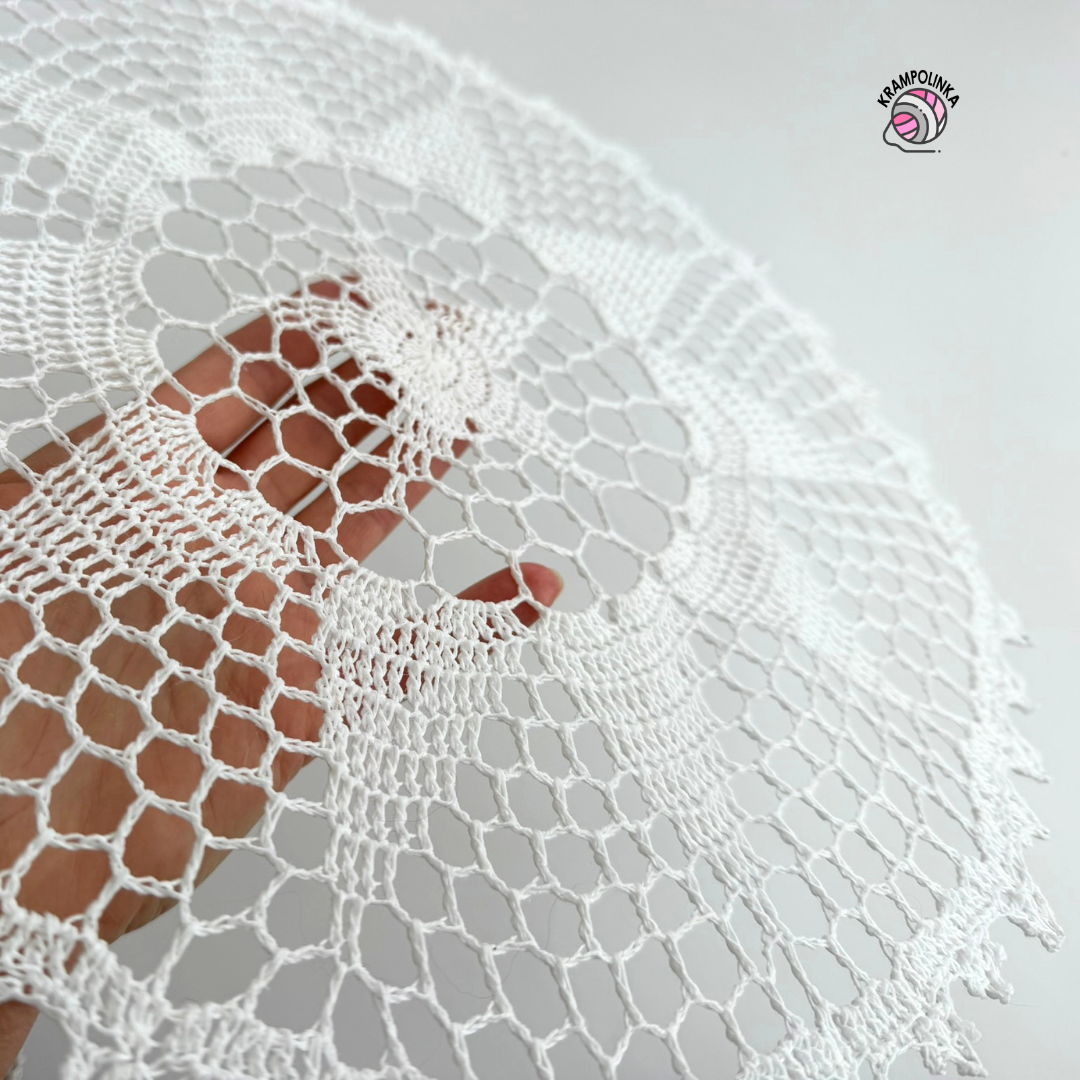
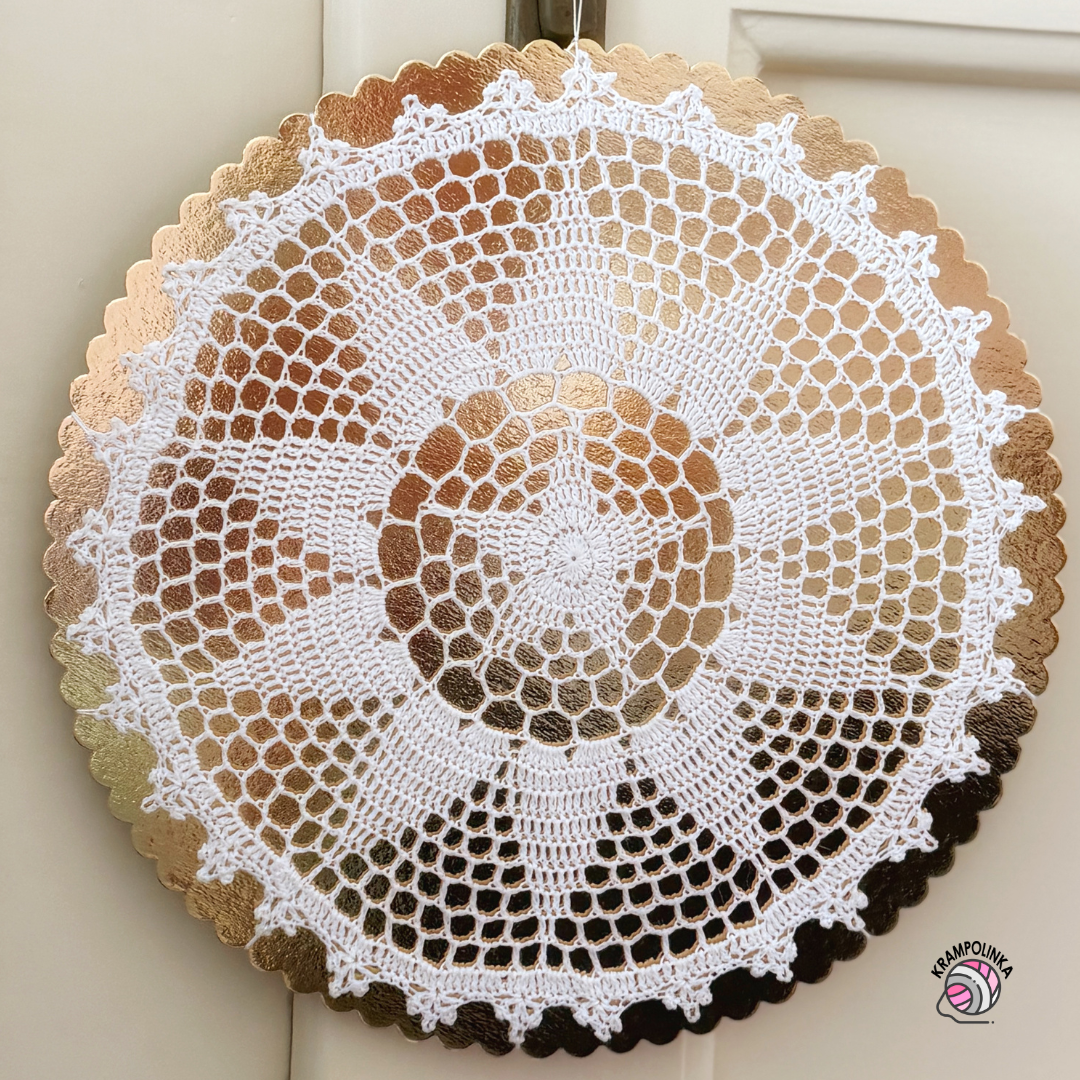
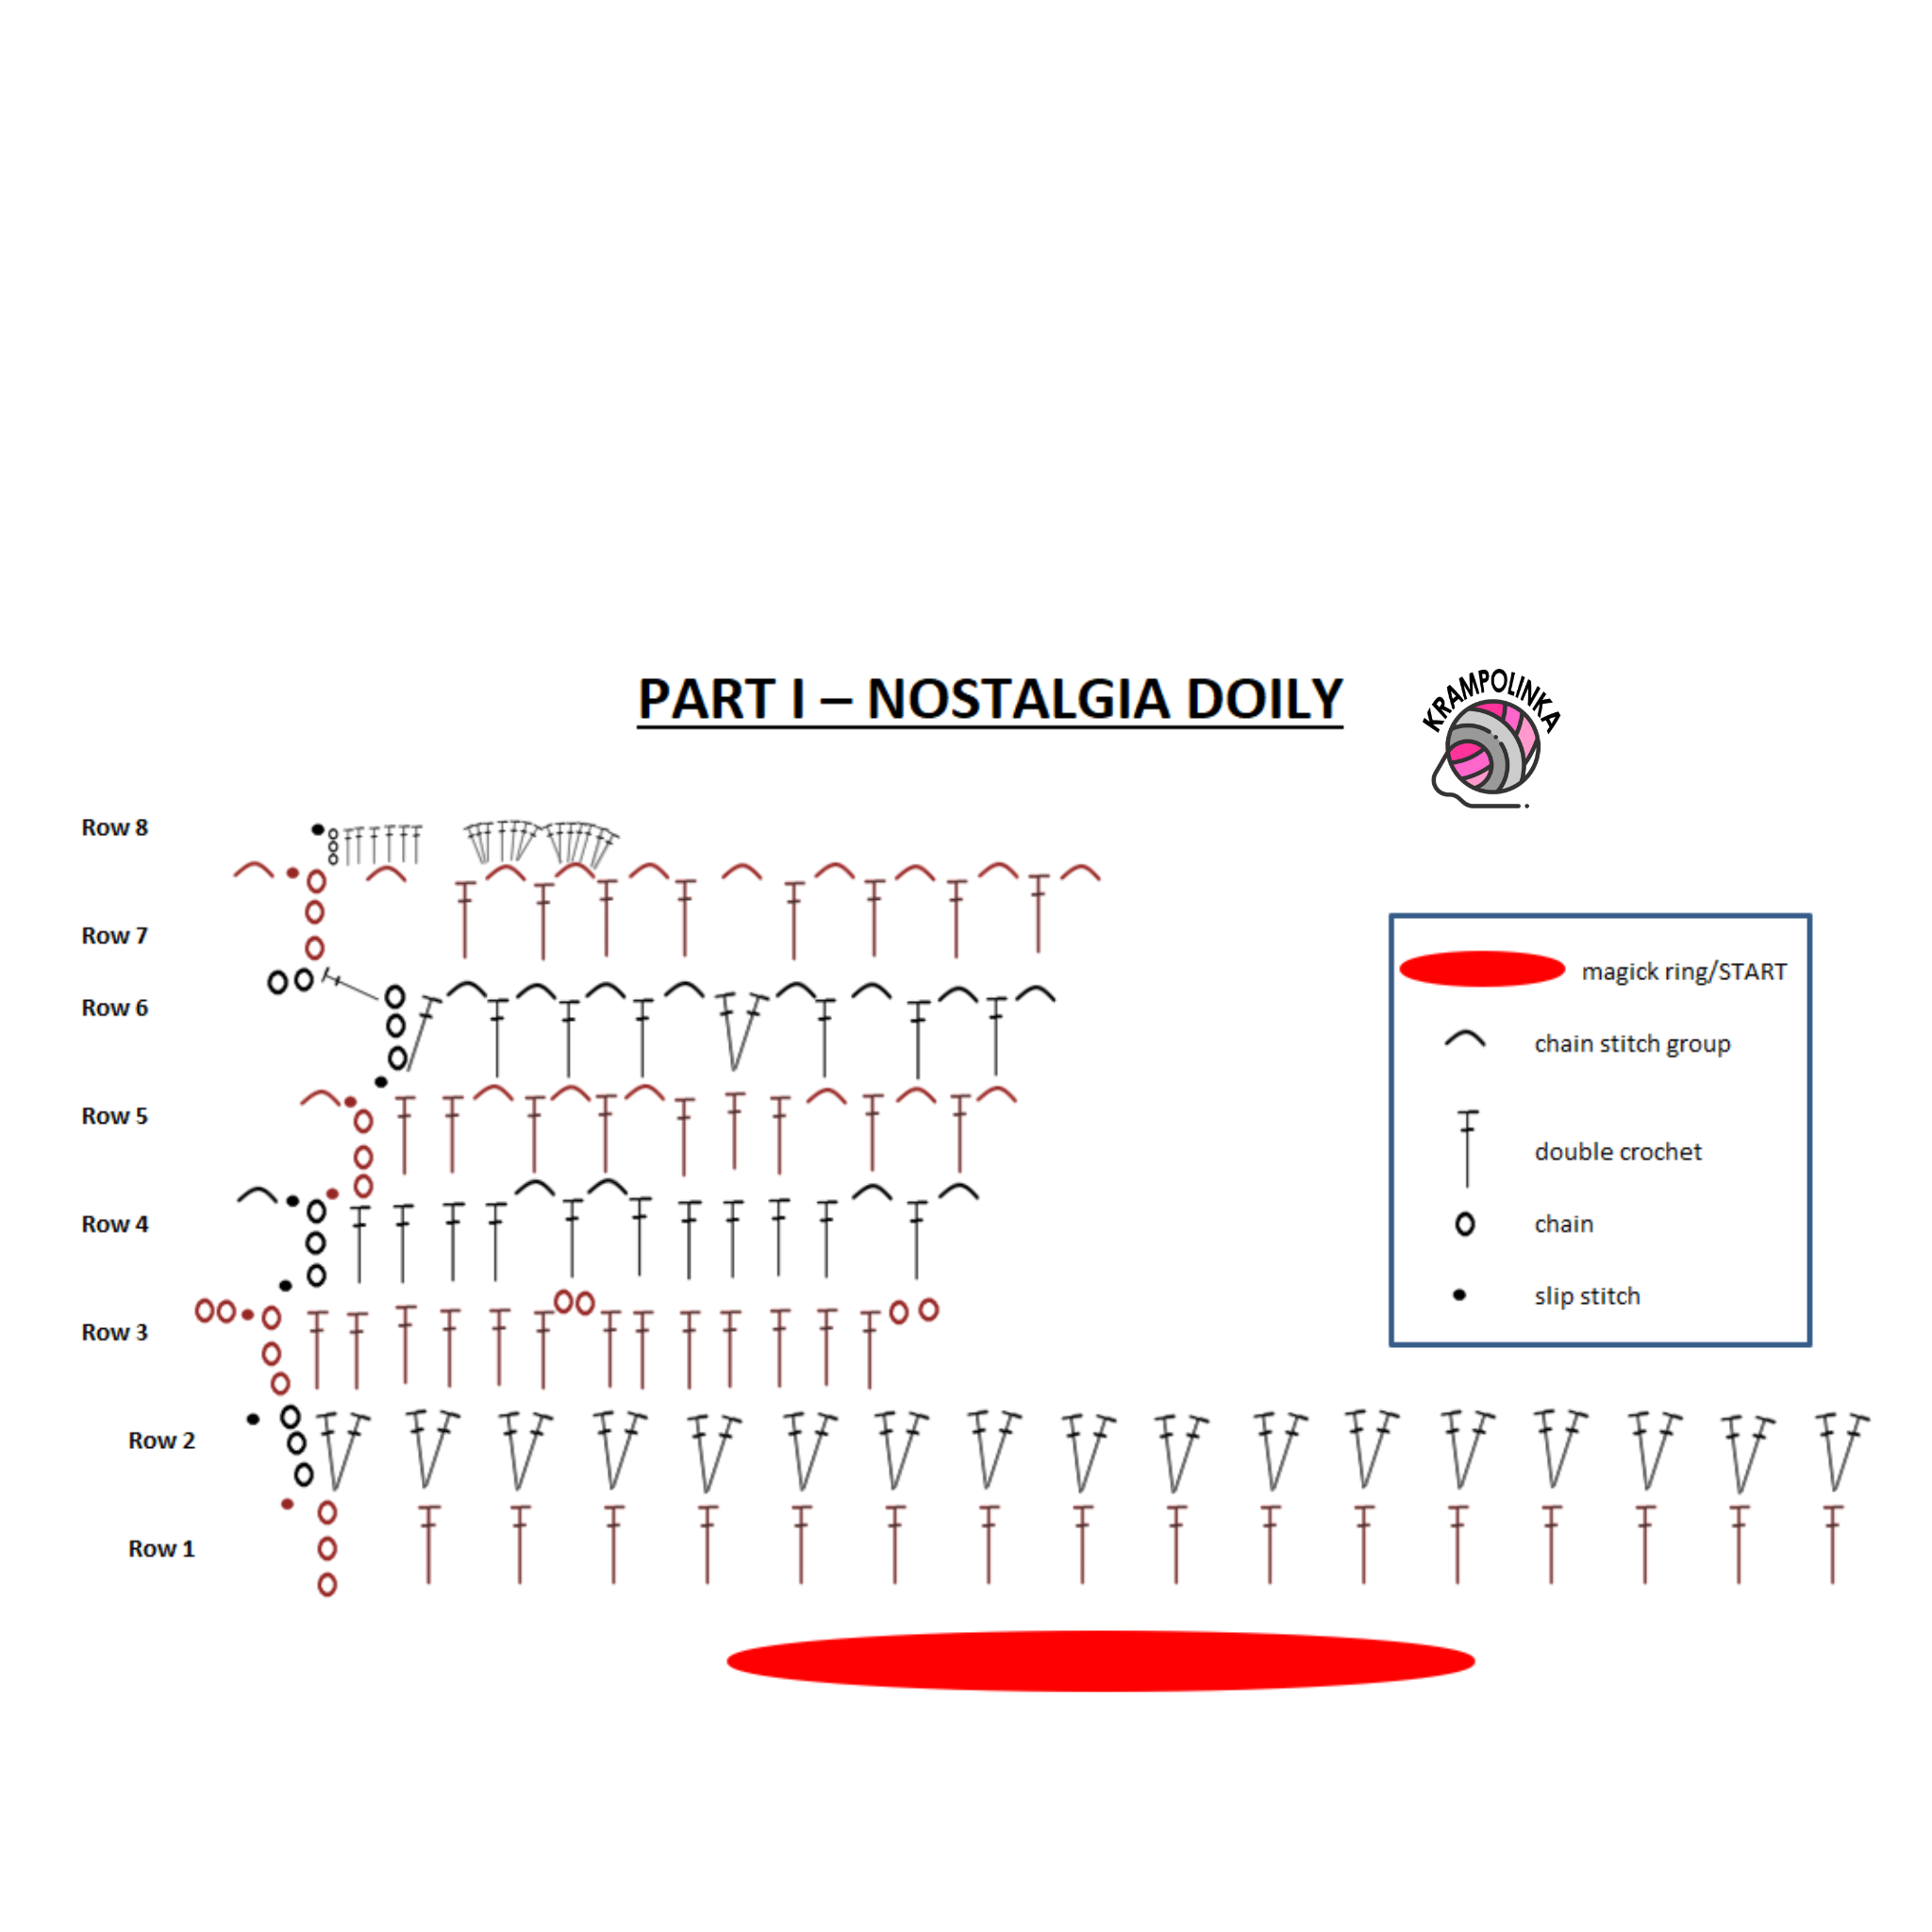
We begin crocheting with a magic ring and continue working on the right side throughout. The doily consists of a central five-pointed star motif, which gradually develops into a ten-pointed flower.
You can easily influence the final look by choosing different color combinations – for example, brown and yellow create a sunflower-like, summery effect, while a white version looks elegant, timeless, and beautiful on the table all year round. This motif is very versatile and also works perfectly as a base for a mandala or a dreamcatcher.
I tested both 1.8 mm and 2 mm hooks, and with my tension there was a difference of about 3–5 cm before blocking. Depending on your tension or hook size, adjust the number of chain stitches accordingly. If the doily curls into a bowl shape, you have too few stitches. If it ruffles or waves, you have too many stitches.
If you plan to use the doily as a table decoration, I recommend starching it. I had great results with Alba Effect starch, a polystyrene board, cling film, and fine stainless pins that do not rust and help you shape the doily beautifully. Everything is demonstrated in the video tutorial.
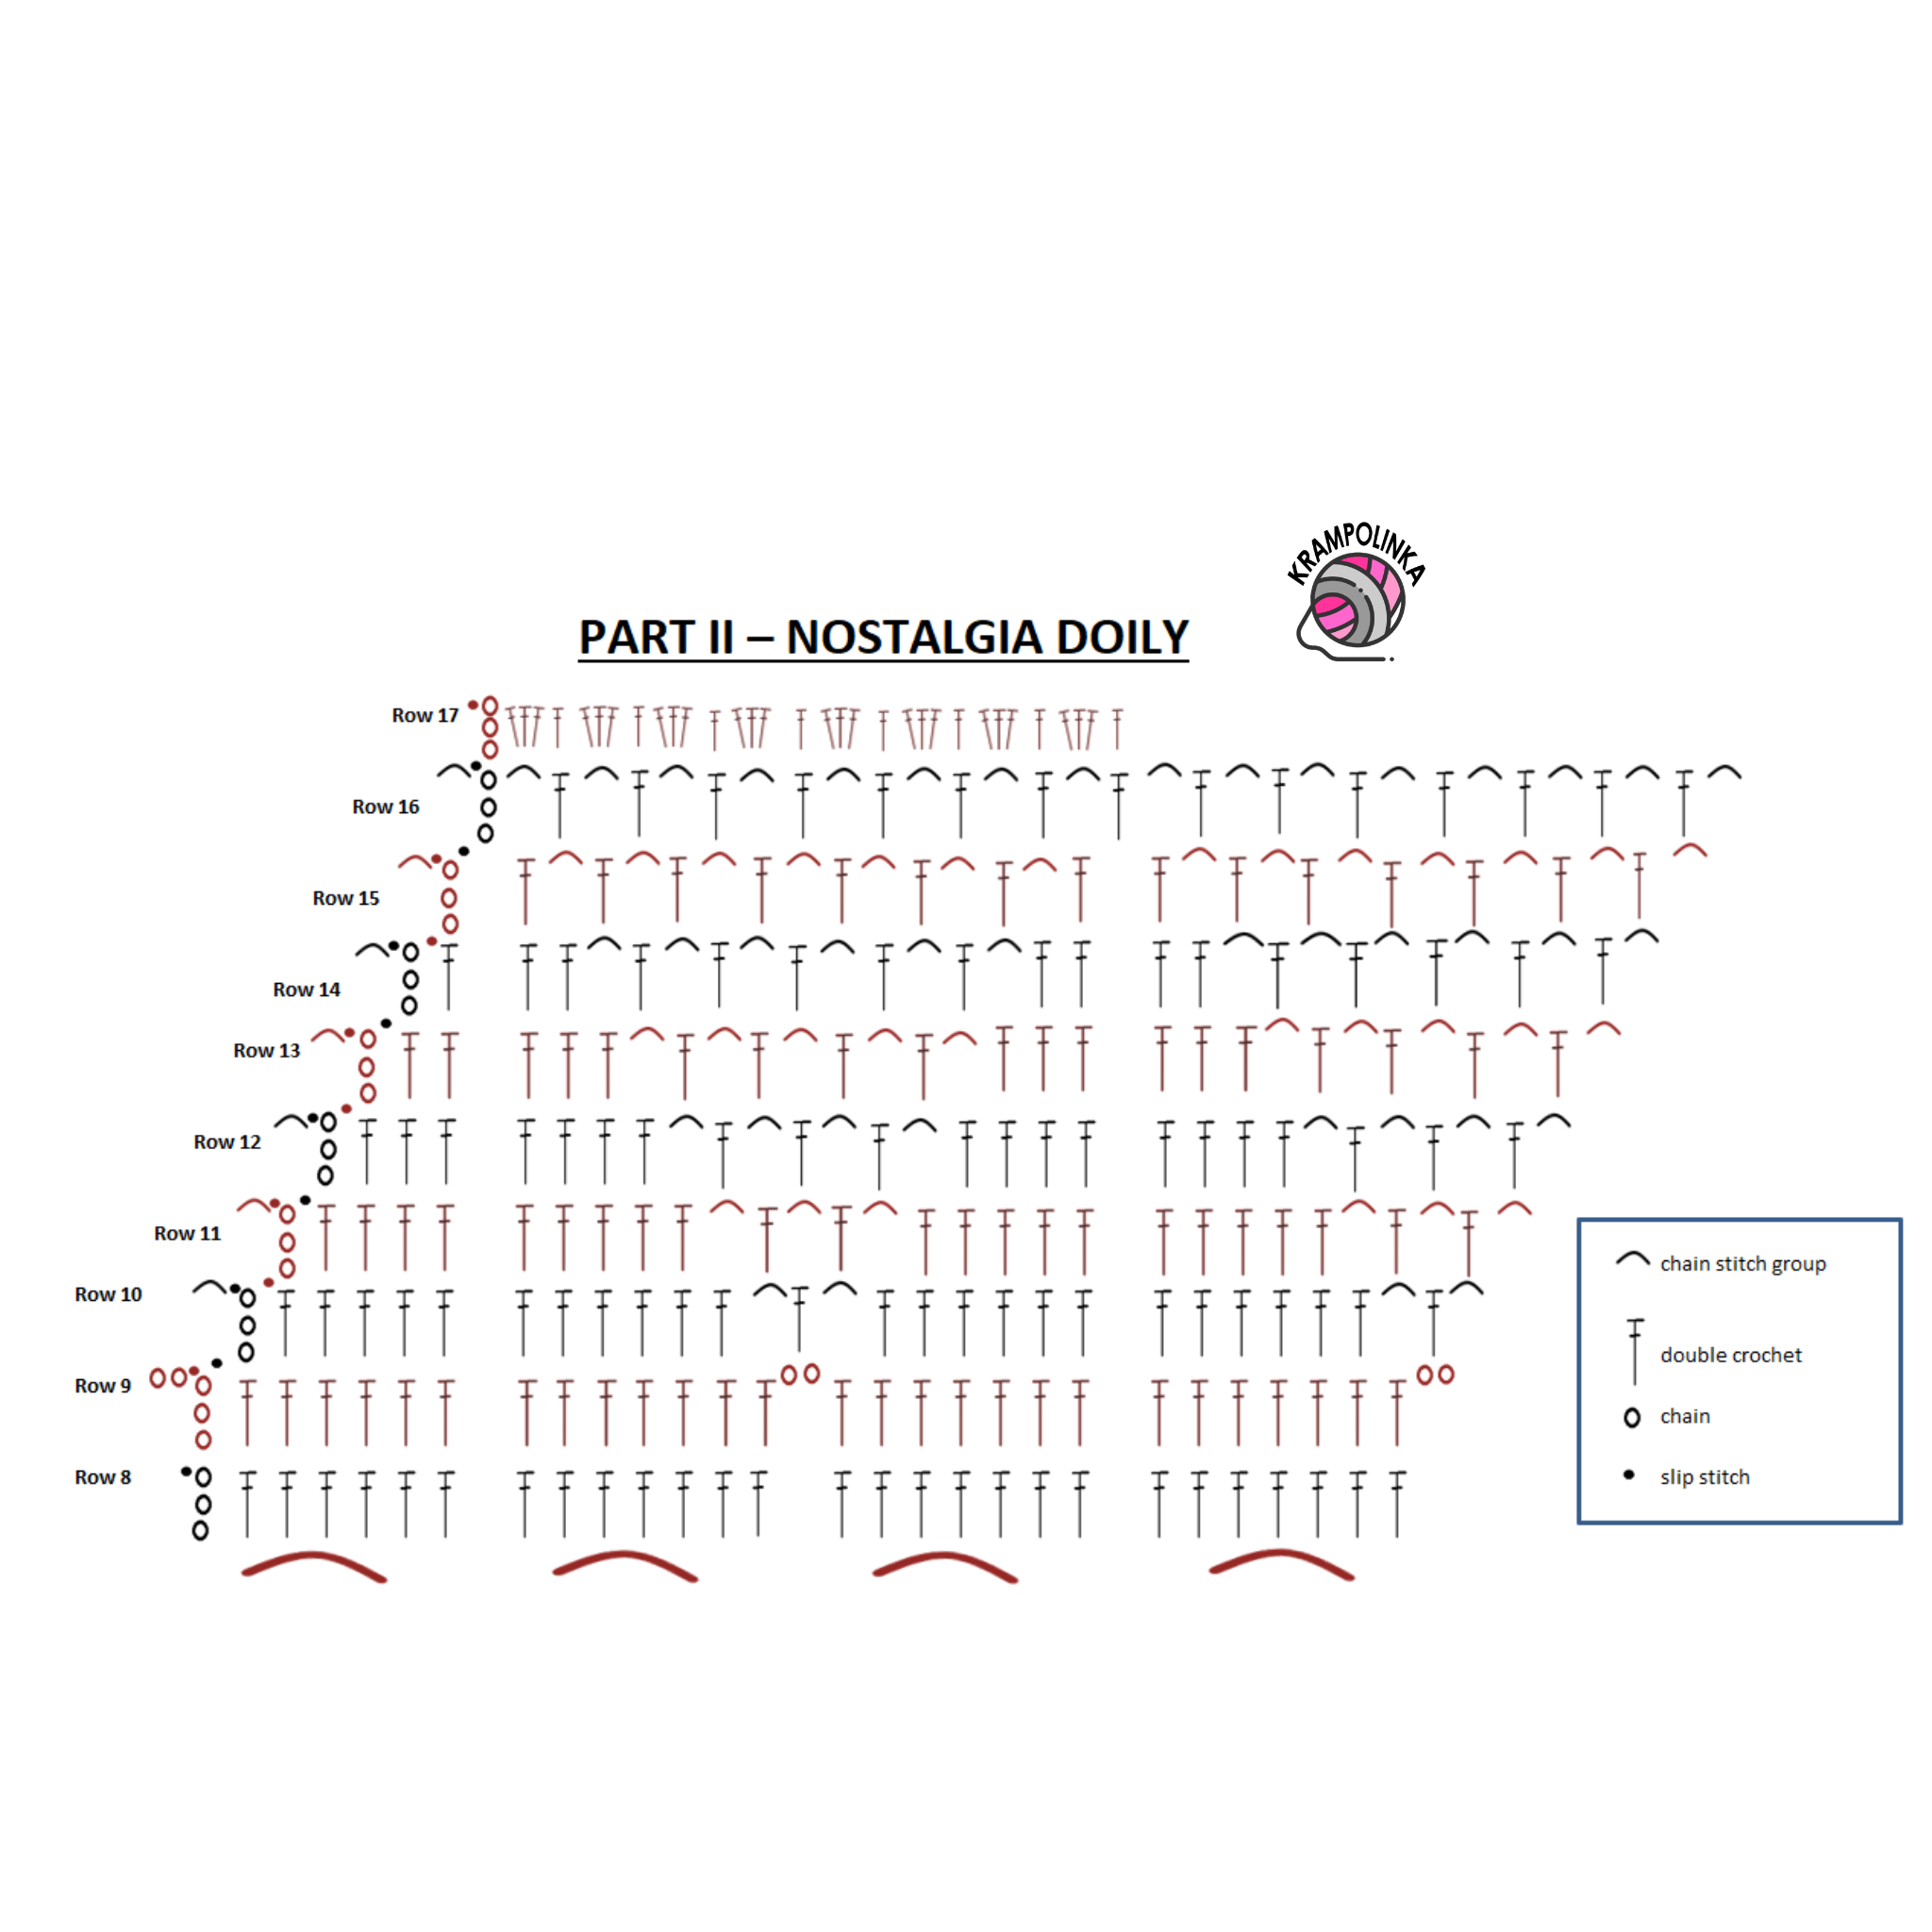
You will find the chart for the doily below the text. It is presented row by row, but you will be working in the round. The entire doily is crocheted on the right side in one direction. Start with Part I of the chart, where the magic ring is indicated.
I hope your Nostalgia Doily turns out beautifully and brings you joy. If you feel like inspiring others or sharing your experience with crocheting or styling the doily, I would love to see your photos! You can share your photos in the Krampolinka Facebook group. On Instagram, please use the hashtag #deckanostalgie so others can easily find your projects. If you tag me in your creations made using my patterns, I can reshare them in my Instagram Stories to inspire others.
NOSTALGIA DOILY
Yarn: Puppets Eldorado or Anchor Freccia
Yarn usage: 1 ball makes approx. 3 doilies
Hook: 1.8 mm Tulip crochet hooks (smaller) or 2 mm Tulip crochet hooks (larger)
Dimensions:
– smaller: approx. 25 cm before blocking / 28 cm after blocking
– larger: approx. 27–28 cm before blocking / 34 cm after blocking
Tools: yarn needle (large eye), starch, pins, blocking board
Time required: approx. 2–3 hours + blocking
Skill level: beginner-friendly
Abbreviations:
ch – chain stitch
MR – magic ring
dc – double crochet
sc – single crochet
sl st – slip stitch
-
- PIN it for later – Pattern for vintage Doily
INNER MOTIF OF THE DOILY (1.8 mm hook)
Round 1: Into a magic ring (MR), crochet 3 ch (counts as the first dc), then 16 dc. Join with a slip stitch (sl st) into the 2nd chain of the starting chain. (17)
Round 2: 3 ch (counts as first dc), then 2 dc into the same stitch. Work 2 dc into each dc around. Join with sl st. (35)
Round 3: 3 ch (counts as first dc). Crochet 6 dc into the next stitches, 2 ch. Pattern for this round: 7 dc into the next 7 stitches, 2 ch. Repeat. Join with sl st.
Round 4: Sl st into the next stitch. 3 ch (counts as first dc), then 4 dc into the next 4 dc. 3 ch, 1 dc under the chain space, 3 ch. Skip 1 dc, 5 dc into the next 5 dc, 3 ch, 1 dc under the chain space, 3 ch. Repeat. Join with sl st.
Round 5: Sl st into the next stitch. 3 ch (counts as first dc), then 2 dc into the next 2 dc. 4 ch, 1 dc under the chain space, 4 ch, 1 dc under the chain space, 4 ch. Skip 1 dc, 3 dc into the next 3 dc, 4 ch, 1 dc under the chain space, 4 ch, 1 dc under the chain space, 4 ch. Repeat. Join with sl st.
Round 6: Sl st into the next stitch. 3 ch (counts as first dc) and 1 dc into the same stitch. 4 ch, 1 dc under the chain space, 4 ch, 1 dc under the chain space, 4 ch, 1 dc under the chain space, 4 ch, and into the middle of the three dc work 2 dc. Repeat. End the round with 2 ch and 1 dc into the 3rd chain of the starting chain. Finish in the middle of the arch.
Round 7: 3 ch (counts as first dc). Work around the entire round: 5 ch and 1 dc under the chain space. At the end of the round, crochet 5 ch and join with a sl st into the 2nd chain of the starting chain.
CONTINUATION OF THE DOILY MOTIF (1.8 mm hook)
Round 8: 3 ch (counts as first dc) and 6 dc under the first arch. Pattern for this round: 7 dc under each arch around the entire doily. Join with a slip stitch (sl st) into the 2nd chain of the starting chain.
Round 9: 3 ch (counts as first dc), then 13 dc into the next stitches, 1 ch. Pattern for this round: 14 dc into the next 14 stitches, 1 ch. Join with sl st into the 2nd chain of the starting chain.
Round 10: Sl st into the next stitch, 3 ch (counts as first dc), then 11 dc into the next stitches, 2 ch, 1 dc under the chain space, 2 ch. Pattern for this round: skip 1 dc, 12 dc into the next stitches, 2 ch, 1 dc under the chain space, 2 ch. Join with sl st into the 2nd chain of the starting chain.
Round 11: Sl st into the next stitch, 3 ch (counts as first dc), then 9 dc into the next stitches, 2 ch, 1 dc under the chain space, 2 ch, 1 dc under the chain space, 2 ch. Pattern for this round: skip 1 dc, 10 dc into the next stitches, 2 ch, 1 dc under the chain space, 2 ch, 1 dc under the chain space, 2 ch. Join with sl st into the 2nd chain of the starting chain.
Rounds 12–13: Same as Round 11. Sl st into the next stitch, 3 ch (counts as first dc). Decrease in a star shape by skipping 1 dc at the beginning of the round and omitting 1 dc at the end of each motif, resulting in groups of 8 and then 6 dc. Between the star points, crochet 2–3 ch and 1 dc under the chain space. Join with sl st into the 2nd chain of the starting chain.
Rounds 14–15: Same as Round 11. Sl st into the next stitch, 3 ch (counts as first dc). Continue decreasing in a star shape by skipping 1 dc at the beginning and omitting 1 dc at the end of each motif, resulting in groups of 4 and then 2 dc. Between the star points, crochet 3 ch and 1 dc under the chain space. Join with sl st into the 2nd chain of the starting chain.
Round 16: 3 ch (counts as first dc), 4 ch, 1 dc under the chain space (repeat 8 times). Between the opposite star points, crochet 1 dc, then continue with 4 ch and 1 dc under the chain space (8 times). Join with sl st into the 2nd chain of the starting chain.
Note: Before and after the dc stitches, I found it works well to crochet 2–3 ch instead of 4 ch, depending on your tension.
DOILY BORDER (1.8 mm hook)
Round 17: 3 ch (counts as first dc) and 3 dc under the arch. Pattern for this round: 1 dc into the next dc, 3 dc under the arch. Join with a slip stitch (sl st) into the 2nd chain of the starting chain.
Round 18: 3 ch (counts as first dc), ch 3, sc into the 4th chain from the hook, dc into the same stitch, repeat (ch 3, sc into the 4th chain from the hook, dc into the same stitch) three times in total. Skip 3 stitches, then work 3 sc into the next 3 dc, skip 3 stitches.
Pattern for this round: into one stitch work dc, ch 3, sc into the 4th chain from the hook, dc, ch 3, sc into the 4th chain from the hook, dc, ch 3, sc into the 4th chain from the hook, dc; skip 3 stitches, work 3 sc into the next 3 dc, skip 3 stitches. Repeat around. At the end of the round, join with a slip stitch. Fasten off the yarn and weave in all loose ends.
STARCHING (BLOCKING)
Dilute ALBA EFEKT starch with a small amount of water. Soak the doily in the starch solution, then squeeze out the excess thoroughly. Place the doily on a polystyrene board covered with cling film. Using fine stainless pins (pink ones are stronger and firmer, black ones are thinner but slightly flexible), block the doily into a perfect circular shape. Let it dry completely.
Finishing
Weave in all loose ends. Do not pull too tightly, as the yarn may break. Add a decorative label if desired.
Copyright Notice
This pattern is for personal use only. For commercial use, please contact me directly. Always include the source credit: www.krampolinka.com. The pattern is designed specifically for this yarn, hook size, and my personal tension. If you use a different yarn, hook, or tension, your final product may vary in size or shape.
Enjoy this free pattern and you can follow my latest projects, tutorials, ideas, reviews, video podcasts, tips, and tricks:
- Krampolinka YouTube videos (subtitled since 2024)
- Krampolinka Instagram
- Krampolinka FB group
-
- A delicate crochet doily inspired by a vintage pattern from 1907
-

- Lightweight cotton doily with a timeless and elegant design
-
- Handmade crochet piece perfect for table styling or home decor
-

- A beautiful blend of history and modern crochet craftsmanship
-

- Doily Nostalgie Part I
-
- Doily Nostalgie Part II
-
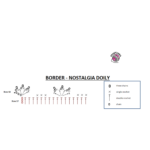
- Border – Doily Nostalgie

No Comments