
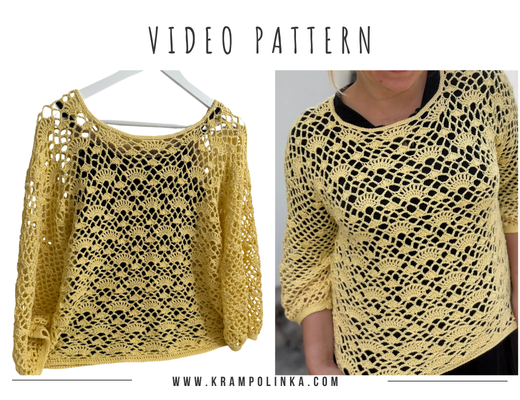
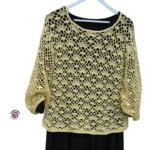
In this video tutorial, we will crochet a lace sweater together using Schachenmayr Baby Smiles Cotton Bamboo yarn. The construction is quite simple – we will make two panels and add 3/4-length sleeves. Thanks to this straightforward design, the sweater is also suitable for a confident beginner. Another great advantage of this pattern is that the size can be adjusted very easily.
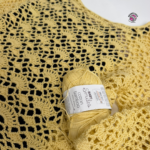
For this sweater, I used Schachenmayr Baby Smiles Cotton Bamboo, 50 g / 156 m per ball. It is a beautifully soft yarn made from 52% cotton and 48% bamboo viscose. This material is perfect for projects from spring through autumn, such as tops, sweaters, camisoles, lightweight summer hats, scarves, lace skirts, and dresses. It can also be used all year round for blouses, vests, cardigans, or sweaters that can be easily layered over long-sleeved tops or turtlenecks.
Thanks to the bamboo viscose content, the finished garment has a beautiful drape and feels light and airy. You can use practically any crochet stitch pattern with this yarn and achieve a lovely result. Just keep in mind that due to the nature of the fiber and the weight of the finished garment, the piece may stretch slightly in length during wear. For this reason, I especially recommend making dresses and skirts a little shorter than the desired final length.
We first introduced this beautiful yarn in the podcast episode Povídání u klubíčka #90; you can also find the related article here.
The Story Behind the Sweater
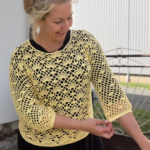
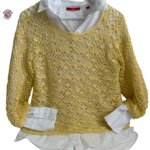
This sweater has a story of its own. I actually started crocheting it last year in Karlovy Vary. But the season came to an end before I managed to finish it, so I was left with a completed back panel and a partially finished front panel. This year, towards the end of summer, its time finally came. As soon as I picked it up again, the sweater came together surprisingly quickly. I wore it for the first time during my podcast Povídání u klubíčka #135, and it received a wonderful response. I believe this is the kind of sweater you can wear almost all year round. On warmer days, you can wear it on its own, while in cooler weather it works beautifully as a layering piece over a top or turtleneck. I think the most challenging part of the project will be keeping the lace stitch pattern consistent and then shaping the sections around the neckline. Apart from that, the sweater construction is quite simple, and I believe you will manage it with ease.
VIDEO TUTORIAL PREMIERE – PART I This part includes instructions for the lace stitch pattern used for both the front and back panels. You can slow down the video directly on YouTube and turn on subtitles.
VIDEO TUTORIAL PREMIERE – PART II This part includes instructions for joining the pieces, crocheting the edgings, and making the sleeves. You can slow down the video directly on YouTube and turn on subtitles.
Sweater Construction
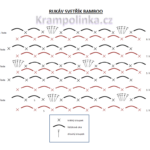
The sweater is made from two crocheted panels, worked from the bottom edge up towards the neckline. The back and front panels are almost identical and differ mainly in the shaping of the neckline. On the front panel, the shoulder sections are worked separately to the required height in order to create a deeper front neckline. Once the panels are sewn or crocheted together, we continue with the sleeves. The sleeves have an open mesh structure created from a combination of arches and shell stitches. Their length can easily be adjusted to suit your preference. For my sweater, I chose 3/4-length sleeves. If you estimate the armhole depth correctly, there is no need to decrease the sleeves gradually. They can be worked straight all the way down, and the lower edge is then gathered slightly with a crocheted ribbed cuff.
Stitch Pattern
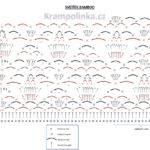
For this sweater, I followed a stitch chart I found on Pinterest, originally from a Chinese crochet book. The pattern combines shell stitches and arched sections, creating a beautiful light and airy lace texture. This is not quite the kind of stitch pattern you can crochet without paying attention. The shell sections alternate in a zigzag line, so it is important to keep an eye on their correct placement. I especially recommend paying close attention to the beginning of each row. Once you understand the repeat and get used to the rhythm of the pattern, the work starts to grow much more quickly. We have already used a similar stitch pattern for the Laguna Sweater. I always recommend making a gauge swatch first — 2 × 16 stitches + 1 turning stitch — and then adjusting the starting chain according to your own crochet tension.
How to Adjust the Size
You can adjust the width of the sweater by working fewer or more pattern repeats. The stitch pattern repeats over 16 stitches + 1 turning stitch, so it is quite easy to adapt the length of the starting chain and therefore the overall width of the sweater. The length of the sweater can be adjusted by crocheting more or fewer rows. The pattern repeat is worked over six rows. The sleeve length can also be adjusted according to your own preference.
How to Wear the Sweater
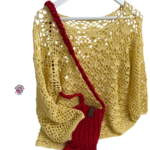
Thanks to the lightweight yarn and airy lace pattern, this sweater is a great piece for layering throughout the year. In summer, you can wear it over a camisole, tank top, or dress. For this style, I recommend making the sweater slightly shorter. In spring and autumn, it looks beautiful layered over a shirt, long-sleeved top, or lightweight turtleneck. In this case, the sweater can also be made a little wider and longer.
I hope you enjoy crocheting your Bamboo Sweater. If you would like to inspire others or share your own experience with crocheting or styling the sweater, I would be very happy to see your photos. If you would like to inspire others or share your experience with crocheting or styling the dress, I would be very happy to see your photos. You can share your photos in the Krampolinka Facebook group. On Instagram, please use the hashtag #svetrikbamboo so they are easy to find. If you tag me in projects made from my patterns, I may reshare them in my Instastories to inspire others.
BAMBOO SWEATER
Yarn: Schachenmayr Cotton Bamboo, available from Bavlnkarna.cz, Bavlnkaren.sk, KlubickaodSrdicka.cz, or Muziker.cz.
Yarn amount: 6 balls, shade 1021 Vanilla
Crochet hooks: 3 mm and 3.5 mm Tulip
Measurements: 51 cm wide, 51 cm long, 3/4 sleeve length 36 cm
Other supplies: tapestry needle, sewing needle and matching thread, decorative label
Estimated time: 24 hours
Skill level: adventurous beginner
Abbreviations
CH – chain
SC – single crochet
DC – double crochet
HSC – herringbone single crochet
SL ST – slip stitch
FRONT AND BACK PANEL, 3 mm hook
Row 1: Crochet a foundation chain of 112 CH. Turn.
Row 2: CH 2 as a substitute for the first DC and work 1 DC into the third chain from the hook. Continue working 1 DC into each chain across. 113 DC in total. Turn.
Row 3: CH 1 instead of the first SC, SC into DC. Pattern: CH 5, skip three stitches and work SC into the fourth stitch. Repeat the pattern to the end of the row. The number of arches should be divisible by 4. At the end of the row, work SC into the turning chain. Turn.
Row 4: CH 3 instead of DC, 3 DC into SC. Pattern: SC under the first arch, CH 5, SC under the second arch, CH 5, SC under the third arch, CH 5, SC under the fourth arch and work a shell of 5 DC into the SC from the previous row. Repeat to the end of the row. Finish the row with 3 DC into the turning chain. Check that there are three arches between the shells. Turn.
Row 5: CH 1 and SC into DC. CH 5 and SC under the first arch, 8 DC under the second arch, SC under the third arch, CH 5 and SC into the middle DC of the shell. Repeat the pattern to the end of the row. Finish the row with an arch of CH 5 and SC into the turning chain. Turn.
Row 6: CH 3 instead of DC, CH 2 as a half arch. SC under the arch, DC into DC and CH 1 (8x), SC under the arch, CH 5. Repeat the pattern to the end of the row. Finish with SC under the arch, CH 2 as part of the pattern and DC into the turning chain. Turn.
Row 7: Work arches only. CH 1 instead of SC and SC into DC. CH 5 and SC into the second space of the shell, CH 5 and SC into the fourth space of the shell, CH 5 and SC into the sixth space of the shell, CH 5 and SC under the arch. Repeat the pattern to the end of the row. Finish the row with an arch and SC into the turning chain. Turn.
Row 8: CH 3 instead of DC, 3 DC into SC. SC under the first arch, CH 5, SC under the second arch, CH 5, SC under the third arch, CH 5, SC under the fourth arch and 5 DC into SC. Repeat to the end of the row. Finish the row with 3 DC into the turning chain. Turn. Row 3 is the same as Row 8.
Note: The pattern repeat consists of six rows. The only difference is at the beginning and end of the rows: in the first six-row repeat, we begin and end with half of a small shell, while in the second six-row repeat, we begin and end with half of a large shell.
Row 9: CH 1 instead of SC, SC into DC. CH 5 and SC under the arch or SC into the middle DC of the shell. Repeat to the end of the row. Finish the row with SC into the turning chain. Turn.
Row 10: CH 3 instead of DC, CH 2 as half of an arch. SC under the first arch, CH 5, SC under the second arch and work a shell of 5 DC into the SC from the previous row. SC under the first arch, CH 5, SC under the second arch, CH 5, SC under the third arch, CH 5, SC under the fourth arch and 5 DC into SC. At the end of the row, work SC under the arch, CH 5, SC under the last arch, CH 2 and DC into the turning chain. Turn.
Row 11: CH 3 instead of DC, 4 DC under the half arch at the beginning of the row, SC under the arch, CH 5, SC into the middle DC. CH 5 and SC under the first arch, 8 DC under the second arch, SC under the third arch, CH 5 and SC into the middle DC of the shell. Repeat the pattern to the end of the row. Finish with CH 5, SC into the middle DC, CH 5, SC under the arch, 4 DC under the half arch at the end of the row and DC into the turning chain. Turn.
Row 12: CH 3 instead of DC, CH 1 as part of the pattern and DC, CH 1 (4x), SC under the arch and CH 5. SC under the arch, DC into DC and CH 1 (8x), SC under the arch, CH 5. Repeat the pattern to the end of the row. At the end of the row, work SC under the arch, DC and CH 1 (4x), and DC into the turning chain. Turn.
Row 13: CH 1 and SC into DC, CH 5 and SC into the second space, CH 5 and SC under the arch. CH 5 and SC into the second space of the shell, CH 5 and SC into the fourth space of the shell, CH 5 and SC into the sixth space of the shell, CH 5 and SC under the arch. Repeat the pattern to the end of the row. At the end of the row, work CH 5, SC into the second space of the arch at the end of the row, CH 5 and SC into the turning chain. Turn.
Row 14: CH 3 instead of DC, CH 2 as half of an arch. SC under the first arch, CH 5, SC under the second arch and work a shell of 5 DC into the SC from the previous row. SC under the first arch, CH 5, SC under the second arch, CH 5, SC under the third arch, CH 5, SC under the fourth arch and 5 DC into SC. At the end of the row, work SC under the arch, CH 5, SC under the last arch, CH 2 and DC into the turning chain. Turn.
Row 15: CH 1 instead of SC, SC into DC. Work CH 5 and SC under the arch or CH 5 and SC into the middle DC of the shell. Finish the row with SC into the turning chain. The number of arches must be divisible by 4.
Rows 16–58 for the back panel: Finish with a row in which you work arches and a shell into SC.
Rows 16–55 for the front panel: Finish with a row of CH arches and SC.
SHAPING THE BACK NECKLINE, 3 mm hook
Row 59: There are 7 shells in the row. Divide the panel into two shells for one shoulder, three shells for the neckline and two shells for the other shoulder. Mark the centre arch between two shells with a stitch marker. CH 3 instead of DC, 4 DC under the half arch at the beginning of the row, SC under the arch, CH 5, SC into the middle DC. CH 5 and SC under the first arch, 8 DC under the second arch, SC under the third arch, CH 5 and SC into the middle DC of the shell. CH 5 and SC under the next arch, then under the marked arch work 5 DC and 1 DC into SC. Turn.
Row 60: CH 3 and CH 1 as part of the pattern. Work DC and CH 1 into DC (5x), SC under CH space, CH 5, SC under CH space and DC and CH 1 (8x) in the following pattern section. SC under the arch, CH 5 and SC under the next arch, and at the end of the row work DC and CH 1 (4x) and DC into the turning chain. Turn.
Row 61: CH 1 instead of SC, SC into DC. Continue with CH 5 and SC into the second space, CH 5 and SC under the arch, then continue as in Row 14. At the end of the row, fasten off and crochet the second side of the back neckline. Start this side at the neckline in the SC of the arch where the stitch marker is placed, and work outwards so that the pattern slopes in the same direction. Work Rows 59–61 in mirror image. Fasten off.
SHAPING THE FRONT NECKLINE, 3 mm hook
Row 56: Count two complete large pattern repeats from the edge and place a stitch marker in the first SC of the third repeat. Skip the third, fourth and fifth pattern repeats and place the second stitch marker in the last SC of the fifth repeat. CH 3 instead of DC, 3 DC into SC. The pattern consists of SC under the first arch, CH 5, SC under the second arch, CH 5, SC under the third arch, CH 5, SC under the fourth arch and a shell of 5 DC into the SC from the previous row. Again work CH 5, SC, CH 5, SC, CH 5, SC and a shell of 5 DC into SC, SC under the arch. Finish with a half arch, i.e. CH 3 and DC into the stitch with the marker. Turn.
Row 57: CH 1 and SC, CH 5 and SC into the middle DC of the shell. Repeat CH 5 and SC under the arch or SC into the centre of the shell. Finish the row with SC into the turning chain. Turn.
Row 58: CH 3 instead of DC, CH 2 as a half arch, SC under the arch, CH 5 and SC under the arch, then work a shell of 5 DC into SC, SC under the arch. Repeat 3x: arch, SC, shell, SC. Work 2 arches and finish with SC under the arch. Do not continue any further. This evens out the appearance of the pattern on the front and back panels.
Rows 59–61: Work the same as Rows 59–61 on the back panel. Do not fasten off and crochet the shoulders together.
JOINING THE SHOULDERS, 3 mm hook
Join the shoulders on the right side. We will use chain stitches and SC in a zigzag joining method. CH 1, insert the hook into an SC on one panel and then into an SC on the other panel and join them with SL ST. Work CH 2 and SC under the arch on the front panel, CH 2 and SC into the arch on the back panel. Alternate between the front and back panels. Finish the row with SC on the front panel and DC into the SC on the opposite panel. Fasten off. Continue crocheting the second section of the front neckline.
SHAPING THE FRONT NECKLINE, 3 mm hook
Join the yarn at the neckline where the stitch marker is placed. Work Rows 56 and 57 in mirror image. At the end of Row 57, finish in the centre of the arch, i.e. work CH 2 and finish with DC into the third chain of the turning chain. This brings you to the centre of the arch and aligns the pattern on the front and back panels.
Rows 59–61: Work the same as Rows 59–61 on the back panel. Do not fasten off and crochet the shoulders together as described above. Fasten off.
JOINING THE SIDES, 3 mm hook
Join the sides on the wrong side. From the top edge, count down two large pattern repeats and use a stitch marker to join both panels together at the level of an arch section. Try the sweater on and check whether the armhole depth is sufficient. If it is, join the sides from the bottom edge towards the underarm. Work SL ST through the edge stitches. Where a row ended with DC, work 2 SL ST; where a row ended with SC, work 1 SL ST. Do not fasten off; use the same yarn to crochet the sleeve.
3/4 SLEEVE, 3 mm hook
Round 1: Work on the right side without closing the round. Crochet CH 4 for the first arch, SC into the row where SC was worked. For the following arches, work CH 5 and SC around the edge SC. For the stitch pattern, we need 25 arches around the sleeve opening. At the end of the round, work a shorter arch of CH 4 and SC under the first arch of the round. Continue working in rounds.
Round 2: Work the stitch pattern in this round. At the beginning of the round, work a shell of 5 DC into the next SC, SC under the arch, CH 5 and SC under the CH space (3x), followed by a shell of 5 DC. Repeat this pattern to the end of the round and move into the next round with an arch.
Round 3: Work arches and SC under the CH space or SC into the centre DC.
Rounds 4–5: Work arches and SC under the CH space.
Round 6: Work the stitch pattern in this round. The shells are staggered, meaning they are not placed directly above one another but in the spaces between them. A useful guide is that the first time we have three SC positioned above one another in consecutive rows, while in the following repeats we have four SC positioned above the shell. Once this combination is reached, work a shell round.
Rounds 7–35: Repeat Rounds 2–6, keeping the shells staggered.
SLEEVE EDGING, 3 mm hook
Round 36: Work CH 4 and SC under the CH space around. At the end of the round, work CH 2 and SL ST into SC. This closes the round.
Round 37: CH 1 instead of SC. Work the edging in HSC, working HSC under the arch and HSC into SC. Finish the round with SL ST.
Rounds 38–40: CH 1 instead of SC, then work HSC through the back loop only. Finish each round with SL ST. Fasten off.
BOTTOM EDGING, 3.5 mm hook: Join the yarn at the side seam. CH 1 instead of SC and continue working HSC into each foundation chain. Finish the round with SL ST.
NECKLINE EDGING, 3 mm hook
Round 1: Join the yarn at the corner of the back panel. CH 1 instead of SC and continue along the straight crocheted edge, working 2 HSC into each row that ended with DC and 1 HSC into each row that ended with SC. Along the front neckline, work 3 HSC under each arch and HSC into SC. Continue in the same way along the back neckline. Finish the round with SL ST.
Round 2: CH 1 instead of SC. Work HSC through the back loop only. Finish the round with SL ST. Fasten off.
FINISHING: Weave in all loose ends. Sew a decorative label onto the bottom edging.
First part
Second part



No Comments