
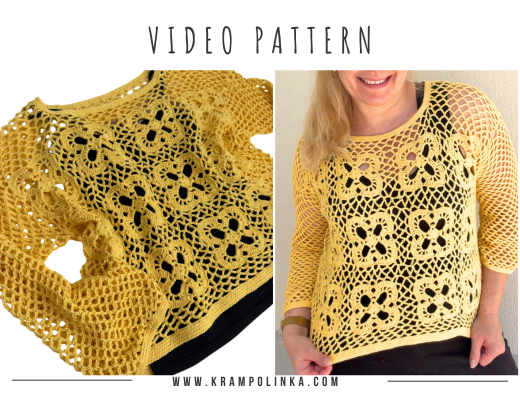
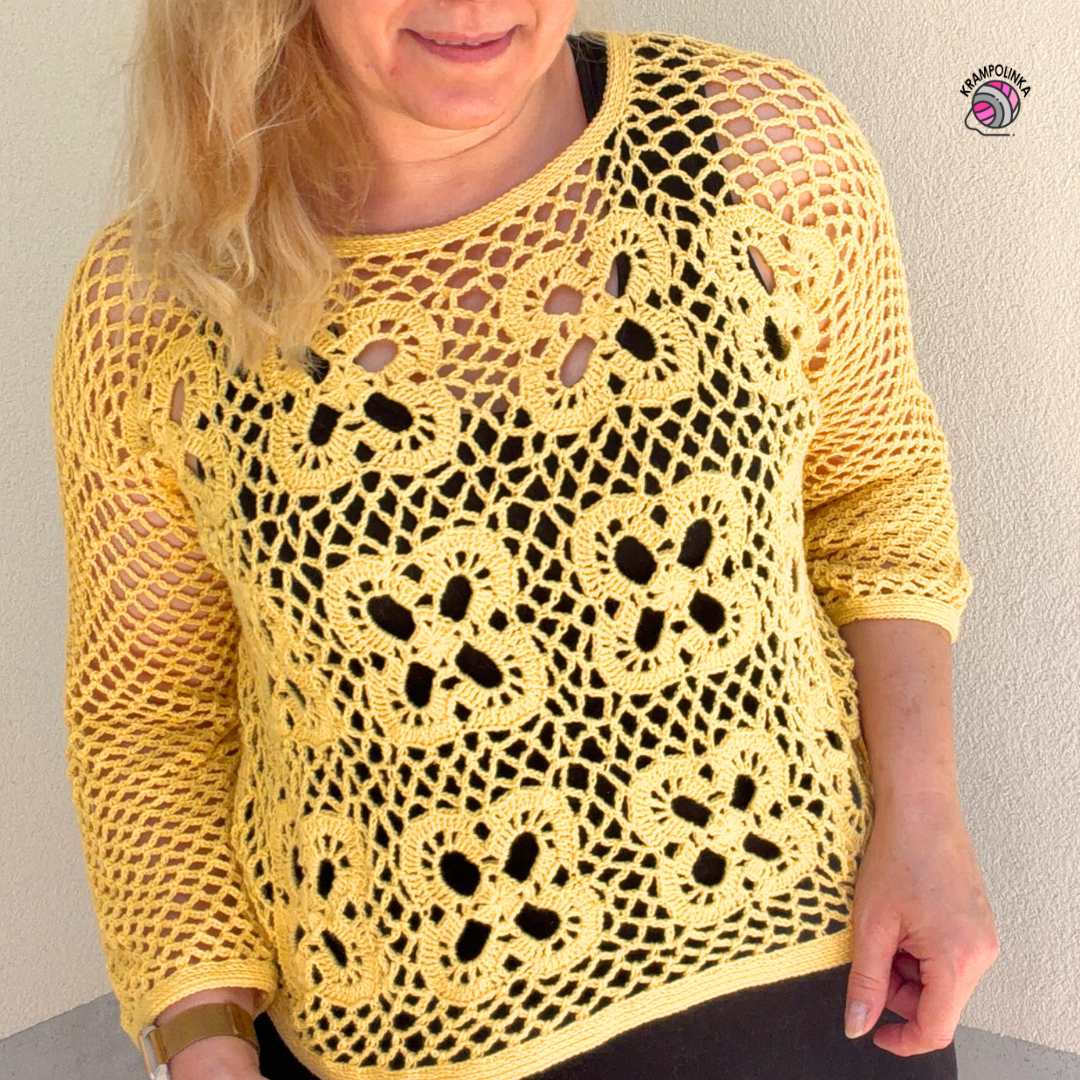
Today’s video tutorial features a crocheted summer sweater made from granny squares. We’re using NATANA Cherry Rose yarn, and each granny square takes just 16 minutes to crochet!
NATANA Cherry Rose comes in 50 g balls with a length of 125 meters. It is a natural, combed 100% cotton yarn with no additional surface treatment and a softer twist, making finished projects beautifully soft to the touch. This yarn is suitable for crocheting toys with a smaller hook or garments with a larger hook. Cotton garments made from yarn of this weight and thickness tend to be slightly heavier, so I recommend choosing an openwork, lacy, and airy crochet pattern to keep your projects light and comfortable.
The Story Behind the Rose Sweater
The idea for this granny square sweater actually came about by chance. I wanted to challenge myself to crochet a granny square against the clock, and I invited you to join the SPEED Crochet Challenge on my YouTube channel. The challenge is simple: crochet one selected square as quickly and accurately as possible. If you make a mistake and need to unravel a few stitches, that time still counts toward your final result. It’s all about combining crochet speed and accuracy! You can watch the first live SPEED Crochet session here.
If you’d like to participate, share photos of your finished squares along with your final crochet time in this Facebook post. My personal best was 16 minutes and 33 seconds, including one round of unraveling! After crocheting just two squares, I completely fell in love with the pattern. And the best part? You can crochet 7 granny squares from a single ball of NATANA Cherry Rose yarn!
-
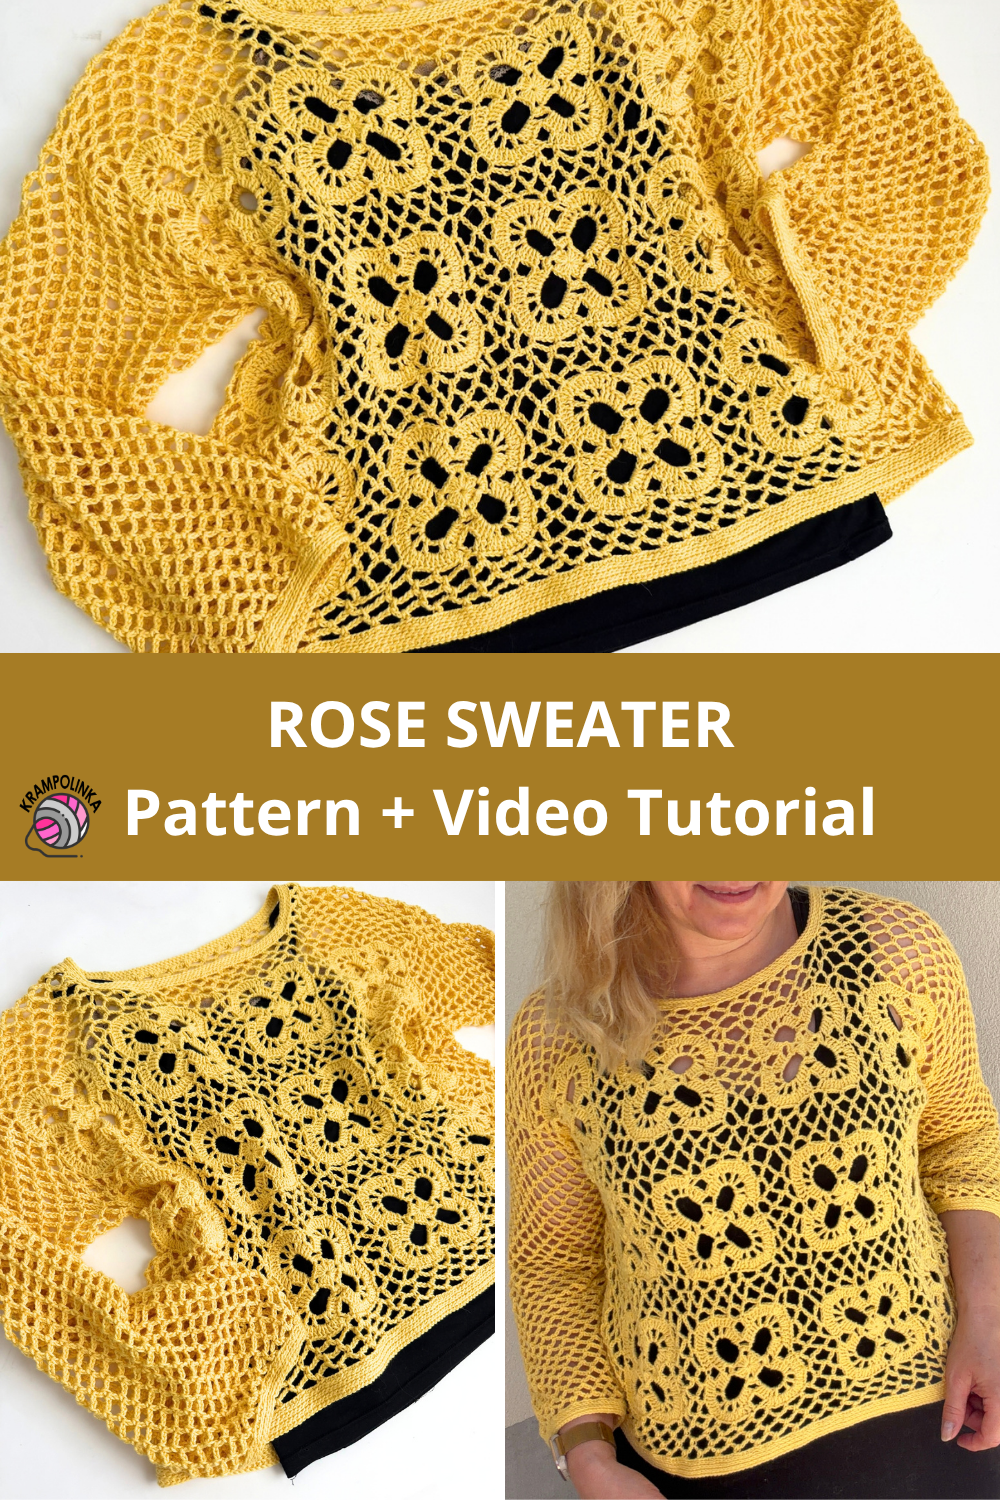
- Crochet Rose Sweater Patter
We unboxed NATANA Cherry Rose yarn in Povídání u klubíčka #127 (Yarn Chat), and you can read the accompanying article here. You can find NATANA Cherry Star yarn in a wide range of beautiful colors at NOEZON.cz or NOEZON.sk, with super-fast delivery!
VIDEO TUTORIAL PREMIERE – PART 1 You can slow down the video directly on YouTube and turn on subtitles.
VIDEO TUTORIAL PREMIERE – PART 2 You can slow down the video directly on YouTube. English subtitles are also available.
How to Crochet the Rose Granny Square Sweater
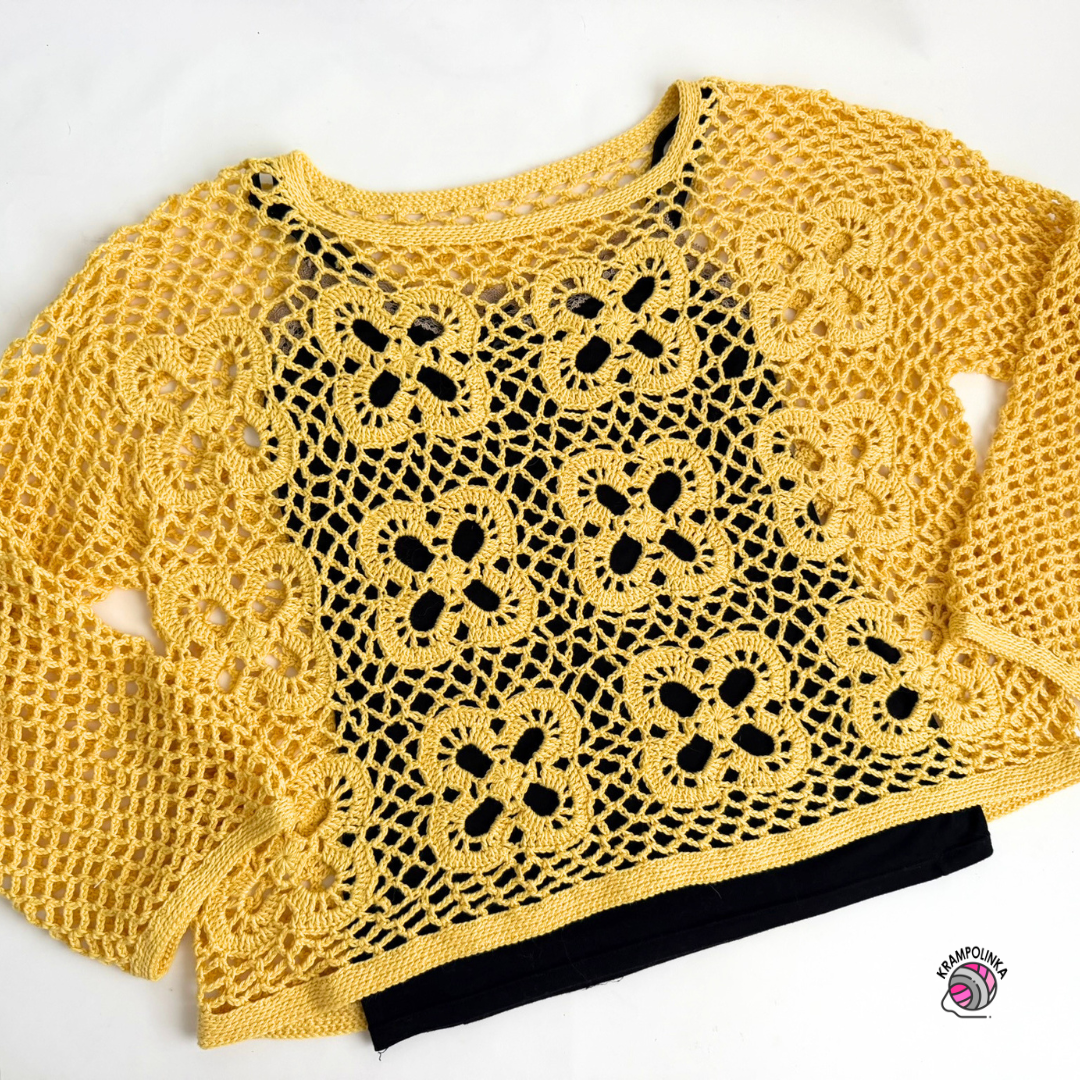
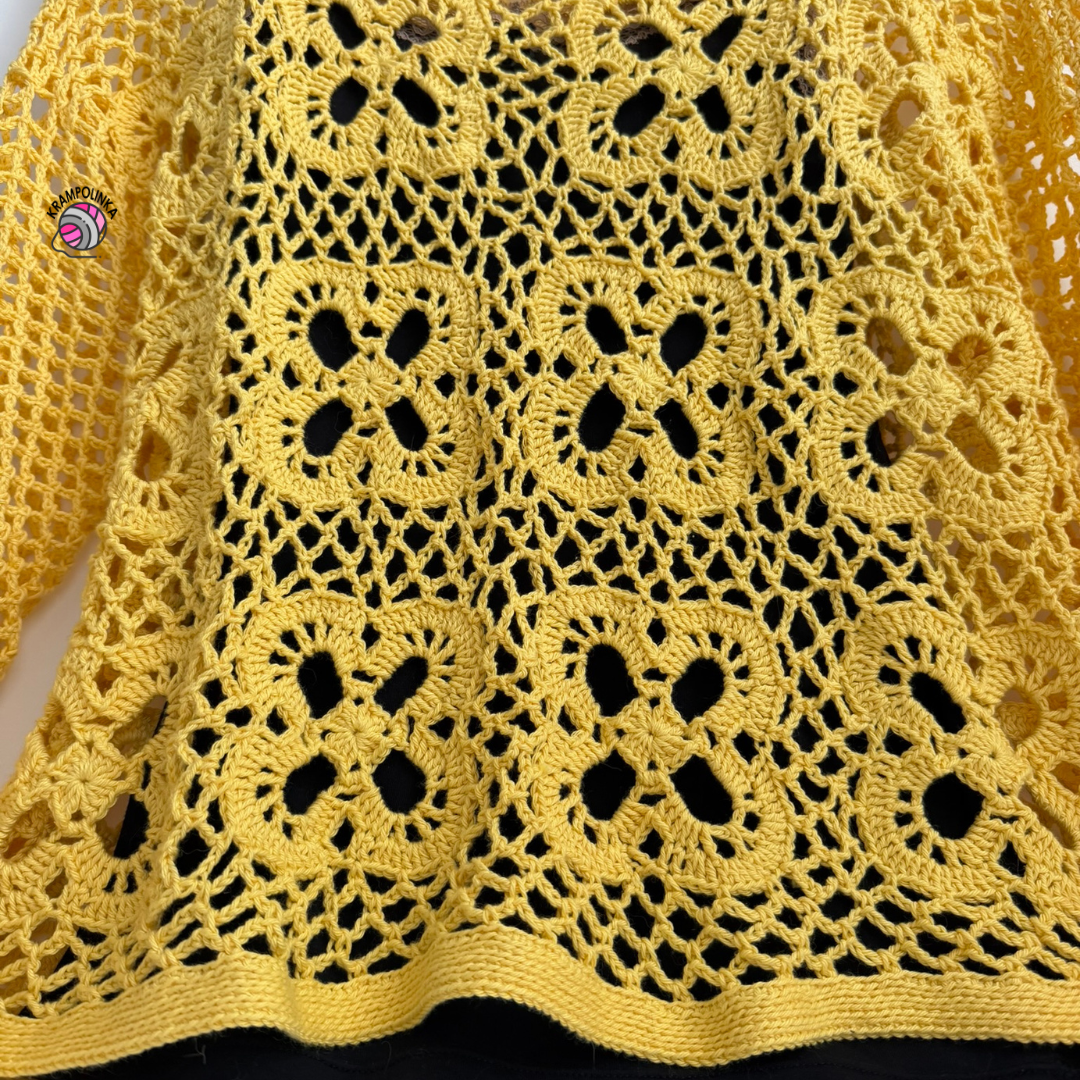
We start crocheting each square with a magic ring. We work on the right side throughout, combining single crochet (SC), double crochet (DC), and chain stitches (CH). The granny square pattern is suitable for beginners. Each square is approximately the size of a mug coaster, so if you don’t feel like making a sweater, you can easily use the pattern to create decorati ve coasters instead. For my short Rose Sweater in EU size 42, I needed 24 granny squares for the front and back panels. If you prefer a longer sweater, you’ll need 32 granny squares for the front and back panels. You’ll also need additional yarn to join the squares, crochet the borders around the panels, and make the sleeves.
Estimated yarn requirements:
- Short sweater: approximately 10 balls
- Longer sweater: approximately 14 balls
Assembling the Rose Sweater
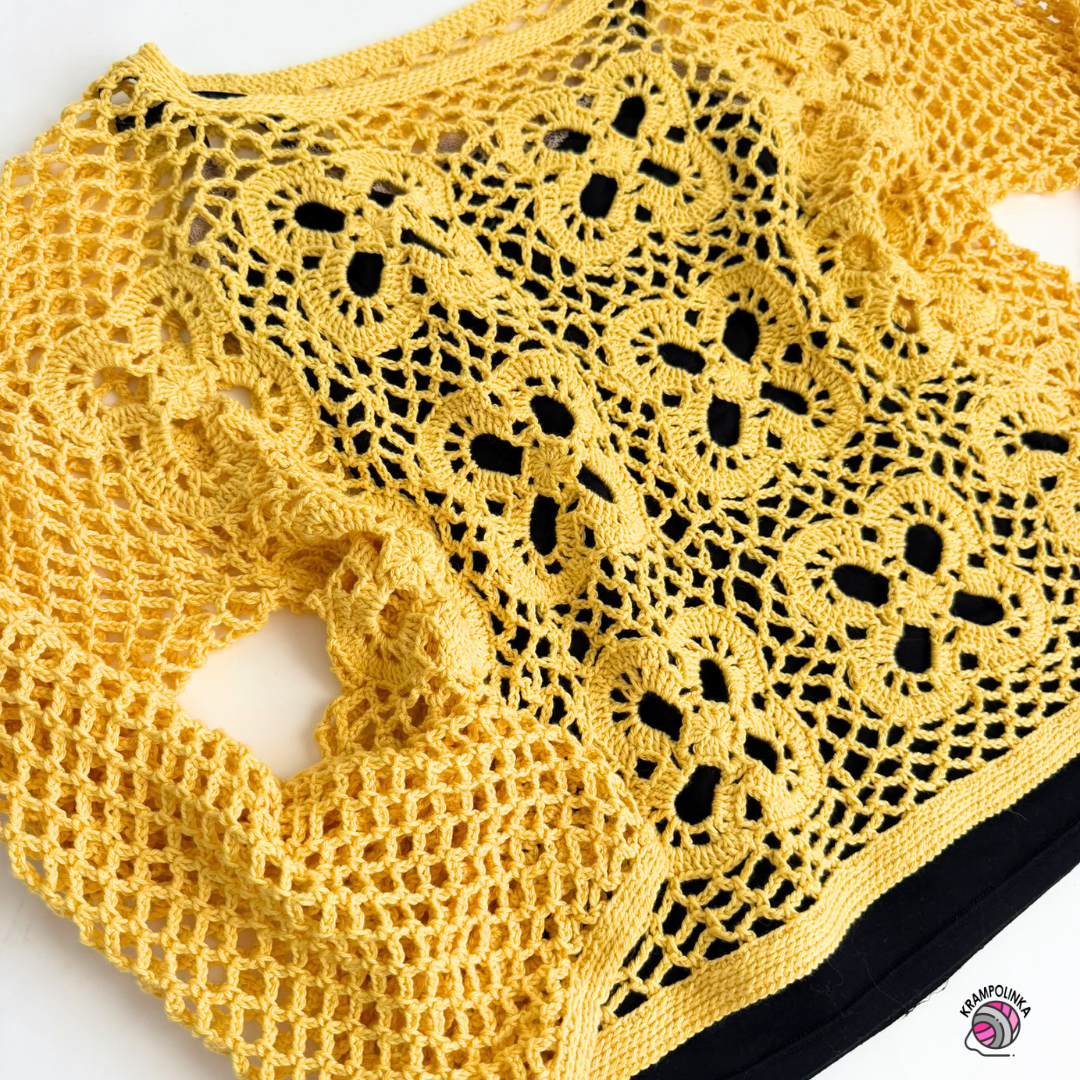
The front and back panels are identical. For the shorter version, we join the squares in a 3 × 4 arrangement (12 squares per panel) using chain stitches. First, we join the squares into strips. Then we connect the strips to create each panel. Finally, we crochet around the edges of the front and back panels using chain stitches and single crochet stitches, shaping the front and back necklines as we go. Once both panels are finished, we join the shoulders and side seams. Then we crochet the sleeves directly onto the armholes. You can choose your preferred sleeve length: short sleeves, three-quarter sleeves, or long sleeves. I hope you enjoy making your very own Rose Granny Square Sweater!
If you’d like to inspire others or share your crochet experience and styling ideas, I’d absolutely love to see your photos of the finished sweater. You can share your photos in the Krampolinka Facebook group. On Instagram, please use the hashtag #svetrikrose so they are easy to find. If you tag me in projects made from my patterns, I may reshare them in my Instastories to inspire others.
ROSE CROCHET SWEATER
- Yarn: Natana Cherry Rose, honey yellow. Available at Noezon.cz or Noezon.sk.
- Yarn Amount: 10–14 balls, depending on the sweater size and length.
- Crochet Hook: 3 mm
- Measurements: Front length: 48 cm, Width: 56 cm, 3/4 sleeve length: 44 cm
- Additional Supplies: Large-eye yarn needle, decorative label.
- Estimated Time: Approximately 16 minutes per granny square, plus 8 hours for assembly and finishing.
- Skill Level: Beginner-friendly
Crochet Abbreviations (US Terms)
- CH – Chain
- SC – Single Crochet
- MR – Magic Ring
- DC – Double Crochet
- SL ST – Slip Stitch
- HDC Herringbone (HHDC) – Herringbone Half Double Crochet
- TR – Treble Crochet
-
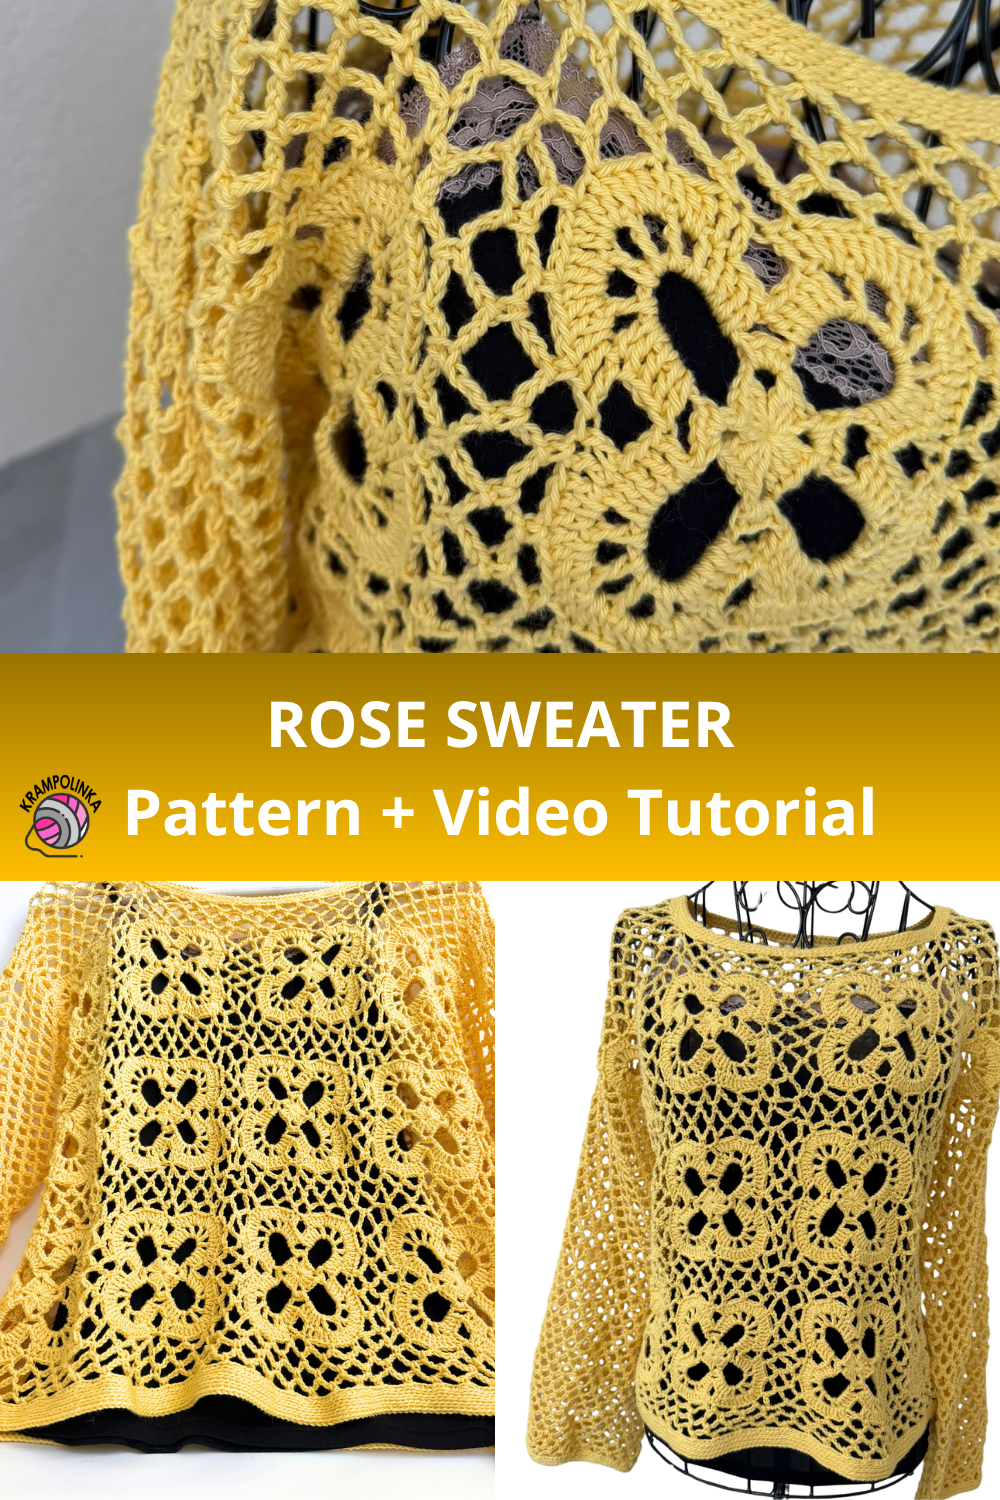
- SAVE PIN – Crochet Rose Sweater Patter
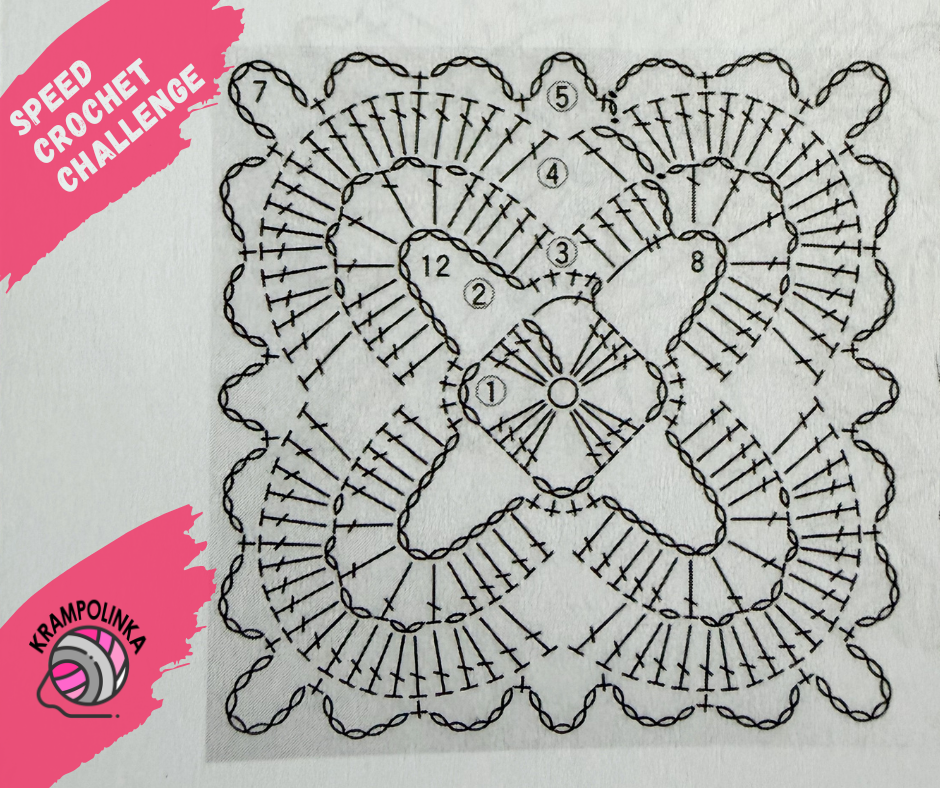
GRANNY SQUARE, 3 mm Crochet Hook
Row 1: Start with a magic ring (MR). CH 3 (counts as the first DC), then work 3 DC, CH 3, 4 DC, CH 3, 4 DC, CH 3, 4 DC, CH 1, and DC into the second chain of the beginning CH 3. This brings us to the middle of the chain space.
Row 2: CH 1 (counts as the first SC), then work 4 SC into the chain space, CH 12. Work 4 SC into the next chain space, CH 12, 4 SC into the next chain space, CH 12, 4 SC into the next chain space, CH 8, and TR. This brings us to the middle of the chain space.
Row 3: CH 3 (counts as the first DC), work 4 DC into the chain space. Work 5 DC into the next chain space, CH 1 and DC, CH 2 and DC, CH 2 and DC, CH 2 and DC, CH 1. Work 5 DC into the chain space. Repeat twice. In the last chain space, complete the remaining pattern: 5 DC into the next chain space, CH 1 and DC, CH 2 and DC, CH 2 and DC, CH 2 and DC, CH 1, and SL ST into the second chain of the beginning chain.
Row 4: CH 3 (counts as the first DC), DC into the next stitch, leaving three DC unworked. Skip three DC in the next arch and work DC into DC, DC into DC, 2 DC into the CH-1 space, and DC into DC. Work 3 DC into the next CH space and DC into DC, 3 DC into the next CH space and DC into DC, 3 DC into the next CH space and DC into DC, 2 DC into the next CH space and DC into DC, DC into DC, leaving three DC unworked. Repeat twice. In the last arch, complete the remaining pattern: skip three DC in the next arch and work DC into DC, DC into DC, 2 DC into the CH space and DC into DC, 3 DC into the CH space and DC into DC, 3 DC into the CH space and DC into DC, 3 DC into the CH space and DC into DC, 2 DC into the CH space, and SL ST into the second chain of the beginning chain.
Row 5: CH 1 (counts as the first SC) and SC into the same stitch. CH 5 and insert the hook into the second stitch of the next arch. CH 5, skip three stitches, and SC into the fourth stitch. CH 5, skip three stitches, and SC into the fourth stitch. For the corner, CH 7, skip one stitch, and SC into the next stitch. Continue the pattern: repeat CH 5, skip three stitches, and SC into the fourth stitch five times, then work the corner: CH 7, skip one stitch, and SC into the next stitch. Finish the row with SL ST into the beginning chain. Fasten off and weave in the ends.
Crochet 12 granny squares for the front panel and 12 granny squares for the back panel.
Joining the Granny Squares
Join the squares with the right side facing you. Insert the hook into the center of the largest corner chain space. CH 1 and SC into the same space. CH 3, take the next square, insert the hook from underneath into the center of its longest corner chain space, and work SC. CH 3, insert the hook into the chain space of the first square, and work SC. CH 3, insert the hook into the chain space of the second square, and work SC. Continue joining the squares in a zigzag pattern, alternating between the two squares. Insert the hook from above on one square and from underneath on the opposite square.
At the end of the row, insert the hook into the center of the corner chain space and work SC, CH 3, and SC into the center of the second square’s corner chain space. Pull the yarn through, fasten off, and weave in the ends. Join four granny squares into a strip. Make three strips in total.
Joining the Strips
Work with the right side facing you. Insert the hook into the center of the largest corner chain space. CH 1 and SC into the same space. CH 3 and insert the hook into the center of the longest corner chain space on the second strip. Continue joining the strips using the same zigzag technique as when joining individual squares. Join all three strips together to form one panel. Fasten off and weave in the ends.
Crocheting the Panel Border, 3 mm Hook
Row 1: Attach the yarn at the center of the upper long corner on the right side. CH 1 and SC into the chain space. Continue with CH 5 and SC into the next chain space. At the panel corners, work SC into the chain space. Finish the row in the middle of a chain space by working CH 2 and DC into the beginning chain. Mark the corners with stitch markers.
Row 2: CH 1 and SC into the chain space. At the corner, CH 7 and SC into the chain space. The pattern consists of CH 5 and SC into the next chain space. At each corner, work a CH-7 space. Finish the row with CH 5 and SL ST into the beginning chain. Mark the corners with stitch markers.
Row 3: CH 1 and SC into the CH-7 space. Continue the pattern with CH 5 and SC into the next chain space. Finish the row with the final chain arch and SL ST. Mark the corners with stitch markers.
Note: You can crochet as many border rows as necessary to achieve the desired panel width and prevent the sweater from being too tight. Depending on the number of border rows, adjust the width and number of rows used to shape the front and back necklines.
Shaping the Front Neckline, 3 mm Hook
Row 1: Work 4 loose SL ST to move to the panel corner. Begin with a shortened chain arch: CH 3 (counts as DC) and DC into SC (the second DC is optional), CH 2 to continue the pattern, and SC into the first chain space. Continue with CH 5 and SC into the next chain space (7 times). Finish with a shortened chain arch: CH 2 and DC into SC. Turn.
Row 2: Begin with a regular chain arch: CH 1 (counts as SC), SC into DC, CH 5, and SC into the next chain space. Finish the row with SC into DC. Turn. (8 chain arches)
Rows 3–7: Repeat Rows 1 and 2 alternately. Fasten off.
To crochet the opposite side, attach the yarn at the neckline in the eighth SC from the edge.
Row 1: Begin with a shortened chain arch, working from the neckline toward the outer edge. CH 3 (counts as DC) and DC into SC (the second DC is optional), CH 2 to continue the pattern, and SC into the first chain space. Continue with CH 5 and SC into the next chain space (7 times). Finish with a shortened chain arch: CH 2 and DC into SC, followed by an additional DC into SC if desired. Turn.
Row 2: Begin with a regular chain arch: CH 1 (counts as SC), SC into DC, CH 5, and SC into the next chain space. Finish with SC into DC. Turn. (8 chain arches)
Rows 3–7: Repeat Rows 1 and 2 alternately.
Shaping the Back Neckline and Joining the Shoulders, 3 mm Hook
Row 1: Work 3 SL ST to move to the center of the corner chain space. Crochet across the entire back panel. Begin with a shortened chain arch: CH 3 (counts as DC) and DC into SC (the second DC is optional), CH 2 to continue the pattern, and SC into the first chain space. Continue with CH 5 and SC into the next chain space. Finish with a shortened chain arch: CH 2 and DC into SC. Turn.
Row 2: Begin with a regular chain arch: CH 1 (counts as SC), SC into DC, CH 5, and SC into the next chain space. Finish with SC into DC. Turn.
Rows 3–5: Repeat Rows 1 and 2 alternately.
Row 6: Place a stitch marker in the eighth SC from the edge. Begin with a regular chain arch: CH 1 (counts as SC), SC into DC, CH 5, and SC into the next chain space. Crochet 8 chain arches. Finish with a shortened chain arch: CH 2 and DC into SC. Turn.
Row 7: Work a regular chain arch: CH 1 (counts as SC), SC into DC (optional), CH 5, and SC into the next chain space. Finish with a shortened chain arch: CH 2 and DC into SC.
Do not fasten off. Take the front panel and join both panels together at the shoulder, working with the right sides facing you. CH 1, insert the hook into the DC on the opposite panel, and work SC. Continue with CH 2 and SC into the chain space on the first panel, CH 2 and SC into the chain space on the opposite panel. Work in a zigzag pattern, alternating CH 2 and SC into the chain spaces on both panels. Finish with CH 1 and SL ST into the beginning chain. Fasten off. To crochet the opposite shoulder, attach the yarn at the neckline in the eighth SC from the edge and repeat the process. Do not fasten off after completing the final row; continue directly with joining the shoulder.
Joining the Side Seams, 3 mm Hook
Starting from the bottom corner, count 14 chain arches upward and place stitch markers on both panels. Join the panels with the right sides facing you. Attach the yarn in the center of the bottom chain space on one panel. CH 1 and SC into the beginning chain space. CH 1 and SC into the SC at the bottom corner of the opposite panel. Continue with CH 2 (or CH 3) and SC into the chain space on the first panel, then CH 2 (or CH 3) and SC into the chain space on the second panel. Continue joining in a zigzag pattern until you reach the stitch markers. Do not fasten off. Continue directly with crocheting the sleeve.
Sleeve, 3 mm Hook
Round 1: Once you reach the armhole, continue directly with the sleeve pattern. The sleeve is worked in continuous rounds without joining or decreasing. CH 4 for the first chain arch and SC into the chain space. Continue with CH 5 and SC into the next chain space. Where the front and back neckline shaping was worked, make SC into the joined seams at the points corresponding to the rows where SC stitches were crocheted. Then return to the regular pattern of SC into the chain space and CH 5. Make sure the sleeve does not ripple or become too tight. I recommend counting the chain arches (approximately 21) to ensure both sleeves have the same number. Finish the first round with CH 5 and SC into the next chain space. Continue working in continuous rounds.
Rounds 2–40: Continue the pattern of CH 5 and SC into the next chain space. At the end of the last round, work CH 2 and SL ST into SC to finish working in continuous rounds.
Sleeve Cuff, 3 mm Hook
Round 1: CH 1 (counts as SC). Work Herringbone Single Crochet (HSC), alternating 3 HSC into the chain space and HSC into SC, then 2 HSC into the chain space and HSC into SC. Adjust the stitch distribution depending on how narrow or wide you want the sleeve cuff to be. Finish the round with SL ST.
Rounds 2–3: CH 1 (counts as SC). Work HSC in the back loop only (BLO). Finish each round with SL ST.
Neckline Border, 3 mm Hook
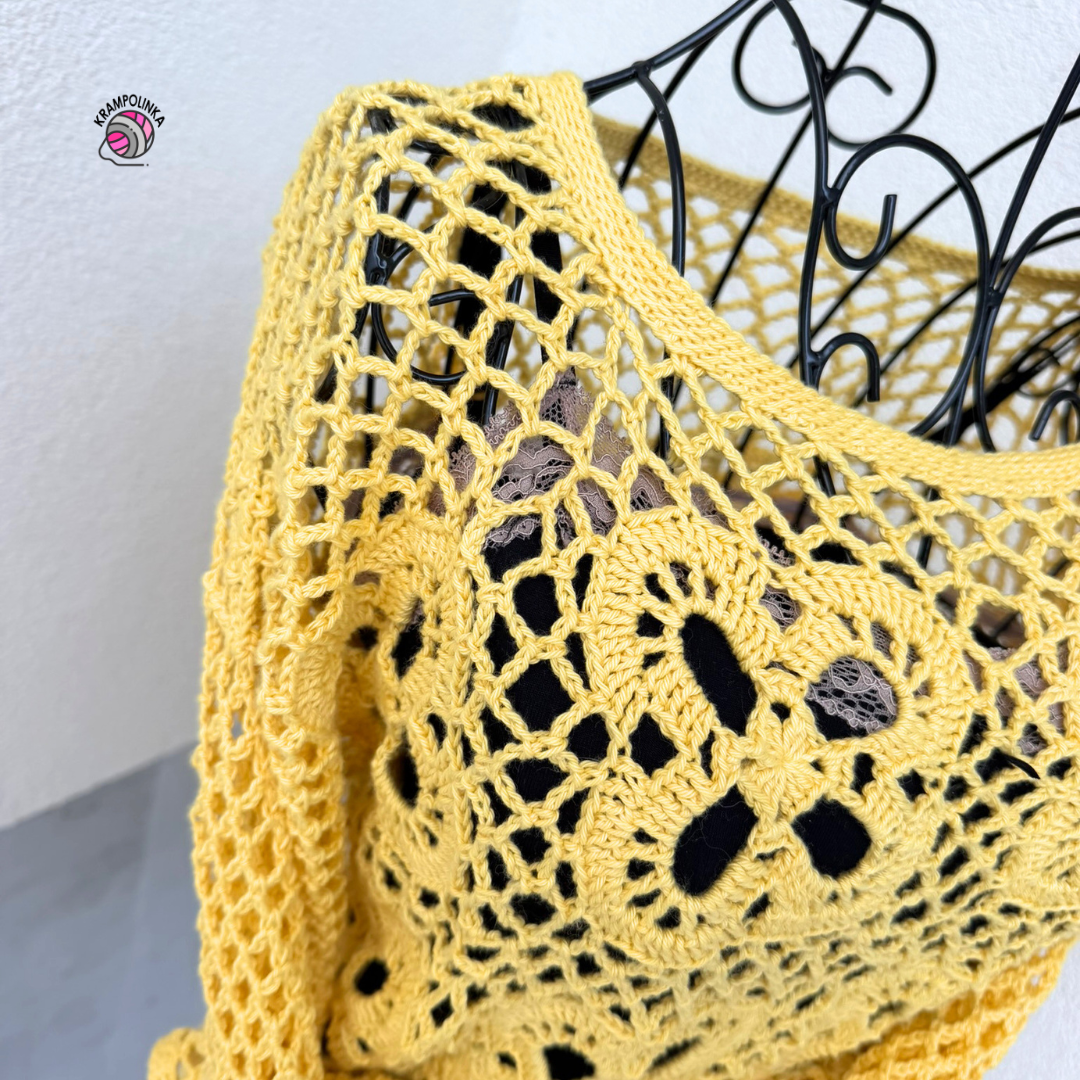
Round 1: Attach the yarn to the back panel and work on the right side. CH 1, work 3 HSC into the chain space and HSC into SC. If you need to make the neckline tighter, alternate between 3 HSC and 2 HSC in the chain spaces. Where the front and back neckline shaping was worked, crochet HSC into the edge SC and 2 HSC into the edge DC. Finish the round with SL ST.
Note: The neckline will become firmer and slightly smaller as you crochet the following rounds.
Rounds 2–3: CH 1 (counts as SC). Work HSC in the back loop only (BLO). Finish each round with SL ST.
Bottom Hem, 3 mm Hook
Round 1: Attach the yarn at the side seam and work on the right side. CH 1 (counts as SC). Work 4 HSC into the chain space and HSC into SC. If the edge becomes wavy, adjust the stitch distribution. Finish the round with SL ST.
Rounds 2–4: CH 1 (counts as SC). Work HSC in the back loop only (BLO). Finish each round with SL ST.
FINISHING
Weave in all loose yarn ends. Sew a decorative label onto the bottom hem.


No Comments