
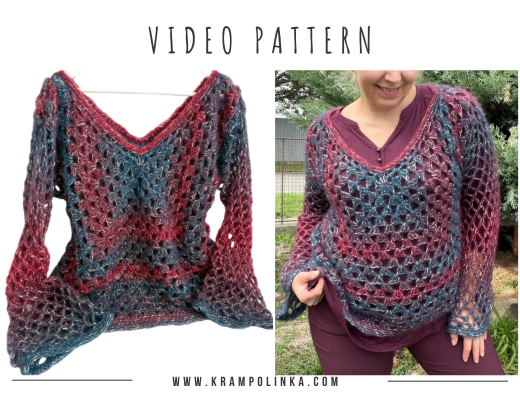
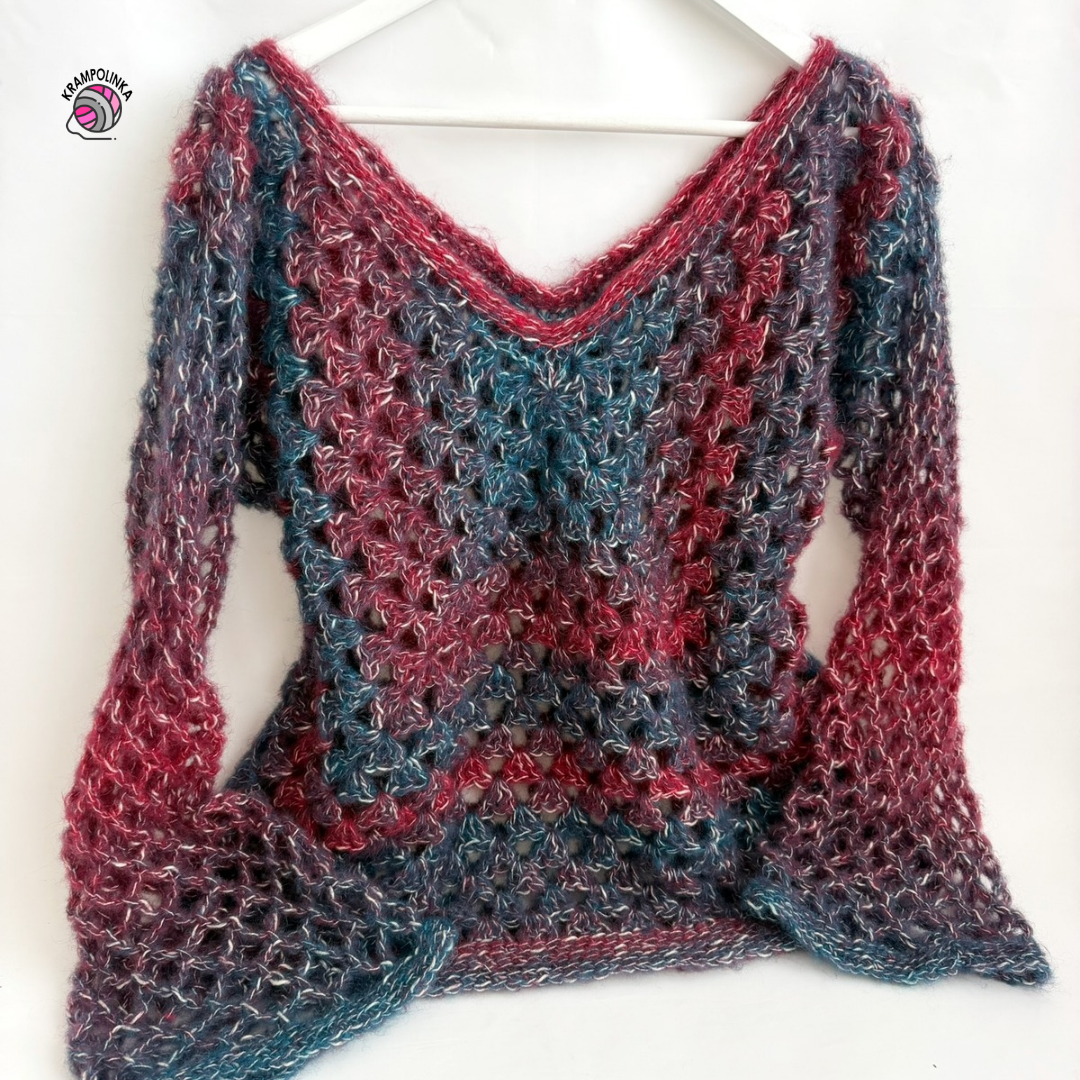
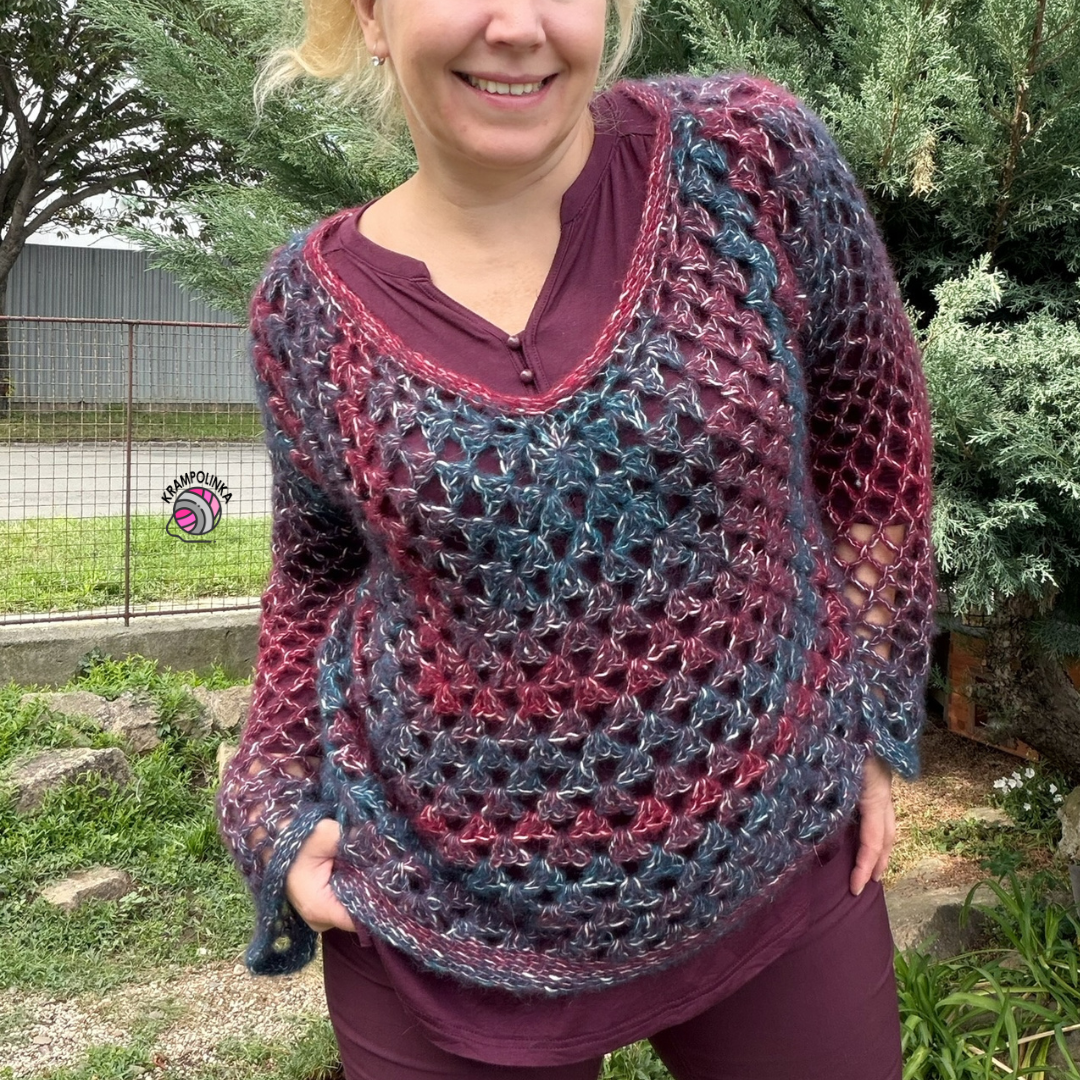
When I unwrapped the new Italian yarn Adriafil Zucchero, I immediately knew I wanted to crochet something wearable. At first, I considered making a vest, a sweater, or a sweater dress, but in the end, I decided on a sweater with a V-neckline and wide bell sleeves. The biggest surprise was how quickly it worked up. I managed to crochet the entire sweater in just one day, using less than four balls of yarn for approximately EU size 42.
Adriafil Zucchero comes in 50 g / 175 m balls and is made of 50% cotton, 32% wool, and 18% alpaca. The yarn is lightweight, fluffy, soft, and pleasant to the touch. It is available in both solid and variegated shades, with some colors featuring an interesting two-tone effect. Zucchero is particularly suitable for sweaters, vests, tunics, sweater dresses, scarves, and other lightweight accessories for autumn through spring. For my sweater in approximately EU size 42, I used less than four balls of yarn. A vest may require around three balls, while a longer tunic or sweater dress may need approximately six to eight balls, depending on the size and length.
We unboxed this yarn in a package from the online yarn shop Klubíčka od srdíčka during episode 134 of the Povídání u klubíčka podcast, and you can read the accompanying article here. The Italian brand Adriafil offers a wide range of beautiful natural and blended yarns.
The Story Behind the Sweater
When I first picked up the yarn, I was immediately impressed by how lightweight and fluffy it felt. That’s why I chose a 7 mm crochet hook and returned to a construction technique I had already used for last year’s Amber Vest and this year’s Medusa Vest. At first, I wasn’t sure whether I would make a vest, a sweater, or a sweater dress. Then I liked a suggestion from one of you on YouTube: start with a sweater and use any leftover yarn for another project. The result is a simple, quick-to-make, and airy crochet sweater that looks especially eye-catching and stylish thanks to the unique texture of the yarn.
CZECH PATTERN HERE.
VIDEO TUTORIAL PREMIERE – PART I – Crocheting the Front and Back Panels, Shaping the Neckline, and Joining the Pieces
VIDEO TUTORIAL PREMIERE – PART II – Edging the Neckline, Crocheting the Sleeves, and Adding the Bottom Hem of the Sweater
Sweater Construction
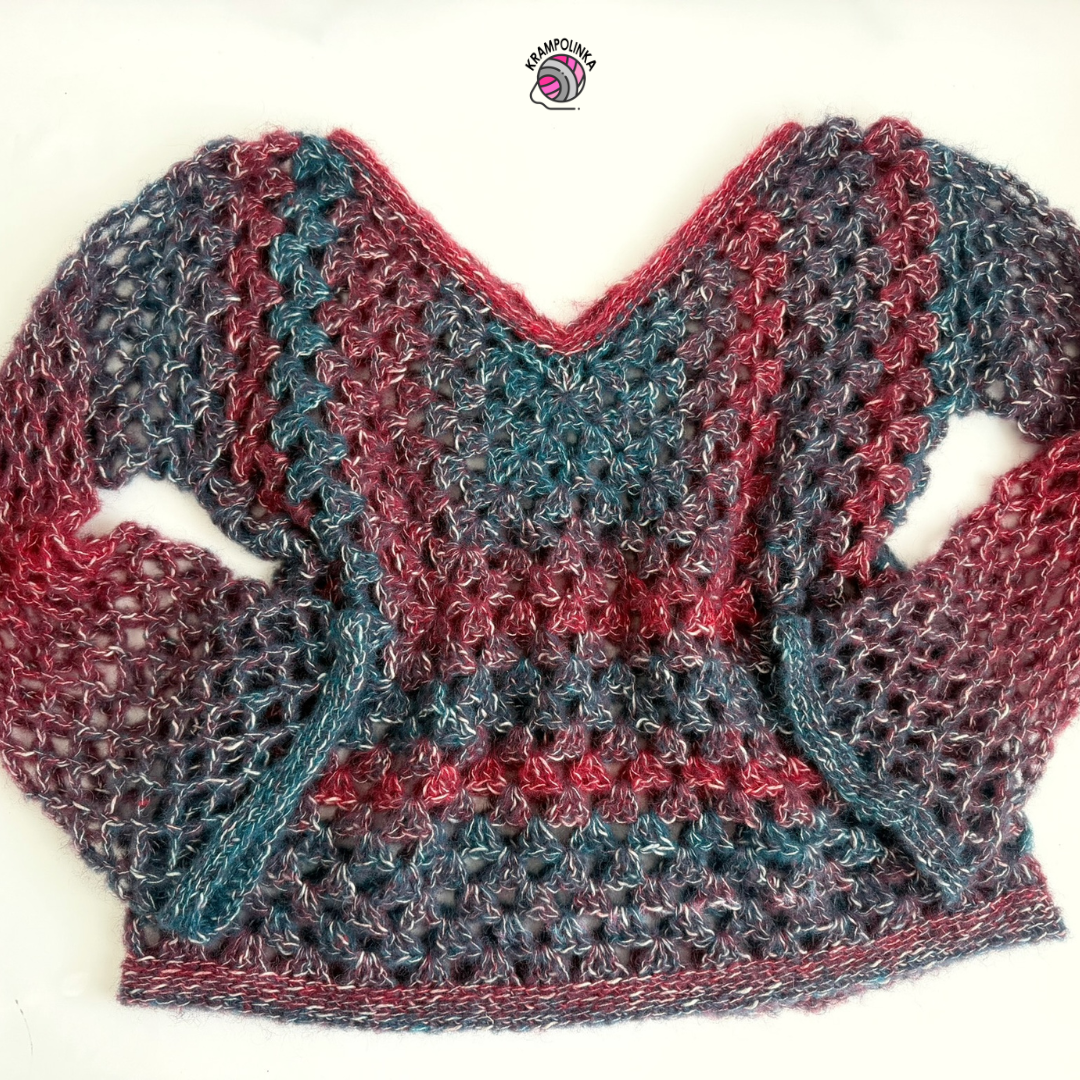
The sweater consists of two panels. We start from the center and crochet an incomplete granny square. We work back and forth in rows while shaping the V-neckline. Once the neckline is deep enough, we continue crocheting straight to create the shoulder section. We crochet as many rows as needed until the panel reaches the desired width. The second panel is made in the same way. If you prefer not to have a V-neckline on the back, you can crochet the back panel as a traditional granny square. Next, we join both panels at the shoulders and sides, crochet the sweater to the desired length, add the sleeves, and finish with the edgings.
Stitch Pattern
The main panels are crocheted using the granny stitch pattern, alternating groups of three double crochet stitches (US terms) and chain stitches. The sleeves are crocheted directly into the armholes using an open mesh stitch pattern made of chain stitches and single crochet stitches. We do not decrease the sleeves along their length, creating a wide, bell-shaped silhouette. Finally, we finish the sweater with a herringbone single crochet edging. The main advantage of this construction is its simplicity and flexibility. You can easily adjust the fit, length, and overall size to suit your body shape and the amount of yarn you have available.
How to Adjust the Size
The size of the sweater is mainly adjusted by changing the number of rows in the main panels. The more rows you crochet, the wider the front and back panels will become. While crocheting, I recommend regularly holding the panel against your body or comparing it with your favorite sweater to check the width from one side to the other. You can adjust the depth of the neckline by deciding when to stop shaping the V-neck and start crocheting the straight shoulder section.
After joining the panels, you can also adjust the length of the sweater by adding or removing rows at the bottom. The sleeve length can be adjusted in the same way. If you prefer a loose, oversized fit, add more rows to the main panels. For a more fitted sweater, stop increasing the width earlier.
How to Style the Sweater
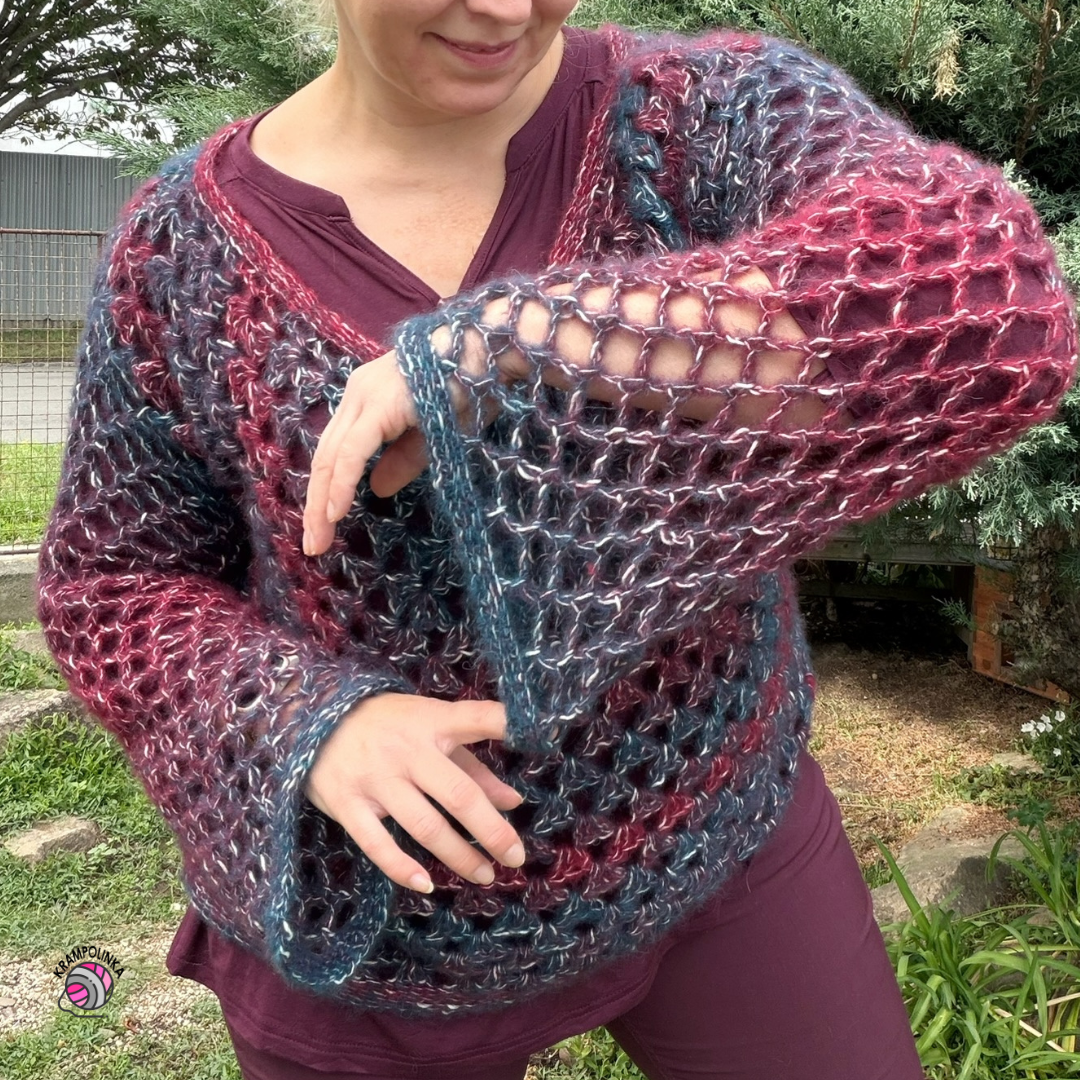
With its relaxed fit, V-neckline, and wide sleeves, the Zucchero Sweater is a statement piece on its own. It looks especially beautiful when paired with simple trousers, jeans, or a fitted skirt. You can wear it over a tank top, a long-sleeved T-shirt, or a lightweight turtleneck. On warmer days, it works perfectly as a light outer layer, while in autumn and spring, it pairs beautifully with high-waisted trousers or skirts. If you crochet the sweater a little longer, you can also wear it as a tunic. A shorter version looks lovely with dresses or high-waisted trousers.
I hope you enjoy crocheting your Zucchero Sweater! If you would like to inspire others or share your crochet experience and styling ideas, I would love to see photos of your finished creations. You can share your photos in the Krampolinka Facebook group. On Instagram, please use the hashtag #svetrikzucchero so others can easily find your projects. If you tag me in your creations made using my patterns, I can reshare them in my Instagram Stories to inspire others.4
ZUCCHERO CROCHET SWEATER
Yarn: Adriafil Zucchero, available at KlubickaodSrdicka.cz
Yarn required: 4 balls, color 86 – Burgundy and Petrol Blue Ombre
Crochet hook: 7 mm
Measurements: 57 cm wide, 59 cm long, sleeve length 50 cm
Other supplies: Large-eye yarn needle, sewing needle and matching thread, decorative label
Time required: 12 hours
Skill level: Beginner-friendly
Crochet Abbreviations (US Terms)
MR – Magic Ring
CH – Chain
SC – Single Crochet
DC – Double Crochet
HSC – Herringbone Single Crochet
SL ST – Slip Stitch
FRONT AND BACK PANELS, 7 mm crochet hook
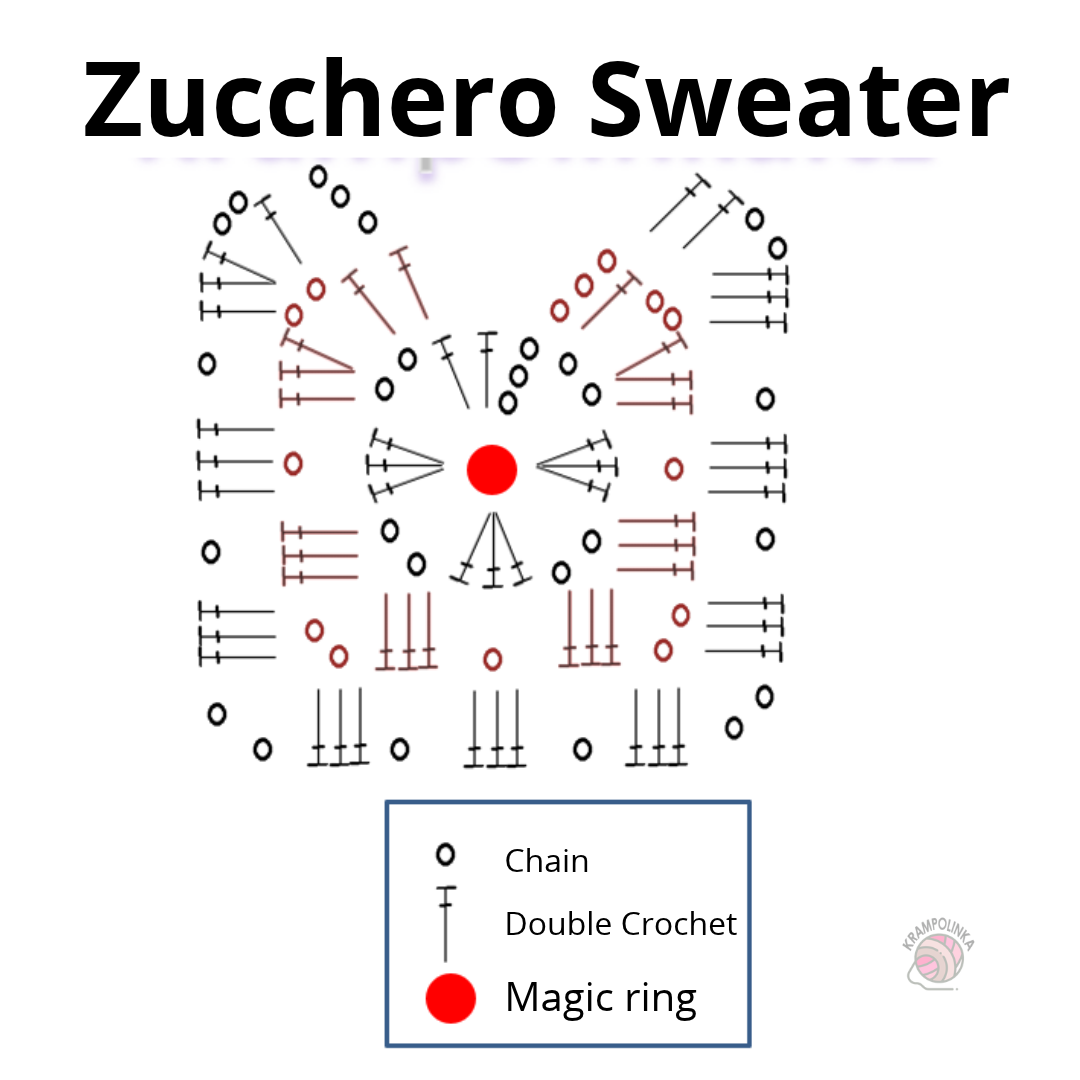
Row 1: Into a MR, crochet CH 3 (counts as DC), 2 DC, CH 3 for the corner (4 times). Finish the row with a SL ST. Turn.
Row 2: CH 3 (counts as DC), into the corner chain space crochet DC-CH 2-3 DC. CH 1, and into the next corner crochet 3 DC-CH 2-3 DC (repeat along three sides). At the end of the row, crochet 3 DC-CH 2-DC into the last corner and finish with a DC into the DC. Turn.
Row 3: CH 3 (counts as DC), into the corner chain space crochet DC-CH 2-3 DC. The pattern consists of CH 1, 3 DC into the chain space, CH 1. In each corner, crochet 3 DC-CH 2-3 DC. Repeat the pattern along three sides. At the end of the row, crochet 3 DC-CH 2-DC into the last corner chain space and DC into the DC. Turn.
Row 4: CH 3 (counts as DC), into the corner chain space crochet DC-CH 2-3 DC. The pattern consists of CH 1, 3 DC into the chain space, CH 1, 3 DC into the chain space, CH 1. In each corner, crochet 3 DC-CH 2-3 DC. Repeat the pattern along three sides. At the end of the row, crochet 3 DC-CH 2-DC into the last corner and finish with a DC into the DC. Turn.
Rows 5–11: Repeat Row 4.
Note: The panel measures approximately 44 cm wide. If this width is sufficient, you can skip the straight shoulder sections.
STRAIGHT SHOULDER SECTIONS, 7 mm crochet hook
Row 12: Using SL ST, move to the center of the chain space. CH 3 (counts as DC), 2 DC into the chain space. The pattern consists of CH 1 and 3 DC into the chain space. In each corner, crochet 3 DC-CH 2-3 DC. Repeat the pattern along three sides. At the end of the row, crochet 2 DC into the chain space and DC into the CH. Turn.
Row 13: CH 3 (counts as DC), CH 1 to continue the pattern. The pattern consists of 3 DC into the chain space, CH 1. In each corner, crochet 3 DC-CH 2-3 DC. Repeat the pattern along three sides. At the end of the row, crochet 3 DC into the chain space, CH 2, and DC into the top of the turning chain. Turn.
Rows 14–15: Repeat Rows 12 and 13. Fasten off.
Note: The panel measures approximately 57 cm wide. If you need a wider or narrower panel, adjust the number of rows accordingly.
Row 16: Join the yarn at the bottom corner of the panel. CH 3 (counts as a DC), then crochet 2 DC into the corner chain space, CH 1, and 3 DC into the chain space. Work only along the bottom edge of the panel. At the end of the row, crochet 2 DC into the corner chain space and DC into the CH. Turn.
Row 17: CH 3 (counts as DC), CH 1 to continue the pattern. Crochet 3 DC into the chain space, CH 1. Repeat to the end of the row. Finish with CH 1 and DC into the top of the turning chain. Do not fasten off. Use the remaining yarn to join the side seams of the panels.
Note: You can also adjust the front length by crocheting additional rows along the bottom edge after joining the side seams.
JOINING THE SIDE SEAMS, 7 mm crochet hook
Join the panels on the wrong side using SL ST. Start at the bottom edge and join both panels together with slip stitches. Insert the hook through the stitches of both panels and crochet 2 SL ST along each horizontal row edge, then SL ST into each DC (3 times), followed by SL ST into the chain space. Leave 6 pattern repeats unjoined for the armhole. Do not fasten off and continue crocheting the sleeves.
JOINING THE SHOULDERS, 7 mm crochet hook
Join the panels on the wrong side using SL ST. Join both panels together with slip stitches, working 2 SL ST along each horizontal row edge. Insert the hook through the edge stitches of both panels. Fasten off on one side. On the other side, do not fasten off and continue with the neckline edging.
NECKLINE EDGING, 7 mm crochet hook
Round 1: CH 1 (counts as SC), insert the hook through the stitch and into the chain space, yarn over and pull through the stitch (as for a SL ST), then yarn over and complete the SC. Work HSC, making 2 HSC into the edge stitches of each horizontal row. Finish the round with a SL ST.
Round 2: CH 1 (counts as SC), insert the hook through the back loop of the stitch, yarn over and pull through the loop (as for a SL ST). Continue working HSC in the back loop only. Finish the round with a SL ST. Fasten off.
SLEEVES, 7 mm crochet hook
Round 1: CH 1 (counts as SC), SC into the seam. Crochet CH 3 and SC into the chain space between the DC stitches. The pattern consists of CH 4 and SC into the space between the DC groups. At the end of the round, crochet CH 2 and SC into the first chain space. Continue working in continuous spiral rounds without joining.
Rounds 2–25: Crochet SC into each chain space and CH 4.
Round 26: Crochet SC into each chain space and CH 4. At the end of the round, crochet CH 2 and SL ST into the chain space to finish working in the spiral.
Note: Adjust the sleeve length to fit your arm, approximately 49 cm.
SLEEVE EDGING, 7 mm crochet hook
Round 1: To edge the bell sleeve, crochet CH 1 (counts as SC), insert the hook through the stitch and into the chain space, yarn over and pull through the stitch (as for a SL ST), then yarn over and complete the SC. For HSC, insert the hook through the bottom loop of the SC and into the chain space, yarn over and pull through the stitch (as for a SL ST), then yarn over and complete the SC. Crochet 4 HSC into each chain space and HSC into each SC. Finish the round with a SL ST.
TIP: If you prefer a classic ribbed cuff, crochet only CH 2 instead of CH 4 in Round 26. In the first round of the edging, crochet 2 HSC into each chain space and HSC into each SC.
Round 2: CH 1 (counts as SC), insert the hook through the back loop of the stitch, yarn over and pull through the loop (as for a SL ST). Continue working HSC in the back loop only. Finish the round with a SL ST. Fasten off.
SWEATER LENGTH EXTENSION, 7 mm crochet hook
Round 1: Join the yarn into the corner chain space at the side seam. Crochet CH 3 and 2 DC into the corner chain space, CH 1. Continue crocheting around the bottom edge of the sweater, working 3 DC into each chain space and CH 1. Finish the round in the middle of the chain space by crocheting SC into the top of the turning chain. Turn.
Round 2: CH 3 and 2 DC into the chain space, CH 1. Continue the pattern of 3 DC into each chain space and CH 1. If you need to widen the sweater, crochet CH 2 instead of CH 1 between the DC groups. Finish the round with CH 1 and SL ST. Turn.
BOTTOM HEM EDGING, 7 mm crochet hook
Round 3: CH 1 (counts as SC), insert the hook through the stitch and into the chain space, yarn over and pull through the stitch (as for a SL ST), then yarn over and complete the SC. Crochet HSC into each DC (3 times) and HSC into the chain space. Finish the round with a SL ST.
Rounds 4–5: CH 1 (counts as SC), insert the hook through the back loop of the stitch, yarn over and pull through the loop (as for a SL ST). Continue working HSC in the back loop only. Finish each round with a SL ST. Fasten off after the last round.
FINISHING
Weave in all loose ends. Sew a decorative label onto the bottom hem.


No Comments