

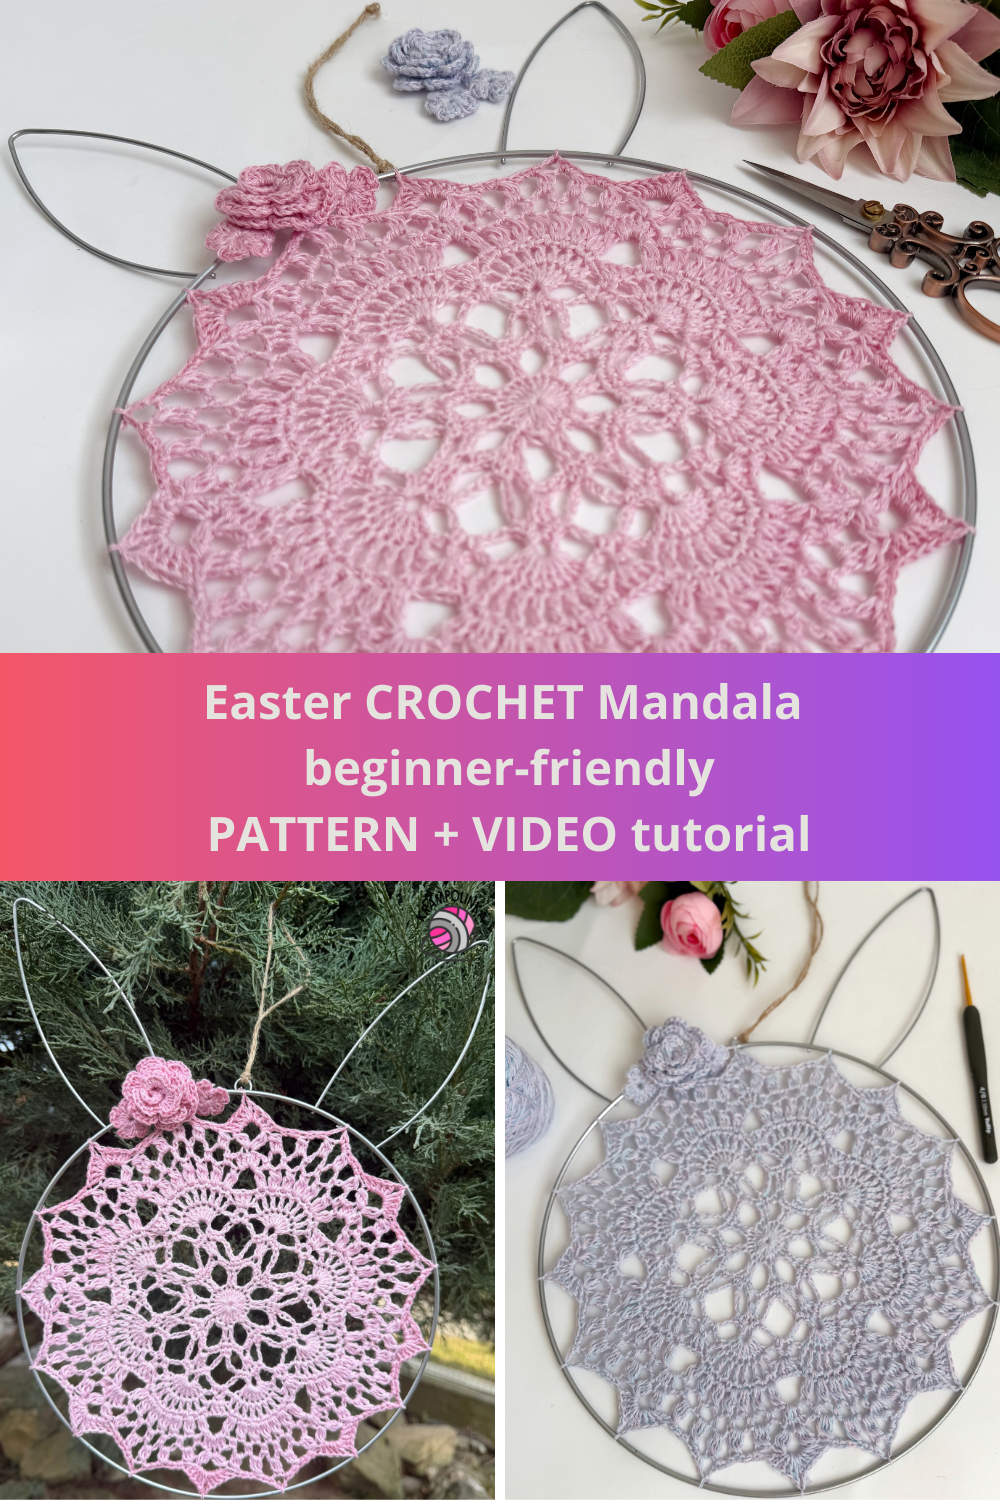
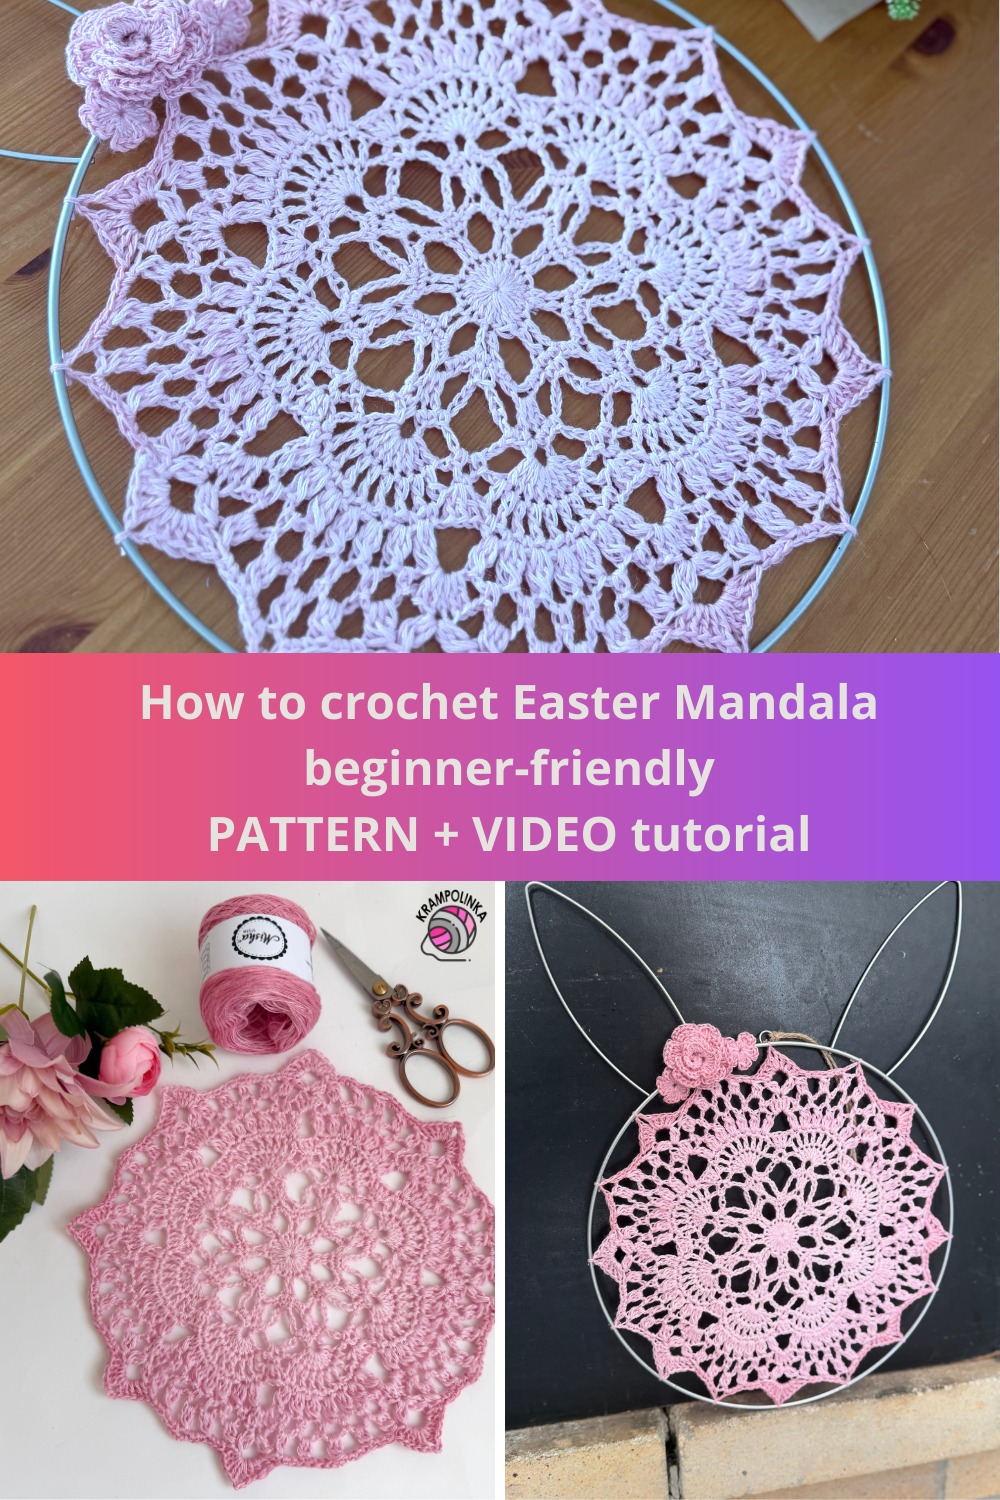
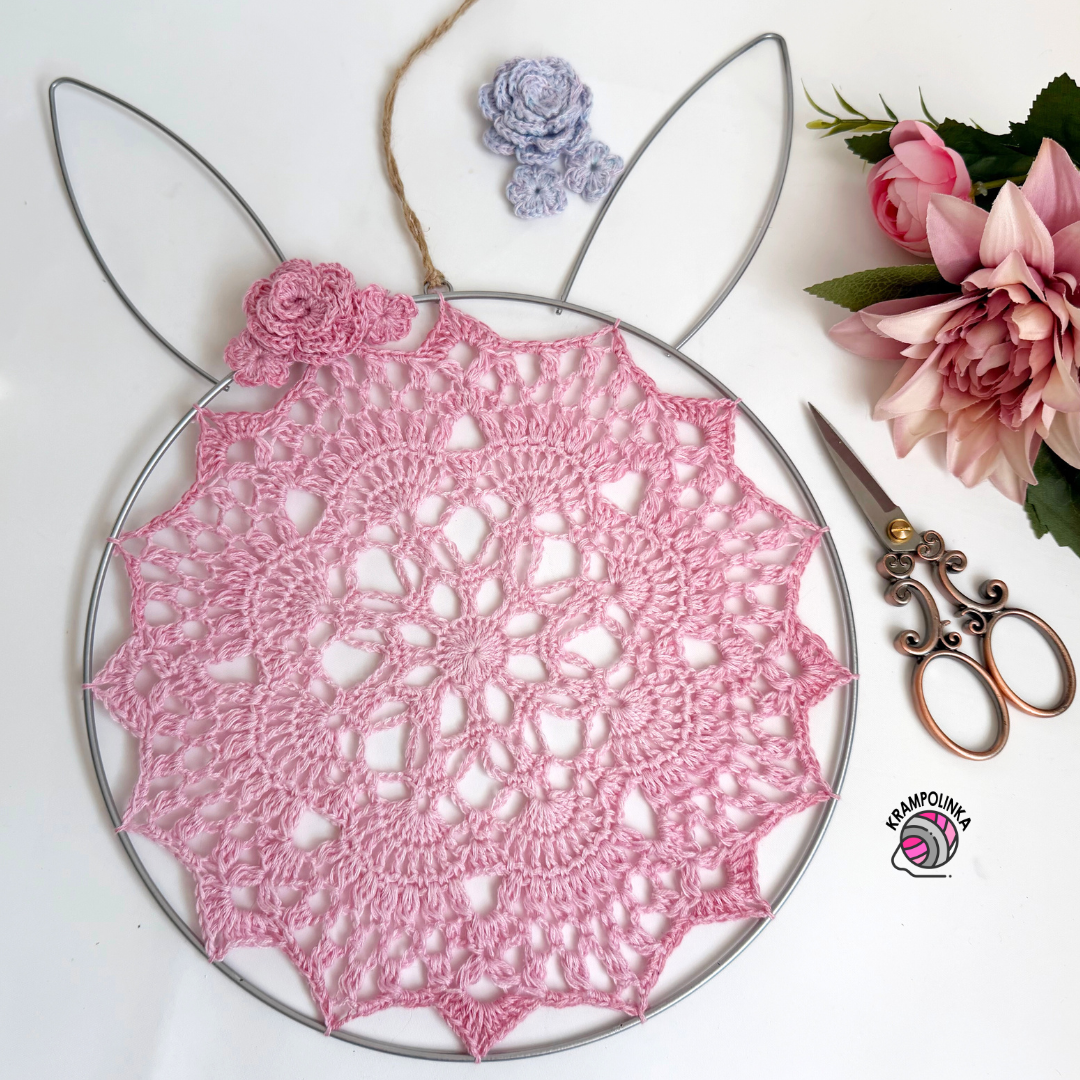
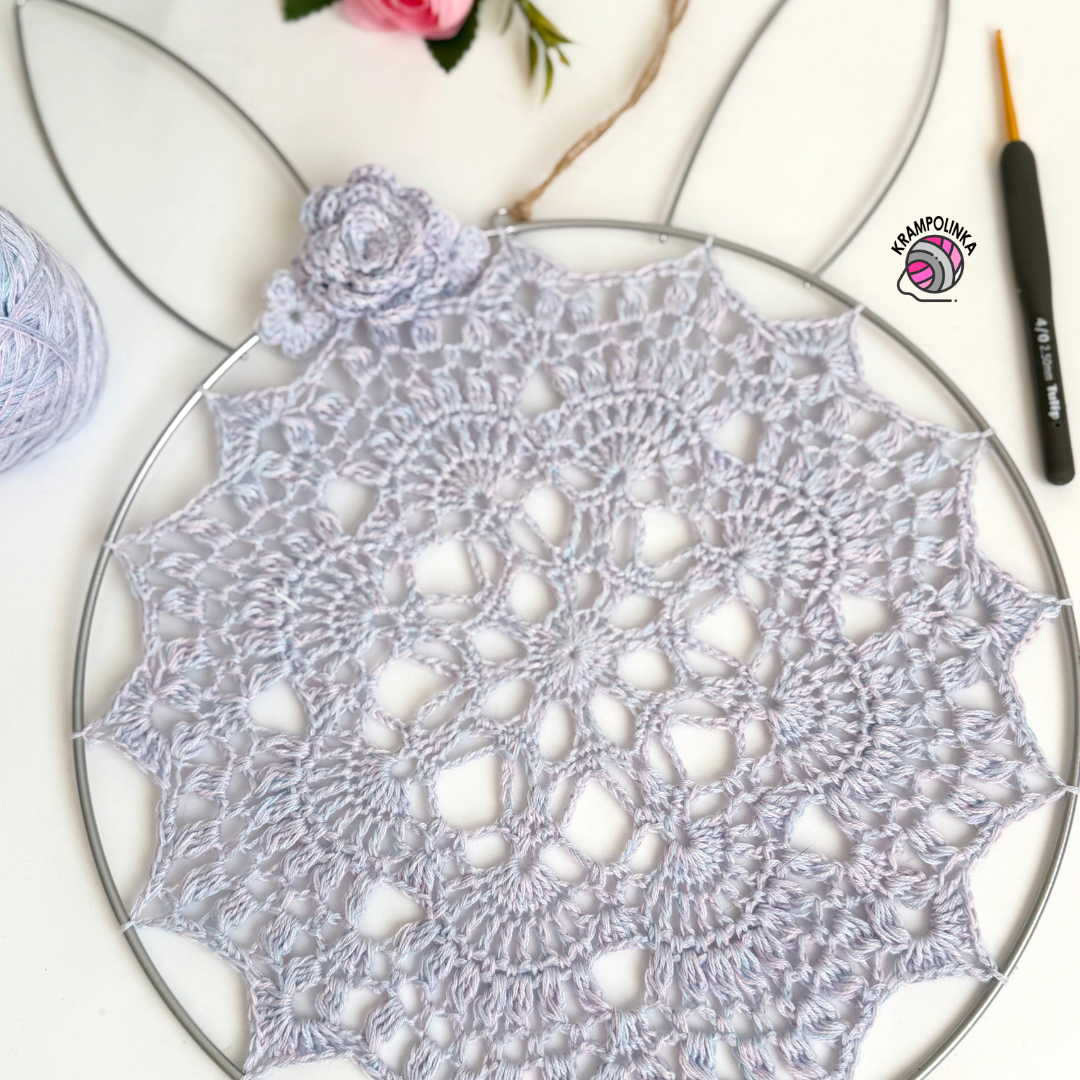
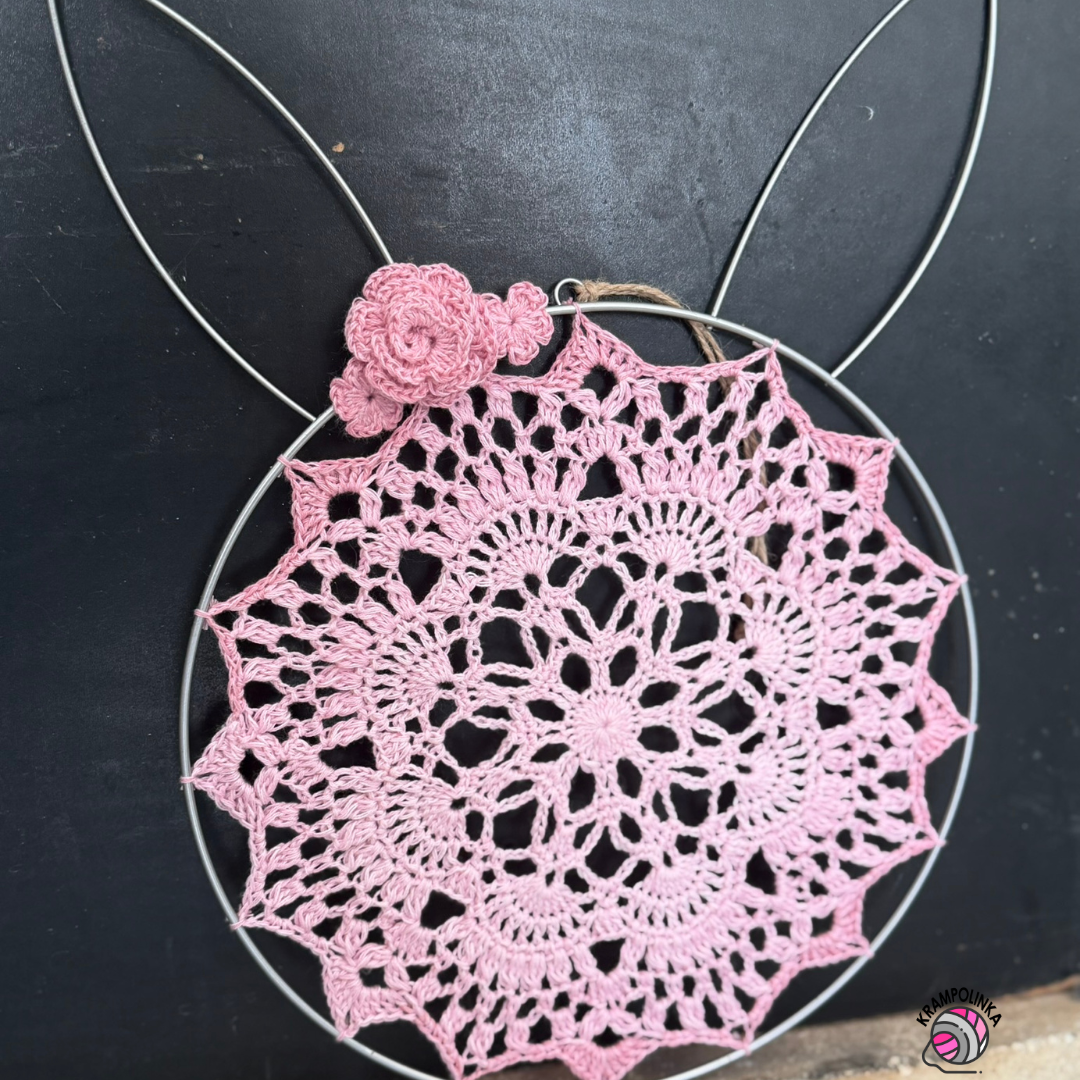
This Easter, I have prepared a crochet mandala tutorial for you that you can use in three different ways. Today we will crochet a mandala together and place it into a hoop shaped like an Easter bunny.
I bought the bunny-shaped hoop at the store Tedi. If you cannot find the same one, a classic dreamcatcher hoop with a diameter of approximately 25 cm will work just as well. For this project we will crochet with a new mini yarn cake from MishaStyle. It is a three-strand yarn made of 50% cotton and 50% acrylic with a length of 150 m. The yarn features soft color transitions, so even in a small project like this the natural shading stands out beautifully. These mini yarn cakes are also very practical – they easily fit into a handbag and are perfect for smaller projects. I am absolutely delighted with these mini skeins. They also make a lovely small gift for a colleague or simply a little treat for yourself.
From one mini cake you can crochet a small dreamcatcher mandala, a small table doily, one larger square, or for example a crocheted stiffened bowl. You can find the podcast about the yarn here and a preview of the MishaStyle yarn cake here.
-
- PIN for your Pinterest – Pattern for mandala
VIDEO TUTORIAL PREMIERE – March 10, 2026, at 7:00 PM. 🎥
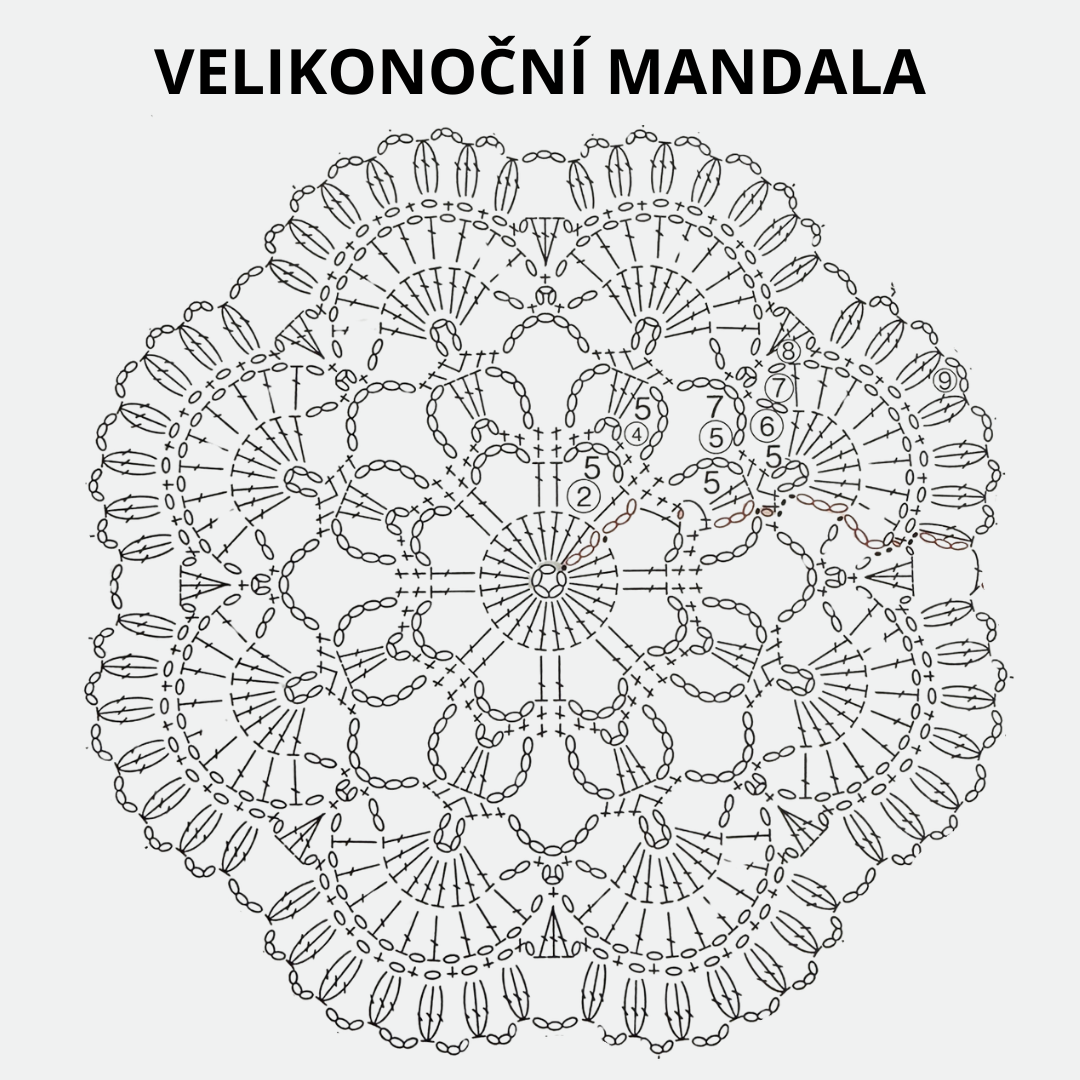
For crocheting the mandala, I used a Tulip hook size 2.5 mm. If you crochet more loosely, I recommend using a 2 mm hook instead. The mandala is crocheted from a magic ring and worked continuously in one direction. Each round is finished with a slip stitch or a suitable stitch so that the round ends approximately in the middle of the arch. The base of the mandala comes from the foreign book Motif and Doily, which I purchased on Aliexpress. However, I had to adjust the original chart and recalculate the pattern so that the final circle would have a diameter of approximately 23 cm.
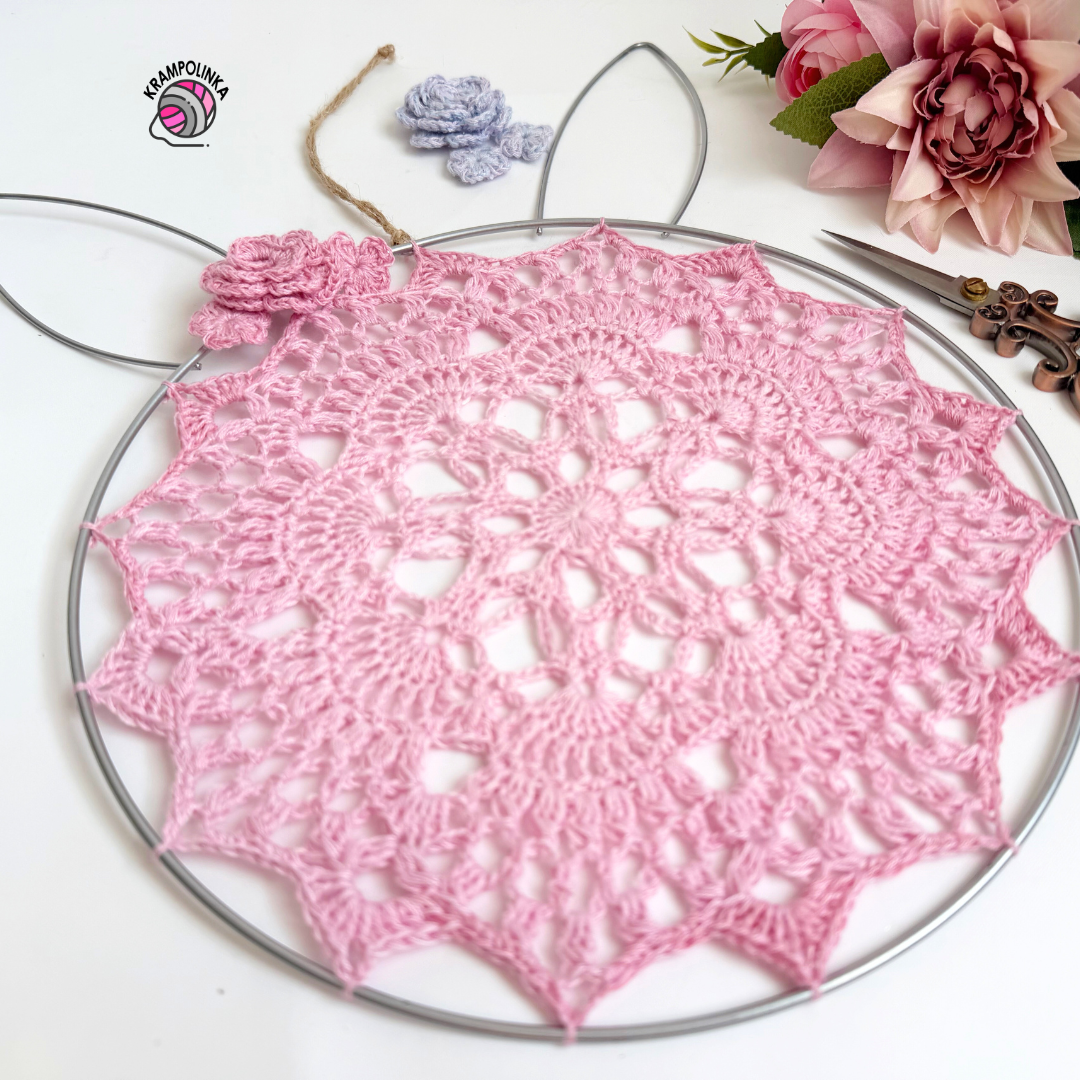
During crocheting, the mandala may slightly ripple or wave. Therefore, I recommend using the suggested material – a three-strand yarn with soft color transitions. The finished mandala was tied to the hoop. From the remaining yarn, we will crochet two types of small flowers. The first flower is a small one crocheted in just one round. The second, larger flower is crocheted in rows back and forth. It consists of a row of chain stitches, followed by a row of filet mesh, and finally a row of petals. In the last step, the strip is rolled into the shape of a flower and secured with stitching.
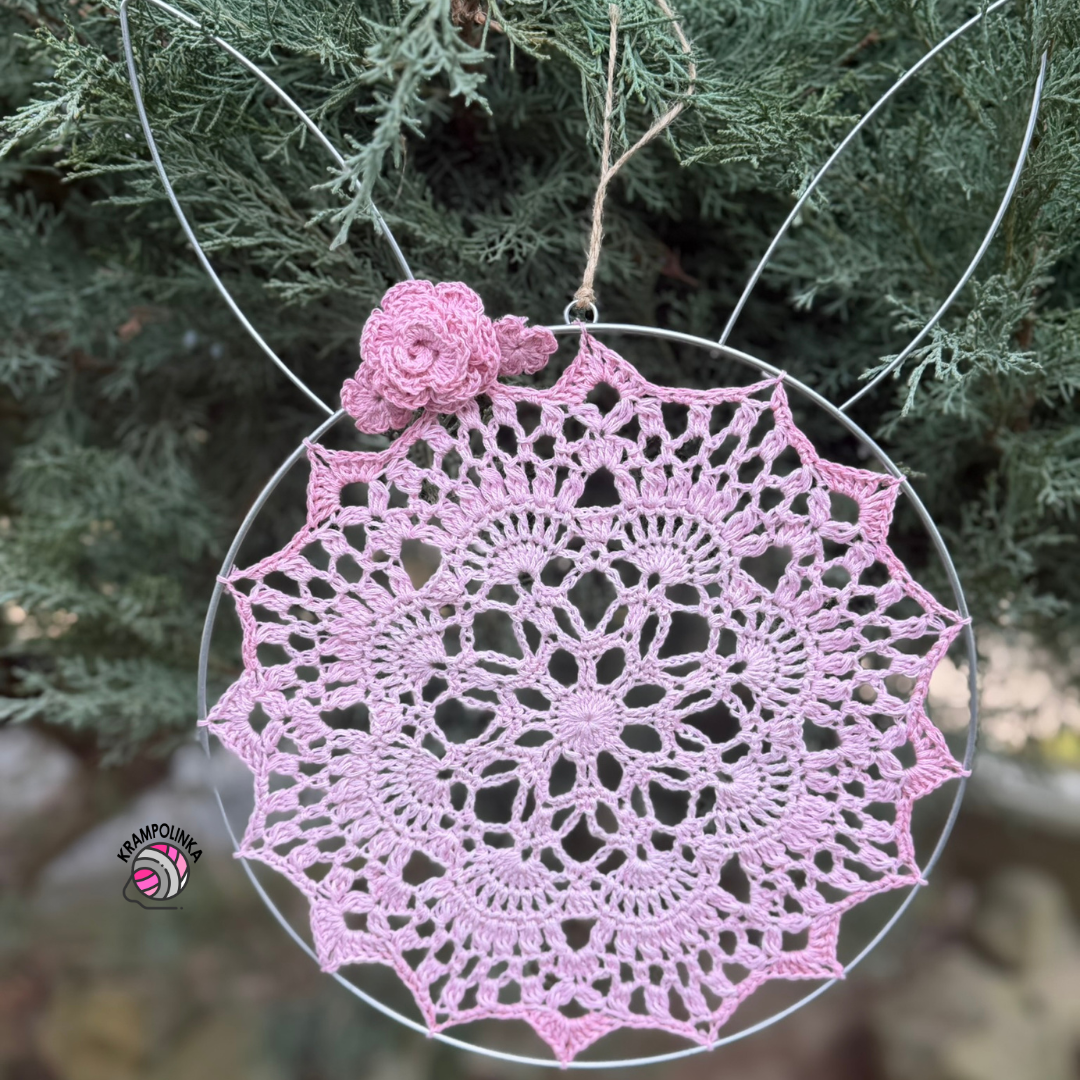
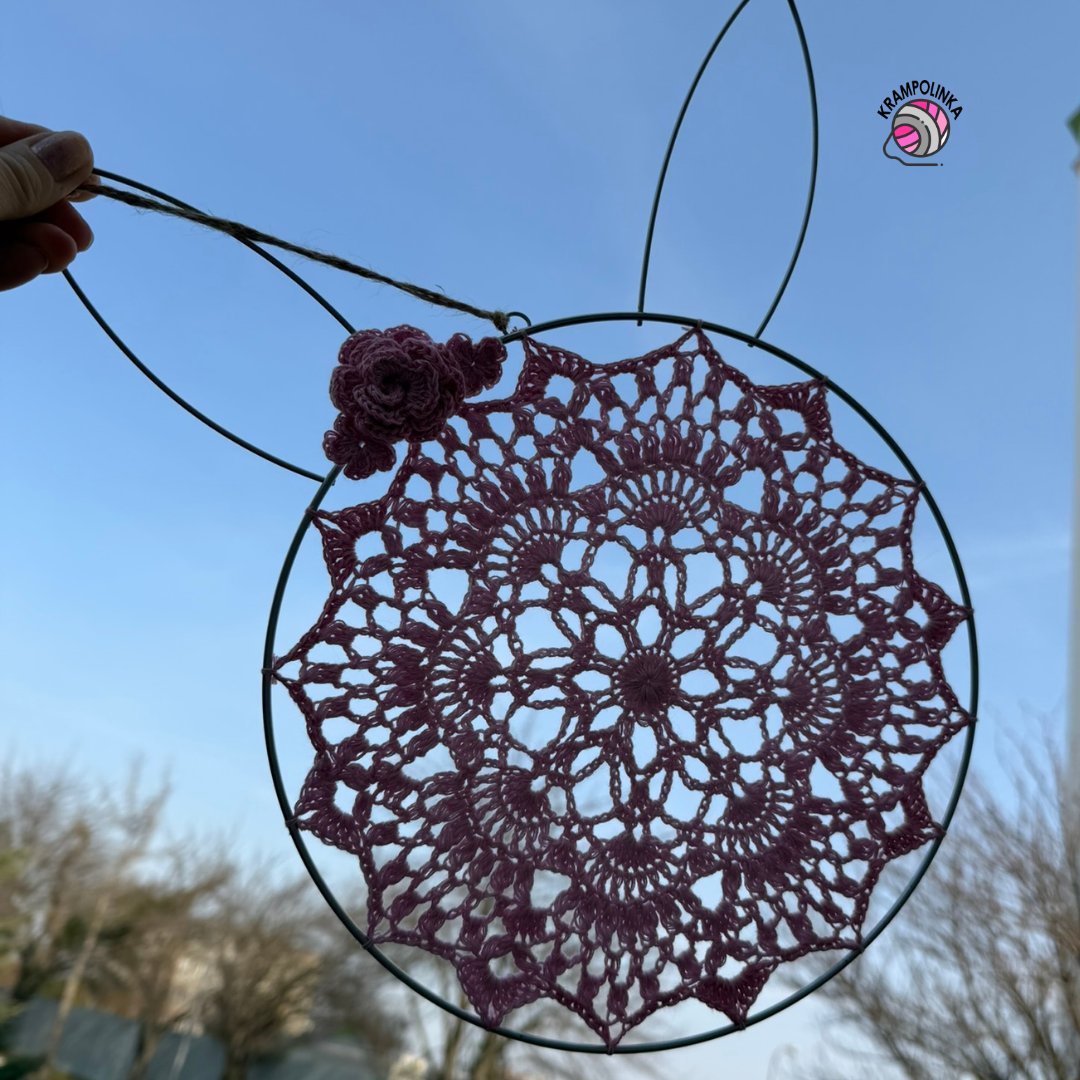
I tied the flowers to the hoop, but if you plan to crochet more flowers or add additional decorations such as a bow, I recommend attaching them with a hot glue gun. I displayed the finished Easter bunny mandala at home as a spring decoration. However, you can also hang it outside, for example on your front door, pergola, or anywhere this delicate crocheted decoration will complement your interior or exterior.
I hope your Easter Mandala turns out beautifully. If you would like to inspire others or share your experience with crocheting or styling Easter Mandala? You can share your photos in the Krampolinka Facebook group. On Instagram, please use the hashtag #velikonocnimandala so others can easily find your projects. If you tag me in your creations made using my patterns, I can reshare them in my Instagram Stories to inspire others.
EASTER MANDALA
Yarn: Mishanek by MishaStyle
Yarn consumption: 1 mini yarn cake, pink color
Hook: 2.5 mm or 2 mm Tulip (depending on your tension)
Size: Mandala diameter approx. 23 cm
Other tools: Yarn needle with a large eye, bunny-shaped hoop from Tedi (approx. 25 cm diameter)
Time required: approx. 2 hours
Skill level: Beginner
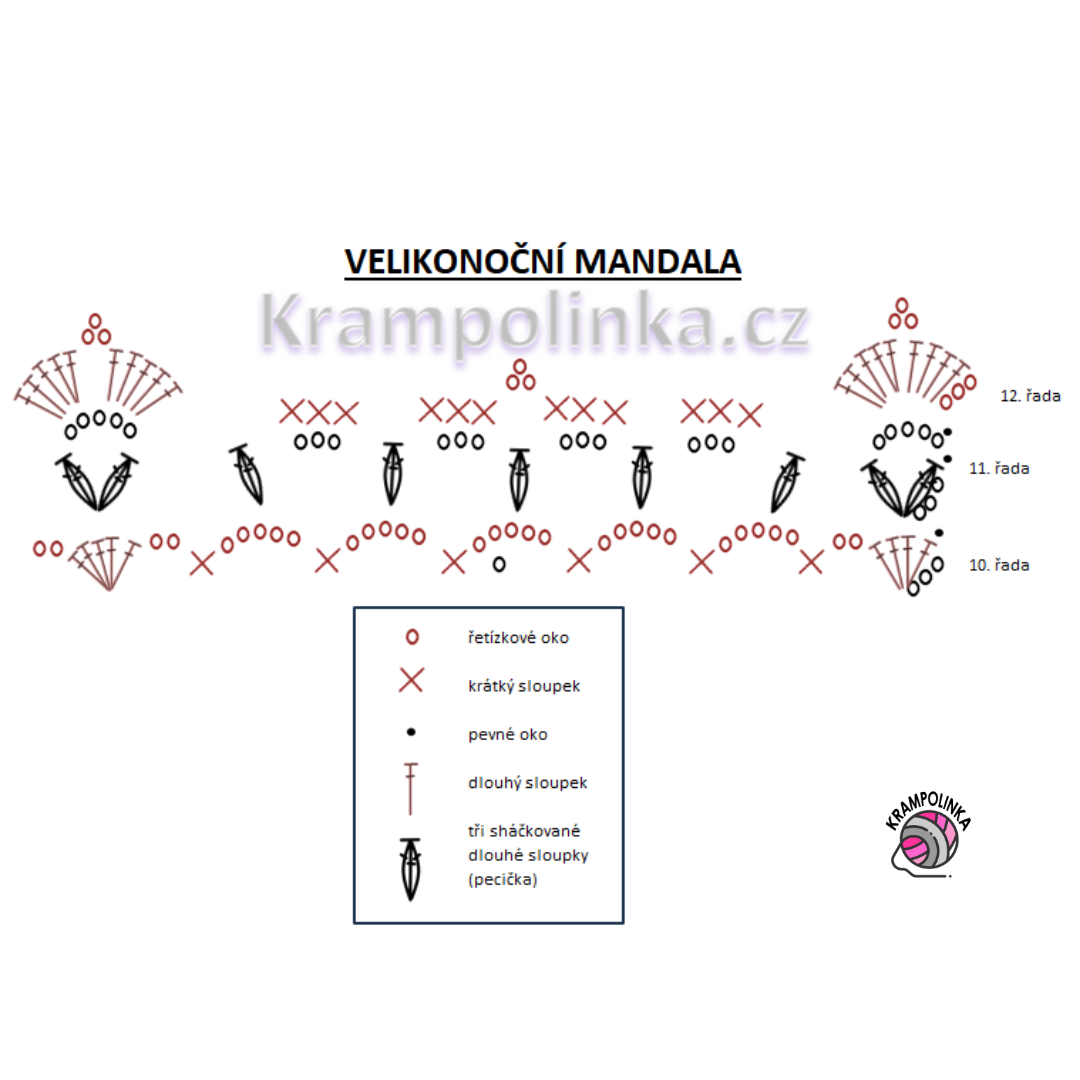
Stitches Used
ch – chain stitch
sc – single crochet
hdc – half double crochet
dc – double crochet
Bobble stitch – three double crochets crocheted together into the same stitch
sl st – slip stitch
MR – magic ring
-
- PIN for your Pinterest – Crochet Easter Mandala for you
Easter Mandala
Mandala – hook 2.5 mm (see Chart 1)
Round 1: Into the magic ring (MR) crochet 3 ch (counts as the first dc), then 23 dc. Join with sl st. Total 24 stitches including the turning chain.
Round 2: 3 ch (counts as the first dc), dc in the next stitch, 5 ch, skip one stitch. Pattern repeat: dc in dc, dc in dc, 5 ch, skip one stitch. Finish the round with 2 ch and dc into the top of the turning chain. End in the middle of the arch. Total 8 repeats.
Round 3: 1 ch, 2 sc under the arch, sc in dc, sc in dc, 2 sc under the arch, 3 ch. Pattern repeat: 2 sc under the arch, sc in dc, sc in dc, 2 sc under the arch, 3 ch. Finish with dc into the top of the turning chain. End in the middle of the arch.
Round 4: 3 ch (counts as dc), 2 dc under the arch, 5 ch, sc into the third sc, sc into the fourth sc. Pattern repeat: 5 ch, 3 dc under the arch, 5 ch, sc into the third sc, sc into the fourth sc. Join with sl st.
Round 5: 1 ch and sc in the same stitch. (sc – 5 ch – sc) in the middle dc, sc in dc, sc under the arch, 7 ch. Pattern repeat: sc under ch-space, sc in dc, (sc–5 ch–sc) in middle dc, sc in dc, sc under arch, 7 ch. Finish with sc under the arch and sl st.
Round 6: Using sl st, move under the 5 ch arch. 3 ch (counts as dc), 8 dc under the arch, 2 ch, sc – 3 ch – sc under the arch, 2 ch. Pattern repeat: 9 dc under the arch, 2 ch, sc–3 ch–sc under the arch, 2 ch. Finish with 2 ch and sl st.
Round 7: 3 ch (counts as dc), ch in the pattern. Work dc in each dc with 1 ch between stitches across the fan, then sc under ch-space. Pattern repeat: ch, dc in dc and ch (9×), sc under ch-space. Finish with sl st.
Round 8: 1 ch (counts as sc) and sc under ch-space. Ch above each dc, sc under ch-space (only 8 times), ch – 3 dc into sc – ch. Pattern repeat: sc between first two dc, ch above dc (8×), ch–3 dc into sc–ch. Finish with sl st into the turning chain.
Round 9: 3 ch (counts as dc) and 2 dc together in the same stitch, 3 ch. Crochet a bobble stitch (3 dc together) under ch-space and 3 ch (7×), then 3 ch above the three dc from the previous round. Finish with ch and dc into the top of the turning chain. End in the middle of the arch.
Round 10: 3 ch (counts as dc), 4 dc under the arch, 2 ch, sc between two bobbles, 5 ch (5×), sc between two bobbles, 2 ch, 5 dc under the arch. Repeat the pattern around. Finish with 2 ch and sl st.
Round 11: Using two sl st, move to the center of the fan. 3 ch and 2 dc into the same space, crochet together into a bobble, 5 ch, then another bobble in the same space. Continue: bobble under arch, 3 ch (3×). Crochet bobble under the last arch, then in the center of the fan work bobble – 5 ch – bobble. Finish with sl st and move with sl st under the arch.
Round 12: 3 ch (counts as dc), 4 dc under the arch – 3 ch – 5 dc under the same arch. Continue 3 sc under first arch, 3 sc under second arch – 3 ch – 3 sc under third arch, 3 sc under fourth arch. Between bobbles crochet 5 dc – 3 ch – 5 dc. Finish with sl st into the turning chain. Cut the yarn and weave in the ends.
Small Flower – hook 2.5 mm
Round 1: Into the magic ring (MR) crochet ch, 4 dc, sc. Repeat 5 times to create five petals. Join with sl st and fasten off.
Large Flower – hook 2.5 mm
Row 1: Chain 50 stitches.
Row 2: 3 ch (counts as dc), ch 1, then crochet hdc into the 5th stitch from the hook. Continue 2 ch, skip 2 stitches, hdc into the next stitch. Repeat across to create filet mesh squares. Turn.
Row 3: Work 1 sl st under the ch-space of the first square. 1 ch (counts as sc). Crochet 5–6 dc, hdc, sc under the ch-space of the filet square. Petal pattern: sc, 5–6 dc, hdc, sc into each ch-space. In the second-to-last square crochet sc, 6 hdc, sc. In the last square crochet 7 sc. Fasten off leaving a long yarn tail. Roll the strip into a flower shape and secure the shape by sewing through the layers with the yarn tail.
Finishing the mandala
Place the mandala and the hoop with wrong sides facing each other. Attach the points of the mandala to the hoop by tying them with yarn. Secure each tie with three knots and trim the yarn ends close to the knot. Attach the flowers to the front side of the mandala, either by tying them to the hoop or by using a hot glue gun. The finished Easter bunny mandala can be used as a spring decoration for your home. You can hang it on a front door, wall, pergola, or anywhere this delicate crochet decoration will fit your interior or outdoor space.
No Comments