

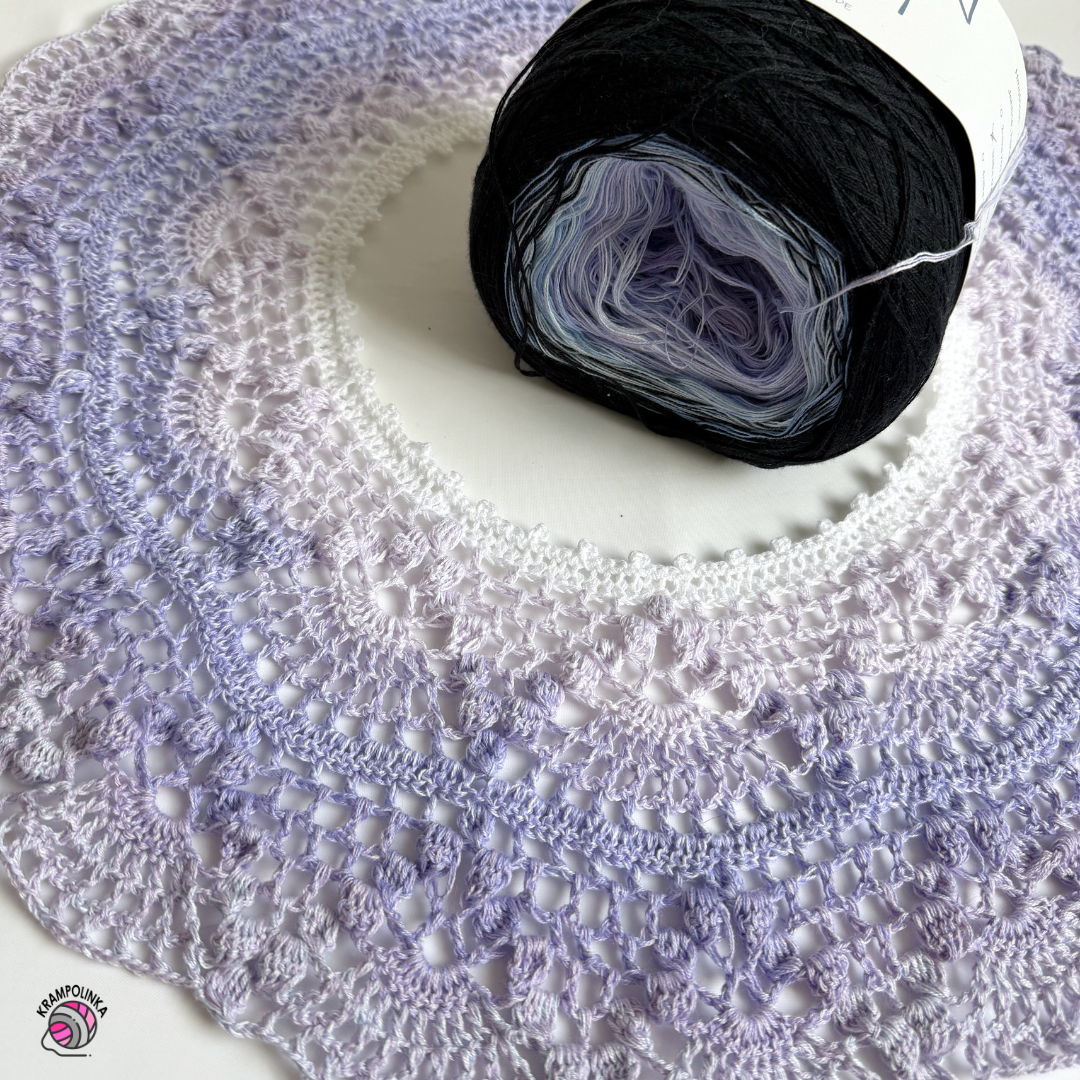
In today’s video tutorial, we’ll crochet a versatile year-round top, blouse, dress, or tunic with a round yoke. This tutorial is inspired by the popular Forest Dew Dress.
The Len a chrpy gradient yarn cake by Hravá klubka is a 3-ply yarn cake weighing 300 g / 1500 m. This amount is ideal for a dress in approximately size 38. For sizes 42–44, you will need about an additional 500 m of the final colour. The gradient yarn cake has a classic composition of 50% cotton and 50% acrylic, making it suitable for year-round projects.
The Len a chrpy yarn cake was created especially for me around 2022. One very hot summer day, while I was on my way to work, I passed blooming cornflowers along the roadside. I have always loved blue, but cornflowers in particular have such beautiful colour undertones. I therefore asked Ivanka to create a gradient yarn cake with irregular colour transitions, and I was absolutely delighted with the result. Even back then, I knew that one day I wanted to use it to crochet a dress.
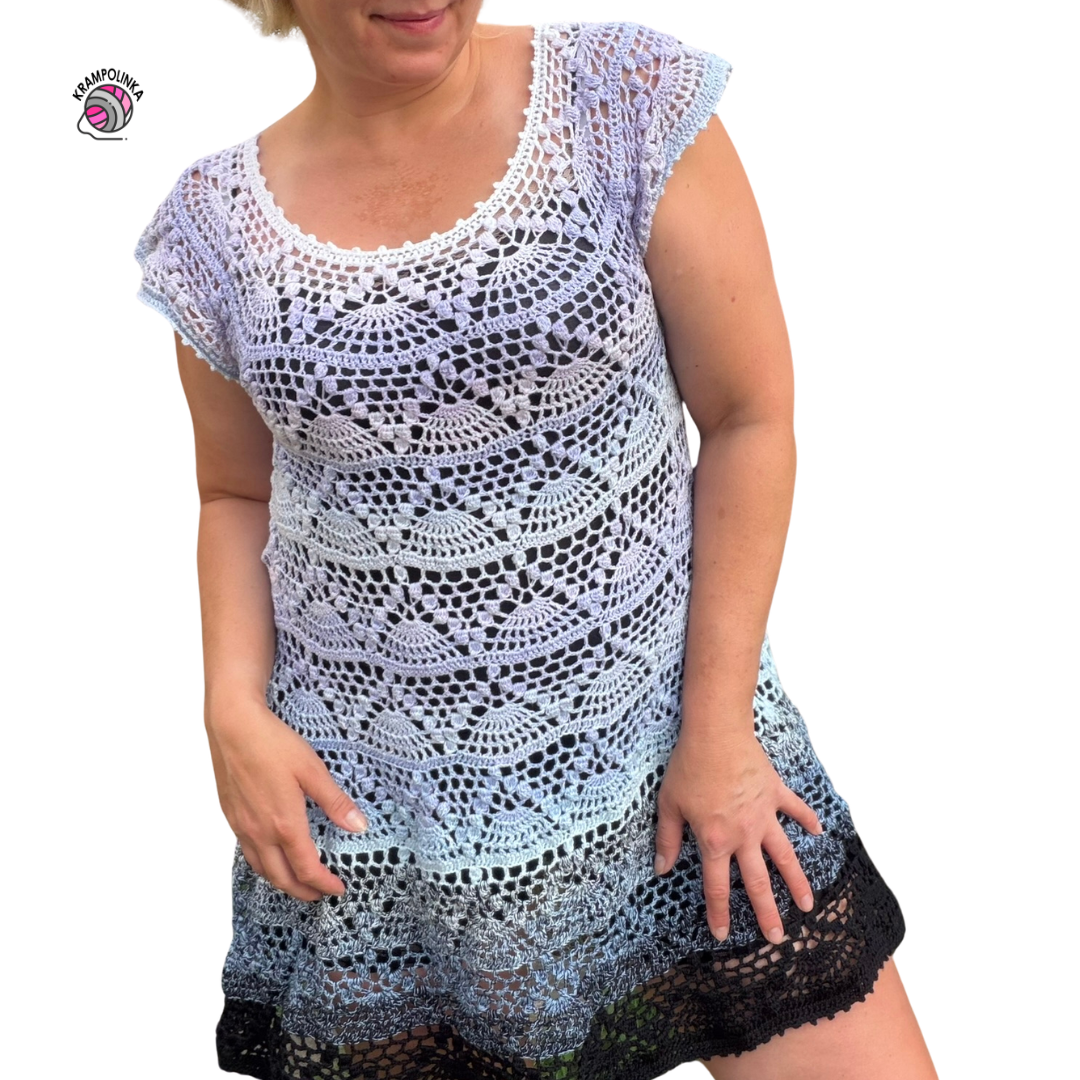
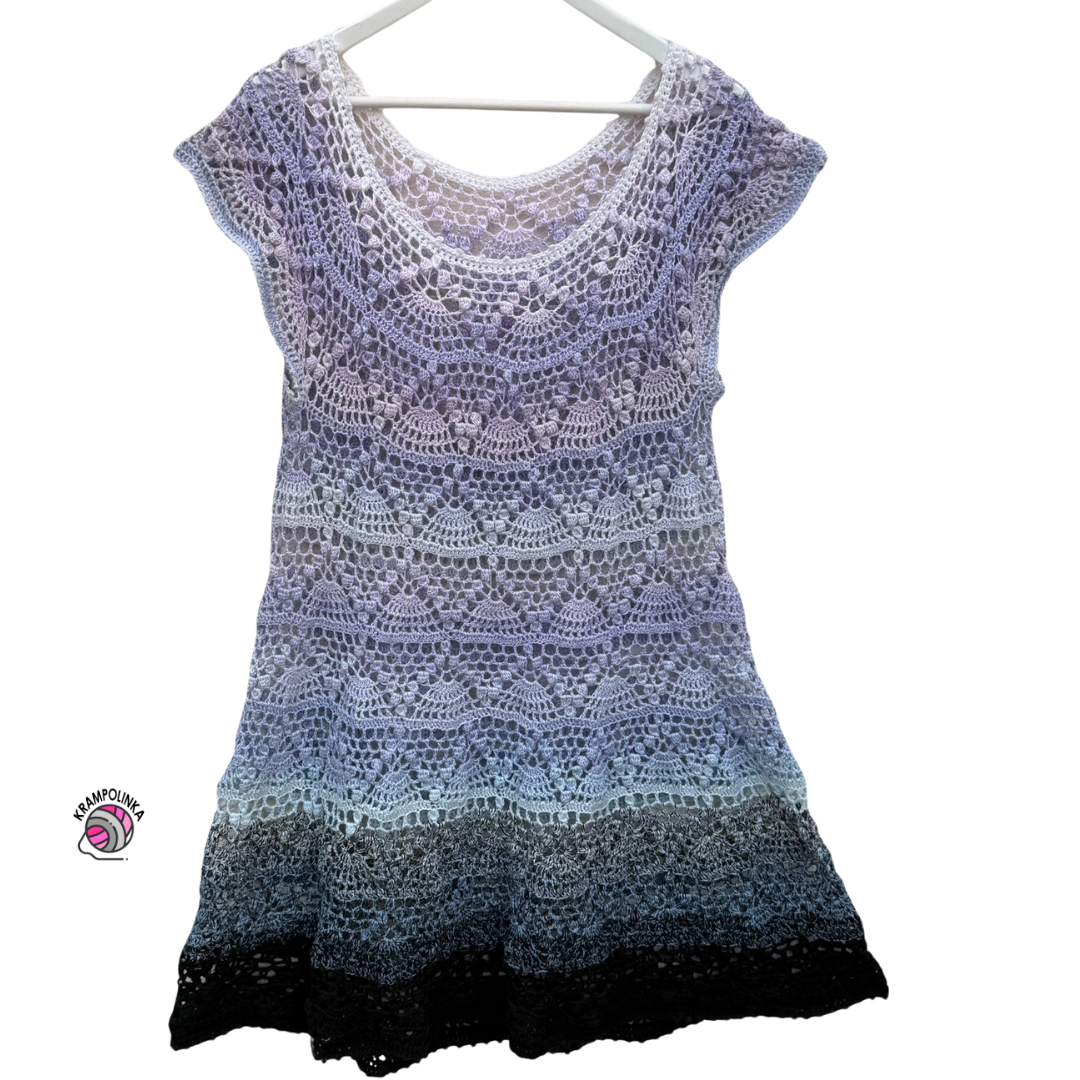
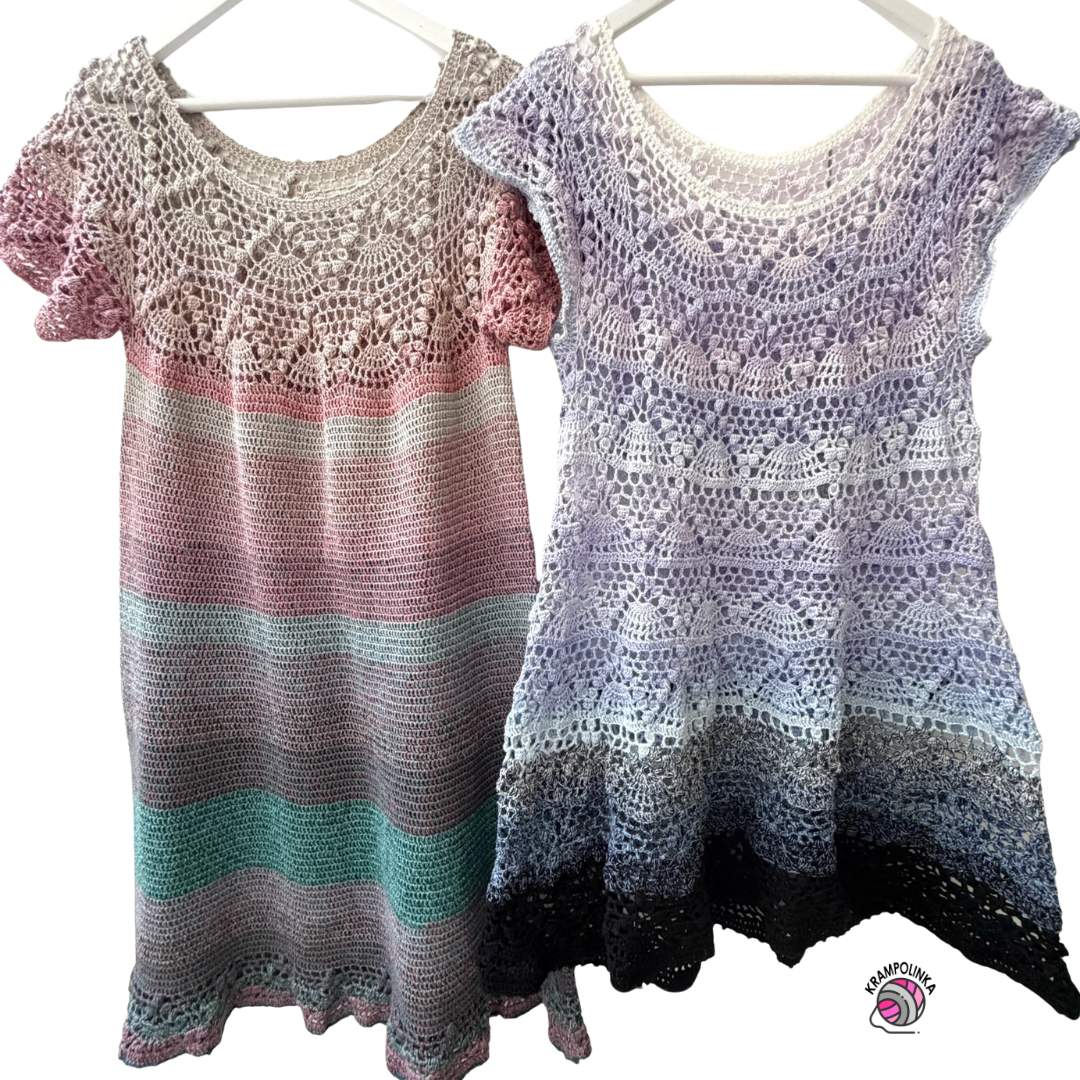
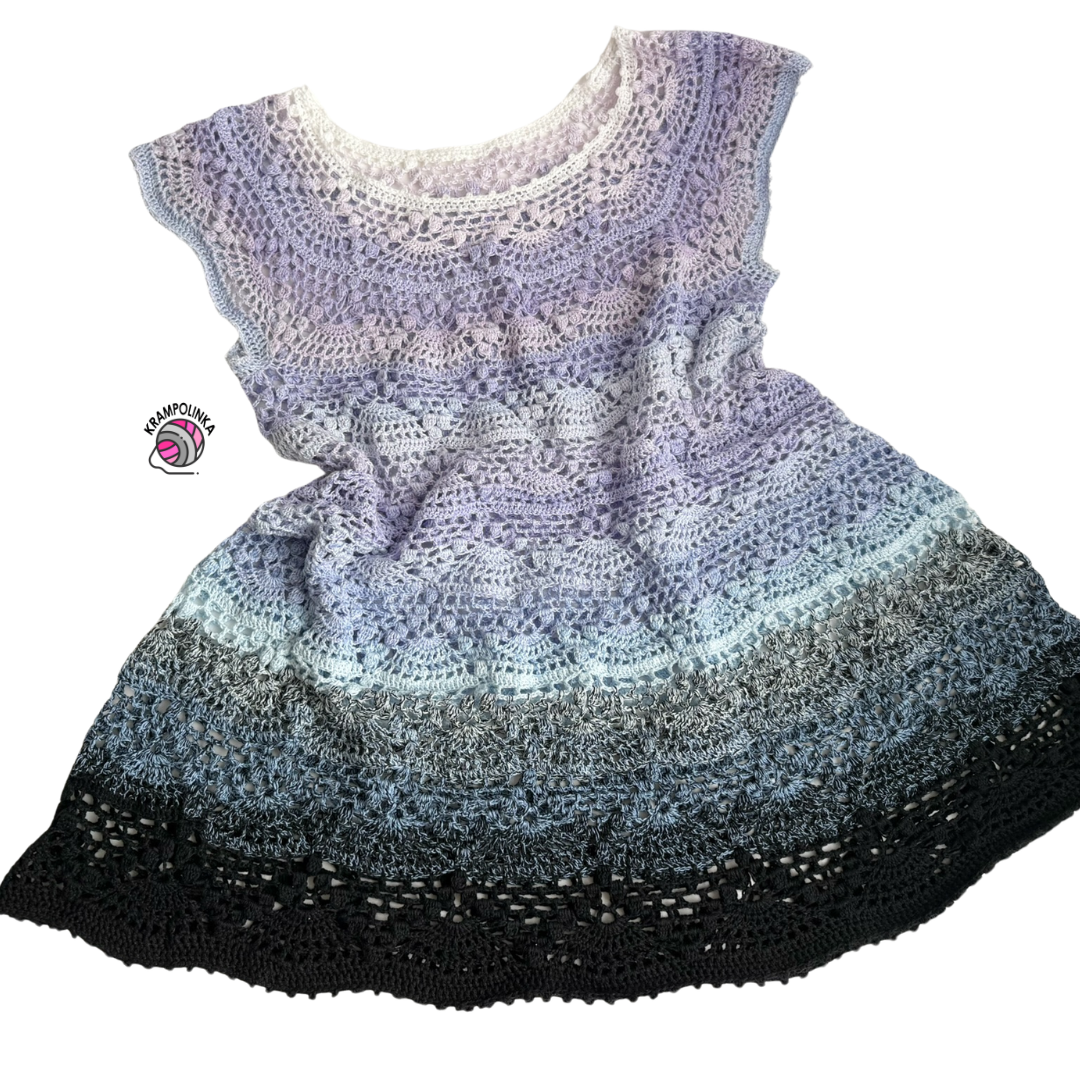
This season, you have really enjoyed the crocheted Forest Dew Dress. It features a round lace yoke and a solid lower part, which means it can be worn throughout the year even without a slip. I really liked the stitch pattern used for the round yoke, so I decided to use a similar principle for this dress as well. When I started crocheting with the Len a chrpy yarn cake, I already had a clear idea in mind: this time, I wanted the dress to be entirely lace and have an A-line shape. I am absolutely delighted with the result. The lace pattern beautifully highlights the colour transitions of the yarn, and at the same time, the project grows surprisingly quickly.
-
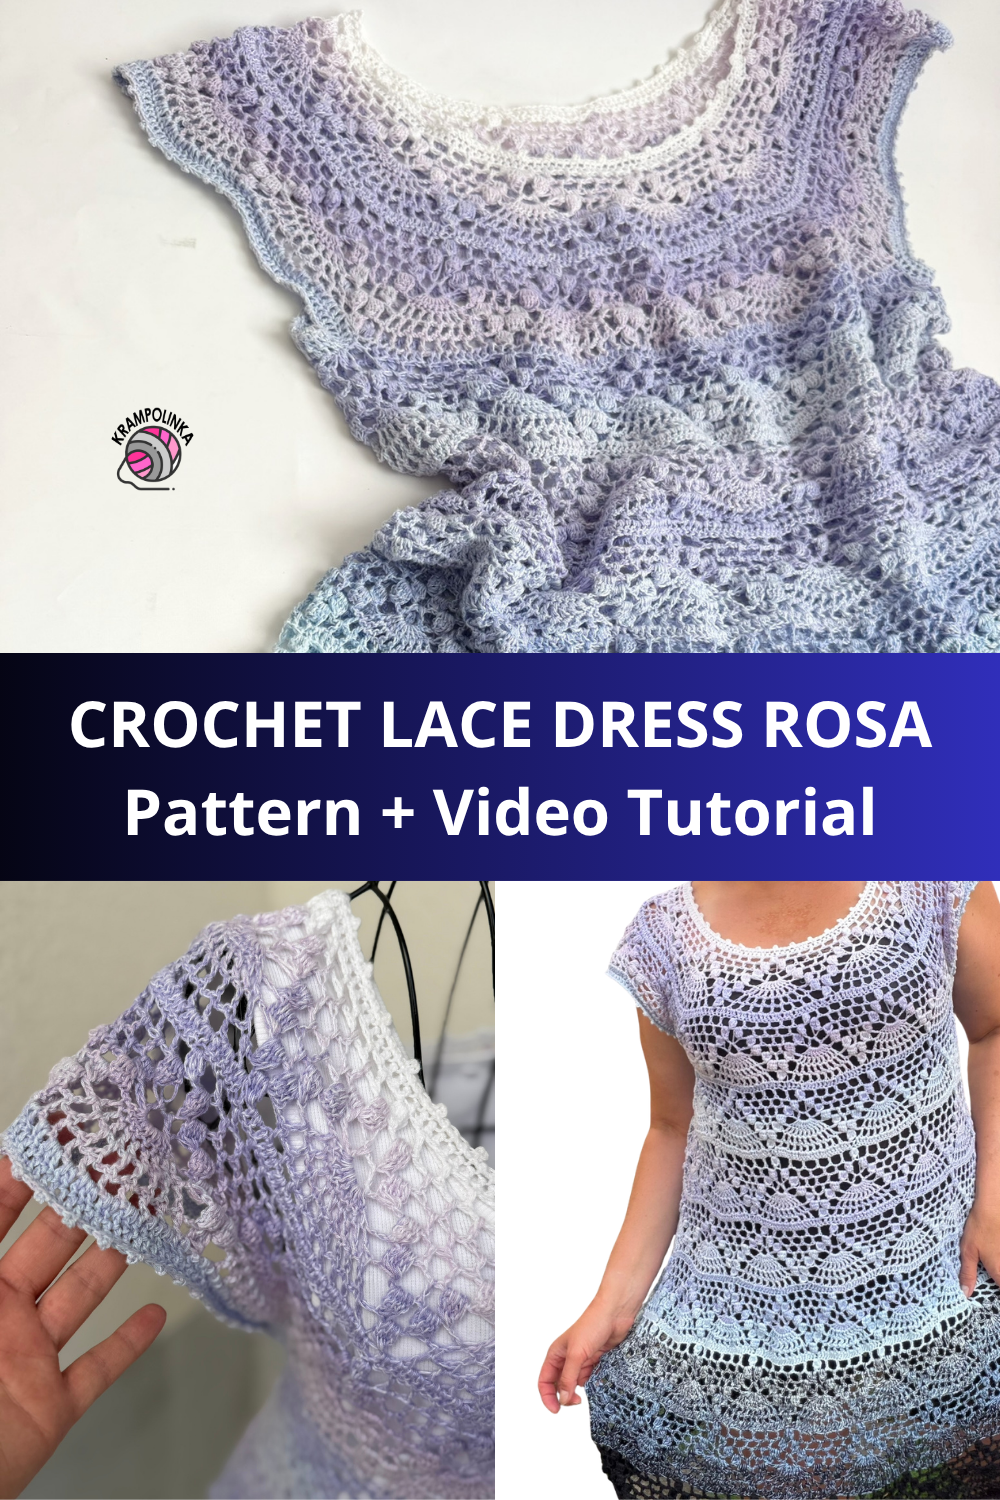
- Save the PIN – Rosa Lace Dress
Because the entire dress is made in a lace pattern, I also needed to decide what to wear underneath it. Jarri Pippi, whom I met at a Hravá klubka gathering, gave me a wonderful tip – instead of a traditional slip, wear short-style underwear or short leggings together with a cotton camisole or tank top in the same or a similar colour. I have to say that this option works perfectly for me.
If, for example, your thighs tend to rub together when walking in hot summer weather, short leggings are an excellent choice. In my opinion, a cotton tank top or camisole is also much more comfortable than a polyester slip. Of course, you can also wear the dress over your swimsuit. It will look wonderful by the pool or at the seaside, and thanks to its airy lace pattern, it is perfect for summer.
And the best part? Thanks to the lace pattern, the dress is relatively quick to crochet. As a reference to the original design, I named this version the Rosa Lace Dress.
We unboxed the Len a chrpy yarn cake in the podcast Povídání u klubíčka #120, and you can also read the related article here.
PART I OF THE VIDEO TUTORIAL – ROUND YOKE. The VIDEO TUTORIAL includes automatically generated subtitles. Did you know that you can slow down YouTube videos and adjust the playback speed to match your own crochet pace?
PART II OF THE VIDEO TUTORIAL – Short rows, joining the yoke, sleeve edging, dress body and bottom edging. The VIDEO TUTORIAL includes automatically generated subtitles. Did you know that you can slow down YouTube videos and adjust the playback speed to match your own crochet pace?
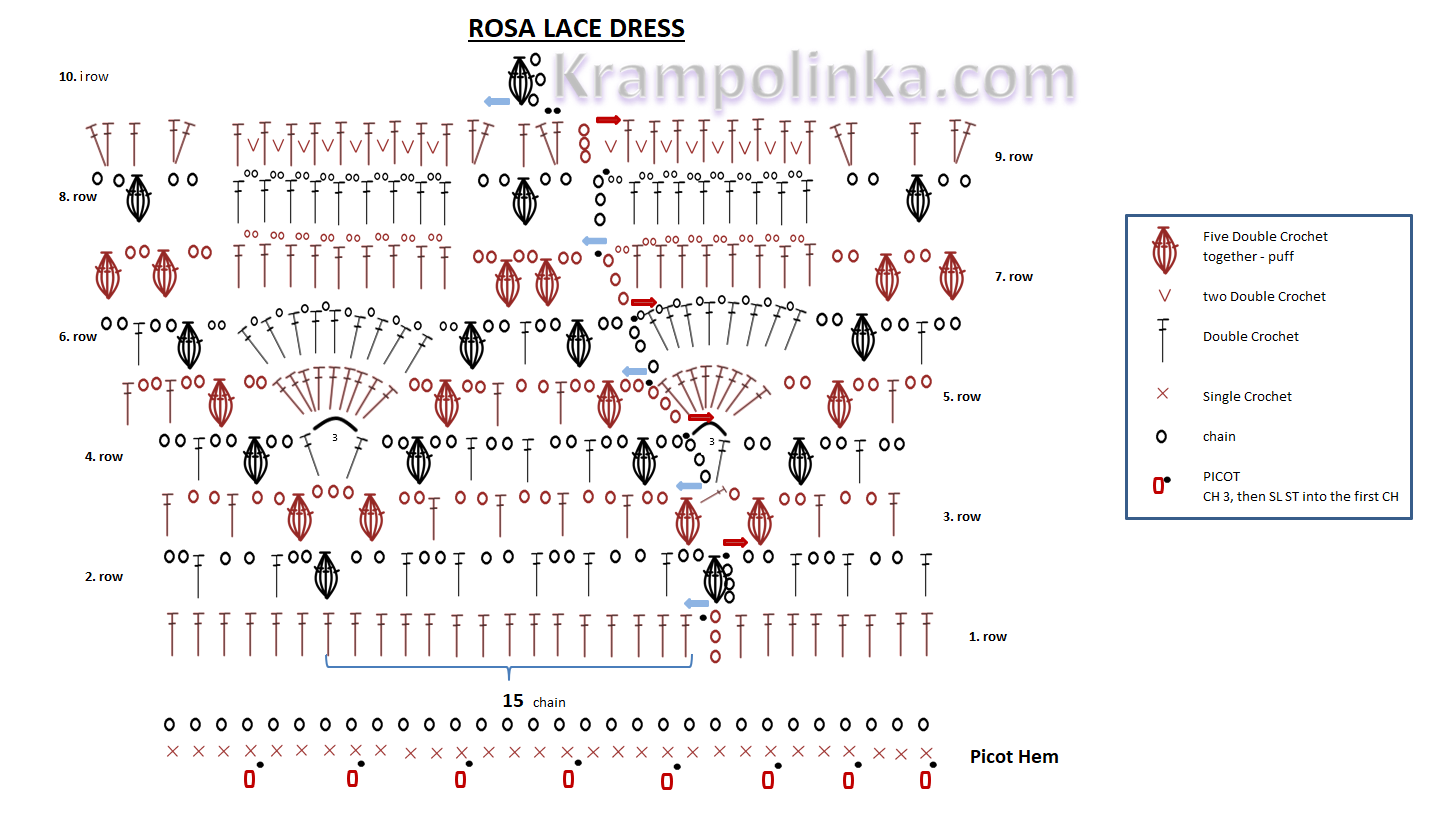
As for the dress itself, we start with a foundation chain with a stitch count divisible by 15, for example 135, 150 or 165 stitches, depending on the required size. First, we crochet a picot edging into the foundation chain and then continue with the round yoke.
The yoke is worked back and forth in rows. The round yoke consists of two complete pattern repeats. Please note that because the yoke gradually increases in size, the individual parts of the stitch pattern do not sit exactly above one another.
Once the round yoke has reached the required diameter, divide the work into four sections – front, back and two sleeves. Move the front section slightly forward and crochet one complete pattern repeat across the back as short rows. Only then join the yoke at the underarms. This naturally lowers the front neckline and helps the dress fit the body more comfortably.
After joining the round yoke, continue working on the right side and repeat the lace pattern. Adjust the increases to suit your own body shape and the desired silhouette. One complete pattern repeat measures approximately 8–9 cm in width, so keep this measurement in mind when planning the increases.
For a slightly flared A-line shape, I increased by no more than one complete pattern repeat. If you would like a more dramatically flared or almost circular skirt, I would recommend adding approximately two to three pattern repeats. Start increasing only around rib level, so that the upper part of the dress follows the body nicely. The dress is crocheted seamlessly.
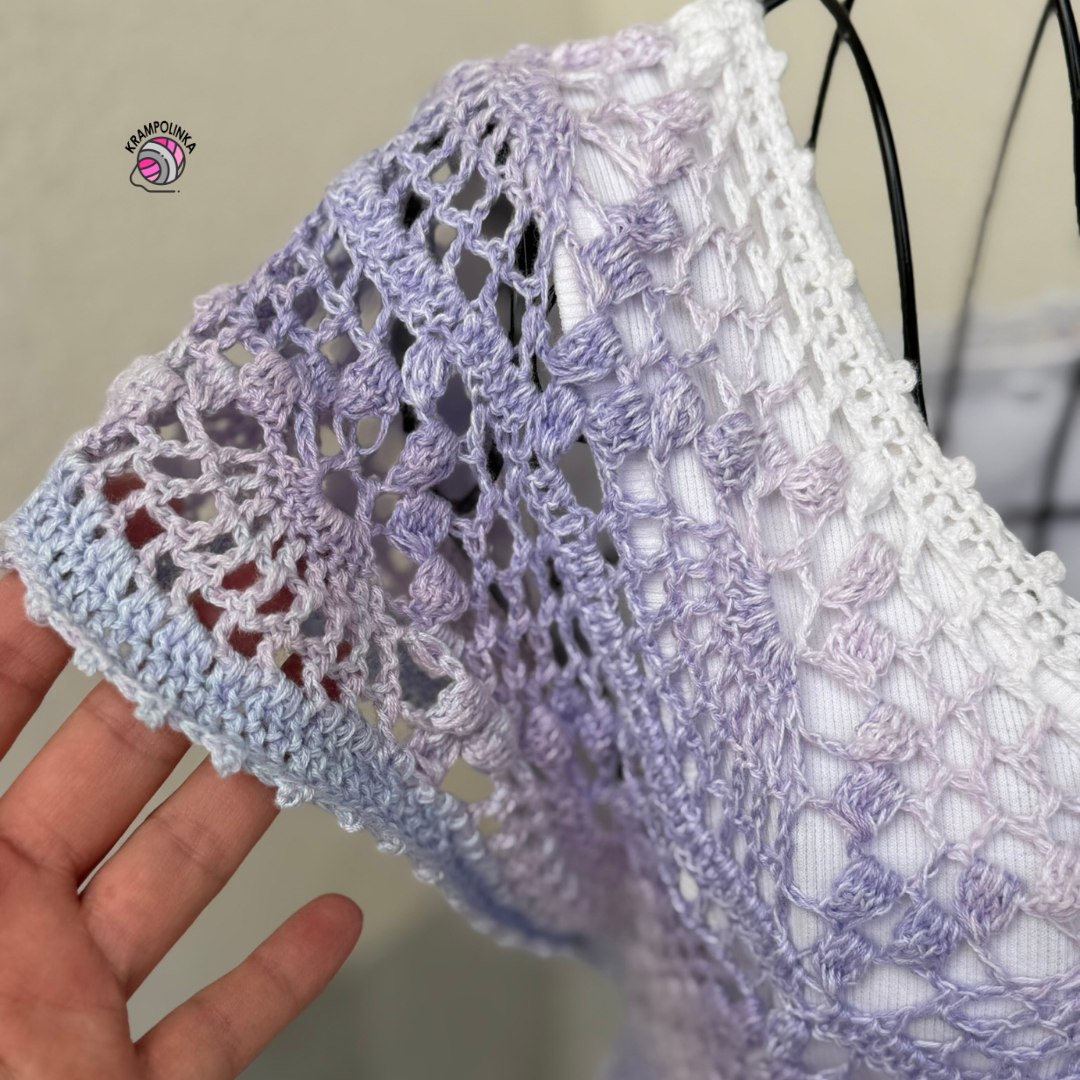
If you would like the sleeve edging or sleeves to match the corresponding colour transition, crochet the body of the dress after joining the yoke until you reach the first colour change. Then cut the yarn and unwind the required section of the colour transition. Weigh the unwound yarn on a digital scale and divide its weight into three equal parts. Use one third for the first sleeve, one third for the second sleeve, and keep the final third for continuing the body of the dress. I recommend weighing the yarn regularly while crocheting to keep the colour transition balanced.
You can also find instructions for crocheting a sleeve in the video tutorial for the Forest Dew Dress. For this Rosa Lace Dress, I simply finished the sleeves with a picot edging. I then rejoined the remaining section of the colour-transition yarn to the body of the dress and continued crocheting.
The round yoke and overall shape of the Forest Dew Dress also work very well for curvier and plus-size figures. And if you like this type of round yoke, I can already reveal that I am preparing another variation for you.
I hope you enjoy crocheting your Rosa Lace Dress and wear your handmade creation with joy. If you would like to inspire others or share your experience with crocheting or styling the dress, I would be very happy to see your photos. You can share your photos in the Krampolinka Facebook group. On Instagram, please use the hashtag #satylesnirosa so they are easy to find. If you tag me in projects made from my patterns, I may reshare them in my Instastories to inspire others.
ROSA LACE DRESS
Yarn: Len a Chrpy gradient yarn cake by Hravá klubka
Yarn consumption: 2000 m, 3-ply, 350 g
Crochet hooks: 3 mm Tulip, 2.5 mm Tulip
Measurements: bust width 47 cm (with stretch), bottom width 88 cm, front length 85 cm
Size: 42–44, model height 168 cm
Pattern repeat: 8–9 cm wide, 9 cm high
Other materials: tapestry needle, decorative label
Estimated time: approx. 40 hours
Skill level: adventurous beginner
ABBREVIATIONS
CH – chain
DC – double crochet
SL ST – slip stitch
SC – single crochet
PUFF – work 5 double crochets, leaving the last loop of each stitch on the hook; yarn over and pull through all loops on the hook, then CH 1
PICOT – CH 3 and SL ST
-
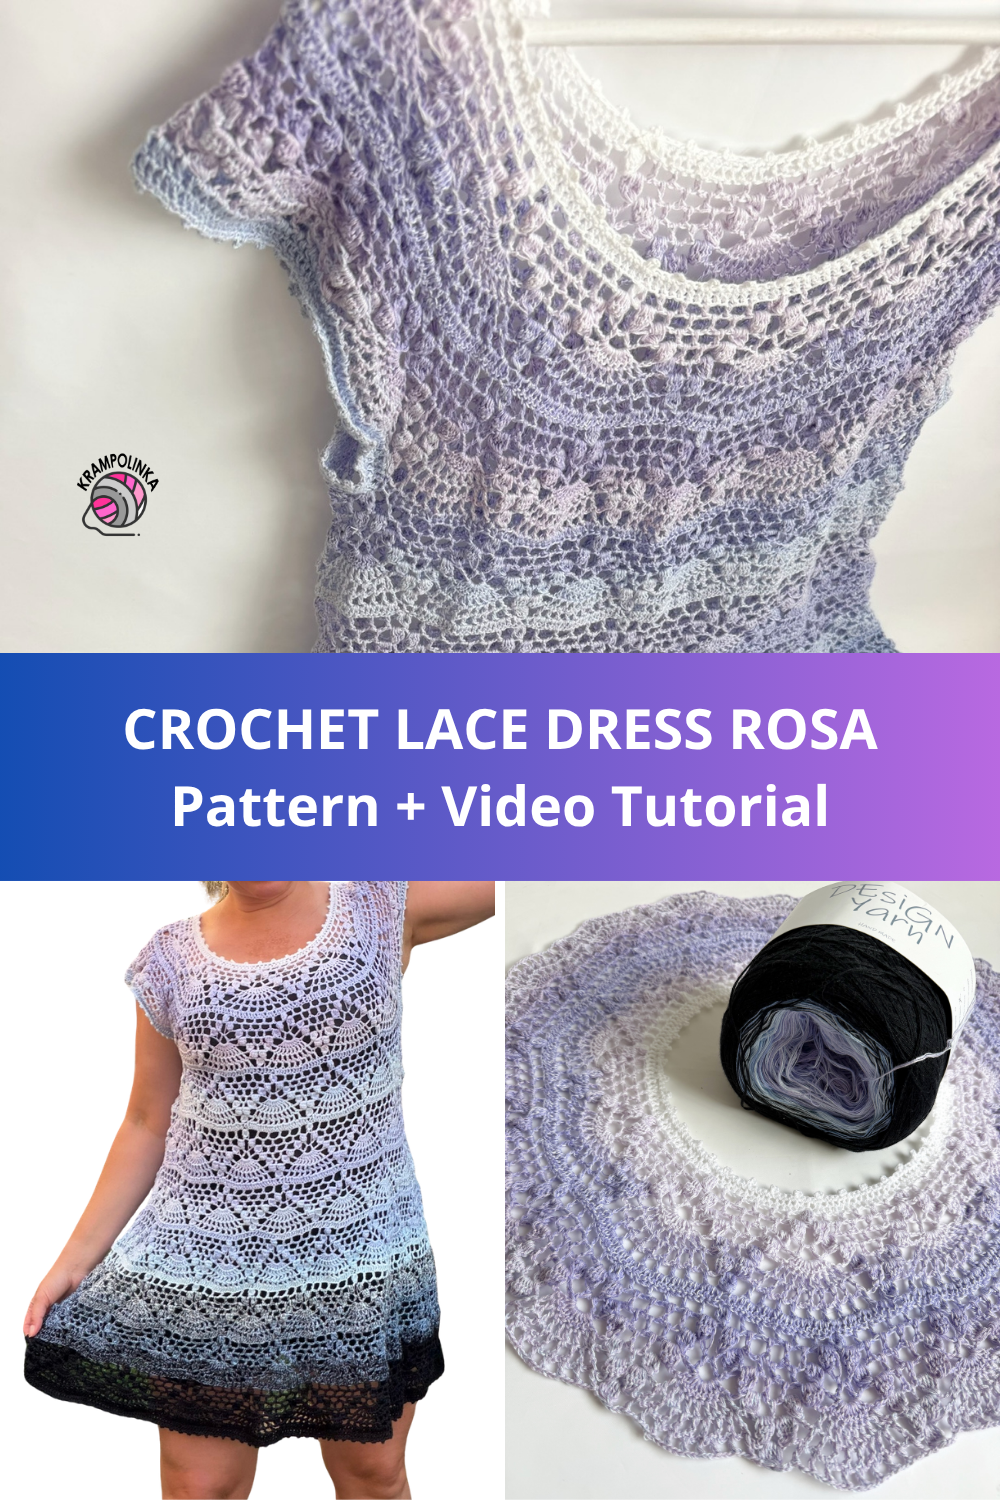
- Save the PIN – Rosa Lace Dress
ROUND YOKE EDGING, 3 mm hook
Row 1: CH 165 and join with a SL ST.
Row 2: CH 1 instead of SC, SC, SC, picot – CH 3 and SL ST. Repeat: 3 SC, picot. Finish the row with a SL ST. Use SL STs to move to the first stitch of the foundation chain.
ROUND YOKE – first pattern repeat, 3 mm hook
Row 1: CH 2 instead of DC, then work 1 DC into each stitch. Join with a SL ST. (165)
Row 2: CH 3 and work 5 incomplete DC, leaving the last loop of each stitch on the hook; yarn over and pull through all loops, then CH 1. The pattern repeat for this row is: CH 2, skip 1 stitch, DC into the next stitch, CH 2, skip 2 stitches, DC into the next stitch, CH 2, skip 1 stitch, DC into the next stitch, CH 2, skip 2 stitches, DC into the next stitch, CH 2, skip 1 stitch, DC into the next stitch, CH 2, skip 2 stitches, and finish with a puff, i.e. work 5 incomplete DC, leaving the last loop of each stitch on the hook; yarn over and pull through all loops, then CH 1.
Repeat the pattern to the end of the row. With the stated stitch count, I have 11 pattern repeats. Finish the row with CH 2 and SL ST into the joined top of the puff. TURN.
Row 3: SL ST into the CH-space of the first square. CH 3 and work 5 incomplete DC, leaving the last loop of each stitch on the hook; yarn over and pull through all loops, then CH 1. Pattern: CH 2 and DC into the CH-space 4 times, CH 2, puff into the last square, CH 3, puff into the first square of the next section. Repeat this pattern to the end of the row. At the end, work CH 1 and DC into the joined top of the puff so that the row finishes in the centre of the arch. TURN.
Row 4: Start with half of the pattern repeat. CH 3 instead of DC, CH 2 above the puff. The pattern repeat for this row is: puff into the first square, CH 2, DC 3 times, CH 2, puff into the last square, CH 2, DC–CH 3–DC into the CH-space between the puffs, CH 2. Repeat the pattern to the end of the row. Finish with DC into the arch between the puffs, CH 3 and SL ST into the second chain of the turning chain. TURN.
Row 5: Start with a fan. CH 3 instead of DC and work 8 DC into the CH-space, CH 2. The pattern repeat is: puff into the first square, CH 2 and DC into the CH-space 2 times, CH 2, puff into the last square, CH 2, fan of 9 DC, CH 2. Repeat the pattern to the end of the row. Finish with a SL ST into the second chain of the turning chain. TURN.
Row 6: CH 3 instead of DC, CH 2 into the pattern. Work the pattern as follows: puff into the first square, CH 2, DC into the CH-space, CH 2, puff into the last square. CH 2, then across the fan work DC into DC, CH 1 8 times, DC, CH 2. Repeat the pattern to the end of the row. Finish with a SL ST into the second chain of the turning chain. TURN.
Row 7: CH 3 instead of DC, CH 2 into the pattern, and across the fan work DC into DC, CH 2. The pattern repeat for this row is: puff into the first square, CH 2, puff into the last square, CH 2, then across the fan work DC into DC, CH 2 9 times. Repeat the pattern to the end of the row. Finish with a SL ST into the second chain of the turning chain. TURN.
Row 8: CH 3 instead of DC, CH 2. The pattern repeat for this row is: puff into the CH-space between the two puffs, creating a small pyramid, then CH 2 and DC into DC 9 times. Repeat the pattern to the end of the row. Finish with CH 2 and SL ST into the second chain of the turning chain. TURN.
Row 9: Either CH 1 and SC into the stitch, then work 2 SC into the CH-space and SC into the DC or into the joined top of the puff; OR CH 2 and DC into the stitch, 2 DC into the CH-space, and DC into the DC or into the joined top of the puff. Finish the row with a SL ST. For my dress, I used DC.
Note: If the work starts to ripple, there are too many stitches and you need to reduce the number of stitches in Row 9. If the work begins to curl into a bowl shape, there are too few stitches and you need to increase the number of stitches in Row 9. If you adjust the number of stitches in Row 9, you will need to recalculate the pattern repeats for the next section.
ROUND YOKE – second pattern repeat, 3 mm hook
Row 10: Use 2 SL STs to move to the joined top of the puff. Continue by repeating the pattern from Rows 2–9, but this time work the repeats over sections of 19 and 18 stitches according to the following sequence:
19–18–18–19–18–18–19–18–18–19–18–18–19–18–18–19–18–18 = 18 pattern repeats
Alternate the two variants, i.e. 6 repeats over 19 stitches and 12 repeats over 18 stitches.
CH 3 and work 4 incomplete DC, leaving the last loop of each stitch on the hook; yarn over and pull through all loops, then CH 1.
The pattern repeat for this row is: CH 2, skip 2 or 3 stitches, DC into the next stitch, then CH 2, skip 2 stitches, DC into the next stitch 5 times, CH 2, skip 2 stitches, puff into the third stitch. Finish the row with CH 2 and SL ST into the joined top of the puff. TURN.
Note: For this size and with my crochet tension, 18 pattern repeats were enough for the round yoke to lie flat nicely without twisting or rippling.
Rows 11–16: Repeat the pattern from Rows 2–9. Finish with the mesh-square row. The round yoke measures approximately 52–53 cm in diameter.
DIVIDING THE YOKE AND SHORT ROWS ON THE BACK, 2.5 mm hook
Divide the yoke as follows: front section (5 pattern repeats) – sleeve (4 pattern repeats) – back section (5 pattern repeats) – sleeve (4 pattern repeats). There are 18 pattern repeats in total. Work only across the back section using short rows, crocheting back and forth between the puffs that form the top of the “pyramid”.
Row 1: CH 3 instead of DC, 2 DC into the CH-space of the first square, DC into DC, DC into the CH-space of the second square and DC into DC. Continue using the sequence: 2 DC into the CH-space – DC into DC, DC into the CH-space – DC into DC. Into the CH-spaces before and after the puff, including the puff itself, work 1 DC into each. Finish with DC into DC. TURN.
Row 2: Work the pattern back and forth in rows. The pattern repeat is worked over 20 stitches. CH 3 instead of DC and work 5 incomplete DC, leaving the last loop of each stitch on the hook; yarn over and pull through all loops. CH 3, skip 3 stitches, DC, CH 2, skip 2 stitches, DC 3 times. For the sixth and final square, CH 3, skip 3 stitches and work a puff into the next stitch. Repeat this 20-stitch pattern to the end of the row. Adjust the final square of the pattern to the remaining stitch count. Finish the row with a puff. TURN.
On the back section, we have now increased from 5 to 6 pattern repeats.
Row 3: CH 3 instead of DC, CH 2 above the puff from the previous row, puff into the first square of the pattern. Continue with the pattern: CH 2, DC into the CH-space 4 times. Into the last square work CH 2 and a puff, CH 2 above the puff from the previous row, then a puff into the next square. Continue repeating the pattern as in Row 3. At the end of the row, work a puff into the last square, CH 2 above the puff from the previous row and DC into the top of the puff. TURN.
Row 4: CH 3 instead of DC, CH 2 into the pattern and DC into the CH-space to create a V-shape. Then CH 2 above the puff and work a puff into the first square. CH 2 and DC into the CH-space 3 times, CH 2 and puff. Continue with CH 2, DC–CH 3–DC into the CH-space, CH 2, then continue with the pattern as in Row 4. At the end of the row, work the V-shape: DC into the CH-space, CH 3 and DC into the top of the turning chain. TURN.
Row 5: CH 3 instead of DC, 2 DC into the pattern. Into the CH-space of the V-shape, work part of the fan, i.e. 4 DC. CH 2 above the puff, then work a puff into the CH-space, CH 2, DC into the CH-space, CH 2, DC into the CH-space, CH 2 and puff. Continue with CH 2, 9 DC into the CH-space of the V-shape, then continue with the pattern as in Row 5. At the end of the row, work the opposite side symmetrically: CH 2 above the puff, 4 DC into the V-shape and DC into the top of the turning chain. TURN.
Row 6: CH 3 instead of DC, CH 1 into the pattern. Across the fan at the beginning of the row, work DC into DC and CH 1 4 times. Continue with CH 2 above the puff, puff into the CH-space, CH 2, DC into the CH-space, CH 2 and puff. Then CH 2 and across the fan work DC into DC and CH 1 9 times. Continue following the pattern as in Row 6. At the end of the row, work CH 2 and DC into DC, CH 1 4 times. Work the final DC into the top of the turning chain. TURN.
Row 7: CH 3 instead of DC, CH 2 into the pattern. Across the fan at the beginning of the row, work DC into DC and CH 2 4 times. CH 2 above the puff, puff into the CH-space, CH 2, puff into the CH-space. Across the fan, work CH 2, DC into DC, CH 2 9 times, then continue following the pattern as in Row 7. At the end of the row, work CH 2 and DC into DC, CH 2 4 times. Work the final DC into the top of the turning chain. TURN.
Row 8: CH 3 instead of DC, CH 2 into the pattern. Across the fan at the beginning of the row, work DC into DC and CH 2 4 times. CH 2 above the puff and work a puff into the CH-space. Across the fan, work CH 2, DC into DC, CH 2 9 times, then continue following the pattern as in Row 8. At the end of the row, work CH 2 and DC into DC, CH 2 4 times. Work the final DC into the top of the turning chain. TURN.
JOINING THE YOKE, 3 mm hook
Row 9: CH 3 instead of DC and place a stitch marker into the third chain. Skip 4 pattern repeats for the sleeve, insert the hook into the top of the puff and work a DC.
For this row, follow the sequence: DC into the CH-space and DC into DC. Work across the front section over 5 pattern repeats, skip 4 pattern repeats for the second sleeve and join to the back section with a DC.
Do not work any additional stitches under the arm. Continue with DC into each CH-space and DC into each DC across the entire back section. Finish the row in the marked turning chain.
Try the dress on at this point. If the armhole feels too tight, undo the row and work 1–3 stitches of a flexible foundation chain under each arm before joining the front and back sections.
DRESS BODY, 3 mm hook
Row 10: CH 3 instead of DC, then work 4 incomplete DC and join them together into one stitch. Work CH 3, skip 2 stitches and DC into DC 5 times, CH 3, skip 2 stitches and work a puff. Repeat the pattern over 18 stitches for 12 pattern repeats or over 19 stitches for 11 pattern repeats.
If you need to increase by more than one pattern repeat, count the number of stitches in Row 9 and divide it by 13 (the planned number of pattern repeats). Work each pattern repeat over the resulting number of stitches. At the end of the row, TURN.
Note: On my dress, I combined pattern repeats worked over 18 and 19 stitches and ended up with 12 pattern repeats. I always recommend working the same number of CH stitches as the number of stitches you skip, even if this creates slightly larger mesh squares. You can gradually reduce the number of stitches later, ideally in Rows 4–7 of the pattern repeat.
Rows 11–16: Work the pattern in the same way as Rows 3–8 of the yoke. TURN after every row. You should have 12 pattern repeats.
Row 17: CH 3 instead of DC into the top of the puff.
*DC into the CH-space – DC into DC. Within the pattern work: 2 DC into the CH-space – DC into DC, DC into the CH-space – DC into DC, DC into the CH-space – DC into DC, 2 DC into the CH-space – DC into DC, DC into the CH-space – DC into DC, DC into the CH-space – DC into DC, 2 DC into the CH-space – DC into DC, DC into the CH-space – DC into DC. At the end of the pattern repeat, work DC into the CH-space before the puff and DC into the puff.*
You should have 24 DC over one pattern repeat. Continue working DC around the entire circumference of the dress. Finish the row with a SL ST. TURN.
Note: Finish crocheting the current colour transition and fasten off. Unwind the next colour-transition section, weigh it on a digital scale and divide it into three equal parts. Use one third for the edging of the first sleeve, one third for the edging of the second sleeve and the final third for continuing the body of the dress.
SLEEVE EDGING, 2.5 mm hook
Row 1: Work on the right side. Join the yarn at the centre of the armhole. CH 3 instead of DC. Around the armhole, work 2 DC for each horizontal row. Within the stitch pattern, work DC into the puff, DC into the CH-space, then 2 DC into the CH-space, DC into DC and DC into the CH-space, DC into DC. Finish the row with a SL ST.
Row 2: CH 3 instead of DC, then work DC into DC around. Finish the row with a SL ST.
Row 3: CH 1 instead of SC, SC, SC, picot – CH 3 and SL ST. Repeat: 3 SC, picot. Finish the row with a SL ST. Fasten off and repeat the same process on the opposite sleeve. Then continue crocheting the body of the dress.
CONTINUING THE DRESS BODY, 3 mm hook
Row 18: No increases are made in this row. Repeat the pattern over 24 DC. CH 3 instead of DC, then work 4 incomplete DC and join them together into one stitch. Work CH 4, skip 3 stitches and DC into DC 5 times, CH 4, skip 3 stitches and work a puff. Repeat the pattern over 24 stitches for 12 pattern repeats.
If you need to increase by more than one pattern repeat, count the number of stitches in Row 17 and divide it by 13 (the planned number of pattern repeats). Work each repeat over the resulting number of stitches. At the end of the row, TURN.
Rows 19–24: Work the pattern in the same way as Rows 3–8 of the yoke. TURN after every row. You should have 12 pattern repeats.
Row 25: CH 3 instead of DC into the top of the puff.
*DC into the CH-space – DC into DC. Within the pattern work: 2 DC into the CH-space – DC into DC, DC into the CH-space – DC into DC, DC into the CH-space – DC into DC, 2 DC into the CH-space – DC into DC, DC into the CH-space – DC into DC, DC into the CH-space – DC into DC, 2 DC into the CH-space – DC into DC, DC into the CH-space – DC into DC. At the end of the pattern repeat, work DC into the CH-space before the puff and DC into the puff.*
You should have 24 DC over one pattern repeat. Continue working DC around the entire circumference of the dress. Finish the row with a SL ST. TURN.
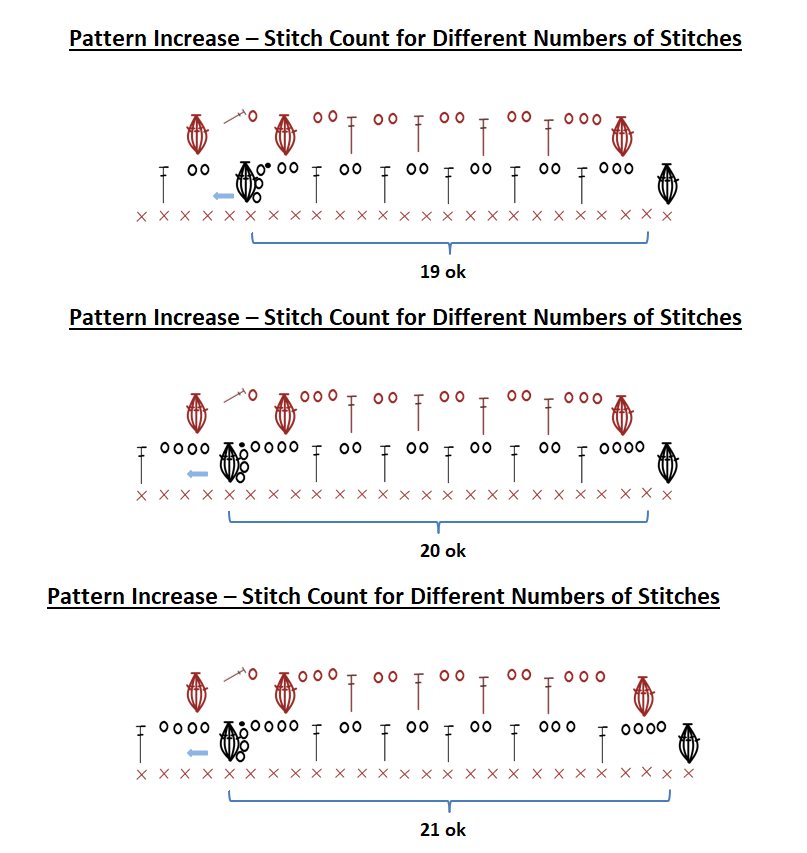
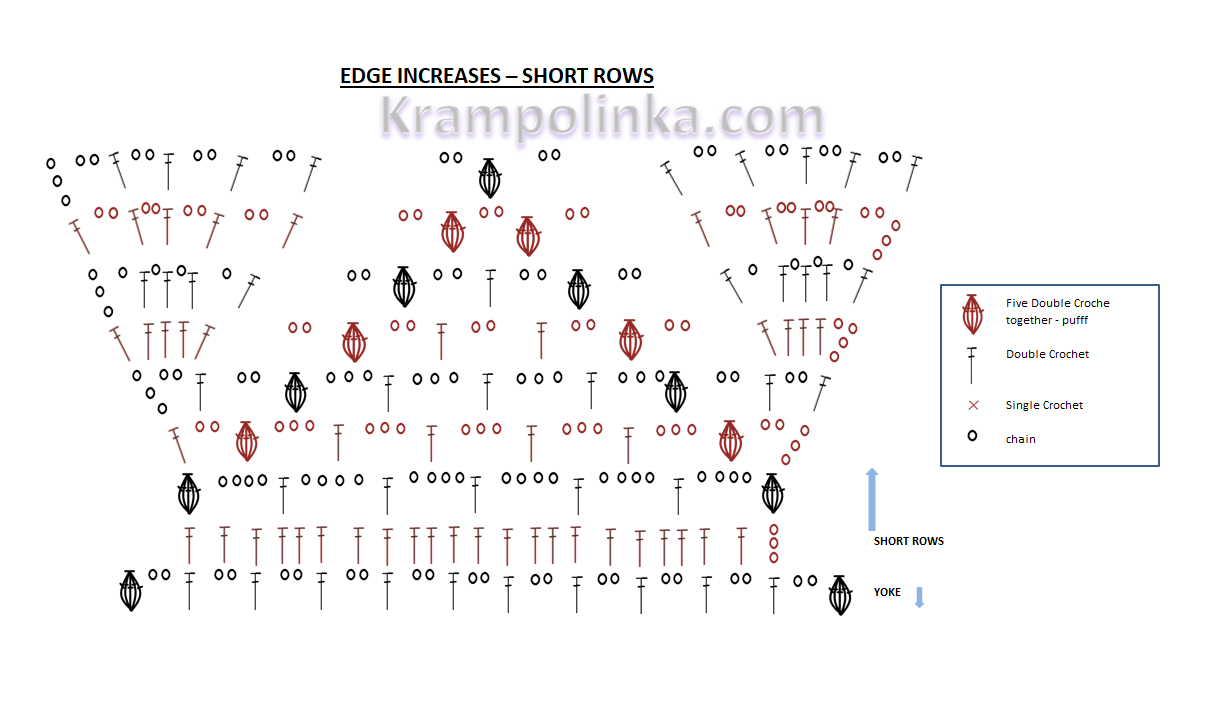
Row 26: Increase by one pattern repeat in this row. In the previous row, you have 24 DC × 12 pattern repeats = 288 DC. Divide this number by 13, which gives approximately 22 stitches per repeat.
To make the pattern work evenly, repeat the first row of the pattern 11 times over 22 stitches and 2 times over 23 stitches.
CH 3 instead of DC, then work 4 incomplete DC and join them together into one stitch.
For a pattern repeat worked over 22 stitches: CH 4, skip 3 stitches and DC into DC 4 times, CH 3, skip 2 stitches and DC into DC, CH 3, skip 2 stitches and work a puff.
For a pattern repeat worked over 23 stitches: CH 4, skip 3 stitches and DC into DC 5 times, CH 3, skip 2 stitches and work a puff.
At the end of the row, TURN.
Rows 27–32: Work the pattern in the same way as Rows 3–8 of the yoke. TURN after every row. You should have 13 pattern repeats.
-
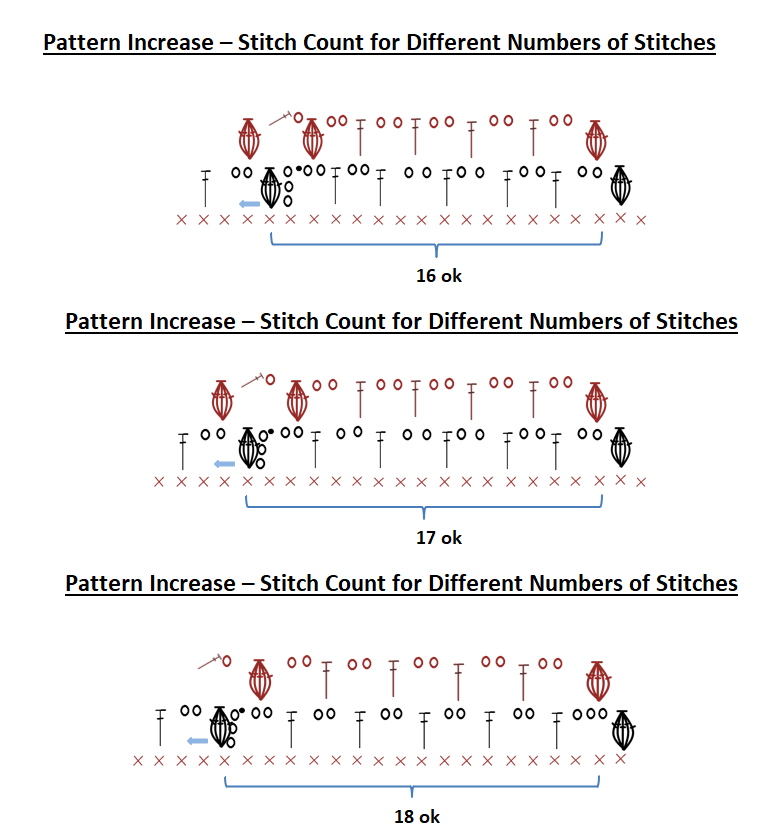
- Rosa Lace Dress Increase
-
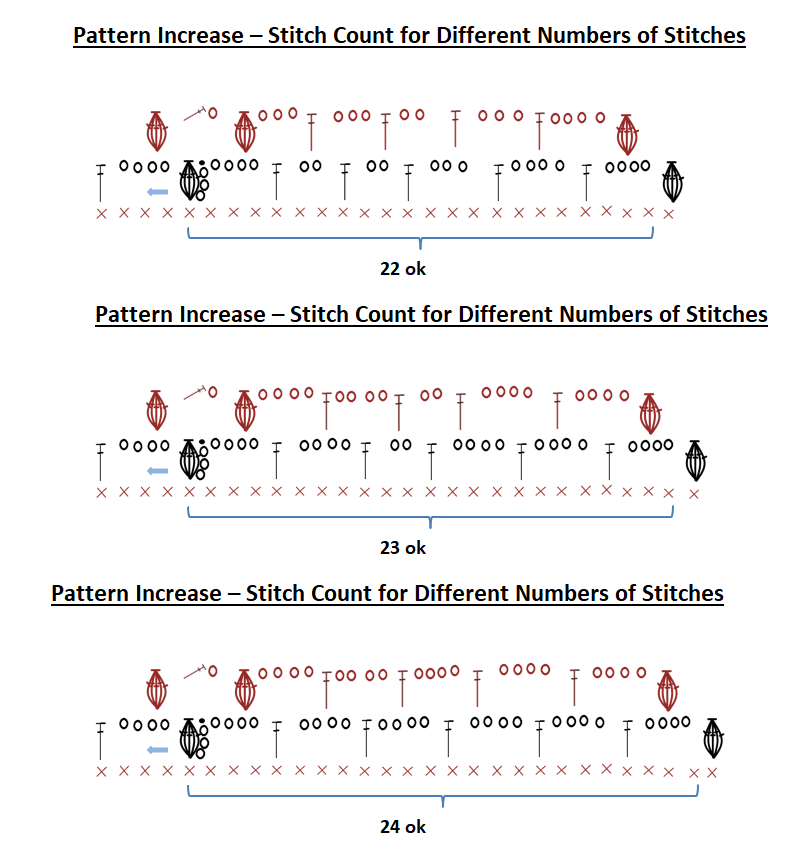
- More of Rosa Lace Dress Increase
-
- Another Rosa Lace Dress Increase
Row 33: CH 3 instead of DC into the top of the puff.
*DC into the CH-space – DC into DC. Within the pattern work: 2 DC into the CH-space – DC into DC, DC into the CH-space – DC into DC, DC into the CH-space – DC into DC, 2 DC into the CH-space – DC into DC, DC into the CH-space – DC into DC, DC into the CH-space – DC into DC, 2 DC into the CH-space – DC into DC, DC into the CH-space – DC into DC. At the end of the pattern repeat, work DC into the CH-space before the puff and DC into the puff.*
You should have 24 DC over one pattern repeat. Continue working DC around the entire circumference of the dress. Finish the row with a SL ST. TURN.
Row 34: Increase by 4 pattern repeats in this row. In the previous row, you have 24 DC × 13 pattern repeats = 312 DC. Divide this number by 17, which gives approximately 18 stitches per repeat.
To make the pattern work evenly, repeat the first row of the pattern 11 times over 18 stitches and 6 times over 19 stitches.
CH 3 instead of DC, then work 4 incomplete DC and join them together into one stitch.
For a pattern repeat worked over 18 stitches: CH 3, skip 2 stitches and DC into DC 5 times, CH 3, skip 2 stitches and work a puff.
For a pattern repeat worked over 19 stitches: CH 3, skip 2 stitches and DC into DC 5 times, CH 3, skip 3 stitches and work a puff.
At the end of the row, TURN.
Rows 35–40: Work the pattern in the same way as Rows 3–8 of the yoke. TURN after every row. You should have 17 pattern repeats.
Row 41: CH 3 instead of DC into the top of the puff.
*DC into the CH-space – DC into DC. Within the pattern work: 2 DC into the CH-space – DC into DC, DC into the CH-space – DC into DC, DC into the CH-space – DC into DC, 2 DC into the CH-space – DC into DC, DC into the CH-space – DC into DC, DC into the CH-space – DC into DC, DC into the CH-space – DC into DC, DC into the CH-space – DC into DC. At the end of the pattern repeat, work DC into the CH-space before the puff and DC into the puff.*
You should have 23 DC over one pattern repeat. Continue working DC around the entire circumference of the dress. Finish the row with a SL ST. TURN.
Row 42: No increases are made in this row. Repeat the pattern over 23 DC. CH 3 instead of DC, then work 4 incomplete DC and join them together into one stitch. Work CH 4, skip 3 stitches and DC into DC 5 times, CH 3, skip 2 stitches and work a puff. Repeat the pattern over 23 stitches for 17 pattern repeats. At the end of the row, TURN.
Note: If you need to increase by more than one pattern repeat, count the total number of stitches and divide it by 18 (the planned number of pattern repeats). Work each pattern repeat over the resulting number of stitches.
Rows 43–48: Work the pattern in the same way as Rows 3–8 of the yoke. TURN after every row. You should have 17 pattern repeats.
Row 49: CH 3 instead of DC into the top of the puff.
*DC into the CH-space – DC into DC. Within the pattern work: 2 DC into the CH-space – DC into DC, DC into the CH-space – DC into DC, DC into the CH-space – DC into DC, 2 DC into the CH-space – DC into DC, DC into the CH-space – DC into DC, DC into the CH-space – DC into DC, DC into the CH-space – DC into DC, DC into the CH-space – DC into DC. At the end of the pattern repeat, work DC into the CH-space before the puff and DC into the puff.*
You should have 23 DC over one pattern repeat. Continue working DC around the entire circumference of the dress. Finish the row with a SL ST. TURN.
Row 50: No increases are made in this row. Repeat the pattern over 23 DC. CH 3 instead of DC, then work 4 incomplete DC and join them together into one stitch. Work CH 4, skip 3 stitches and DC into DC 5 times, CH 3, skip 2 stitches and work a puff. Repeat the pattern over 23 stitches for 17 pattern repeats. At the end of the row, TURN.
Rows 51–56: Work the pattern in the same way as Rows 3–8 of the yoke. TURN after every row. You should have 17 pattern repeats.
Row 57: CH 3 instead of DC into the top of the puff.
*DC into the CH-space – DC into DC. Within the pattern work: 2 DC into the CH-space – DC into DC, DC into the CH-space – DC into DC, DC into the CH-space – DC into DC, 2 DC into the CH-space – DC into DC, DC into the CH-space – DC into DC, DC into the CH-space – DC into DC, DC into the CH-space – DC into DC, DC into the CH-space – DC into DC. At the end of the pattern repeat, work DC into the CH-space before the puff and DC into the puff.*
You should have 23 DC over one pattern repeat. Continue working DC around the entire circumference of the dress. Finish the row with a SL ST. TURN.
Row 58: No increases are made in this row. Repeat the pattern over 23 DC. CH 3 instead of DC, then work 4 incomplete DC and join them together into one stitch. Work CH 4, skip 3 stitches and DC into DC 5 times, CH 3, skip 2 stitches and work a puff. Repeat the pattern over 23 stitches for 17 pattern repeats. At the end of the row, TURN.
Rows 59–64: Work the pattern in the same way as Rows 3–8 of the yoke. TURN after every row. You should have 17 pattern repeats.
Row 65: CH 3 instead of DC into the top of the puff.
*DC into the CH-space – DC into DC. Within the pattern work: 2 DC into the CH-space – DC into DC, DC into the CH-space – DC into DC, DC into the CH-space – DC into DC, 2 DC into the CH-space – DC into DC, DC into the CH-space – DC into DC, DC into the CH-space – DC into DC, DC into the CH-space – DC into DC, DC into the CH-space – DC into DC. At the end of the pattern repeat, work DC into the CH-space before the puff and DC into the puff.*
You should have 23 DC over one pattern repeat. Continue working DC around the entire circumference of the dress. Finish the row with a SL ST. From this point on, continue working on the right side.
Note: Try the dress on and check the length. If you would like to make it longer without further increases, repeat Rows 58–65.
DRESS HEM, 3 mm hook
Row 66: CH 3 instead of DC, then DC into DC. Work a picot: CH 3 and SL ST into the first chain. The repeat for this row is: DC into DC, DC into DC, DC into DC, picot. Repeat around. Finish the row with a SL ST and fasten off.
FINISHING
Weave in all loose ends and decorate the dress with a label.


No Comments