

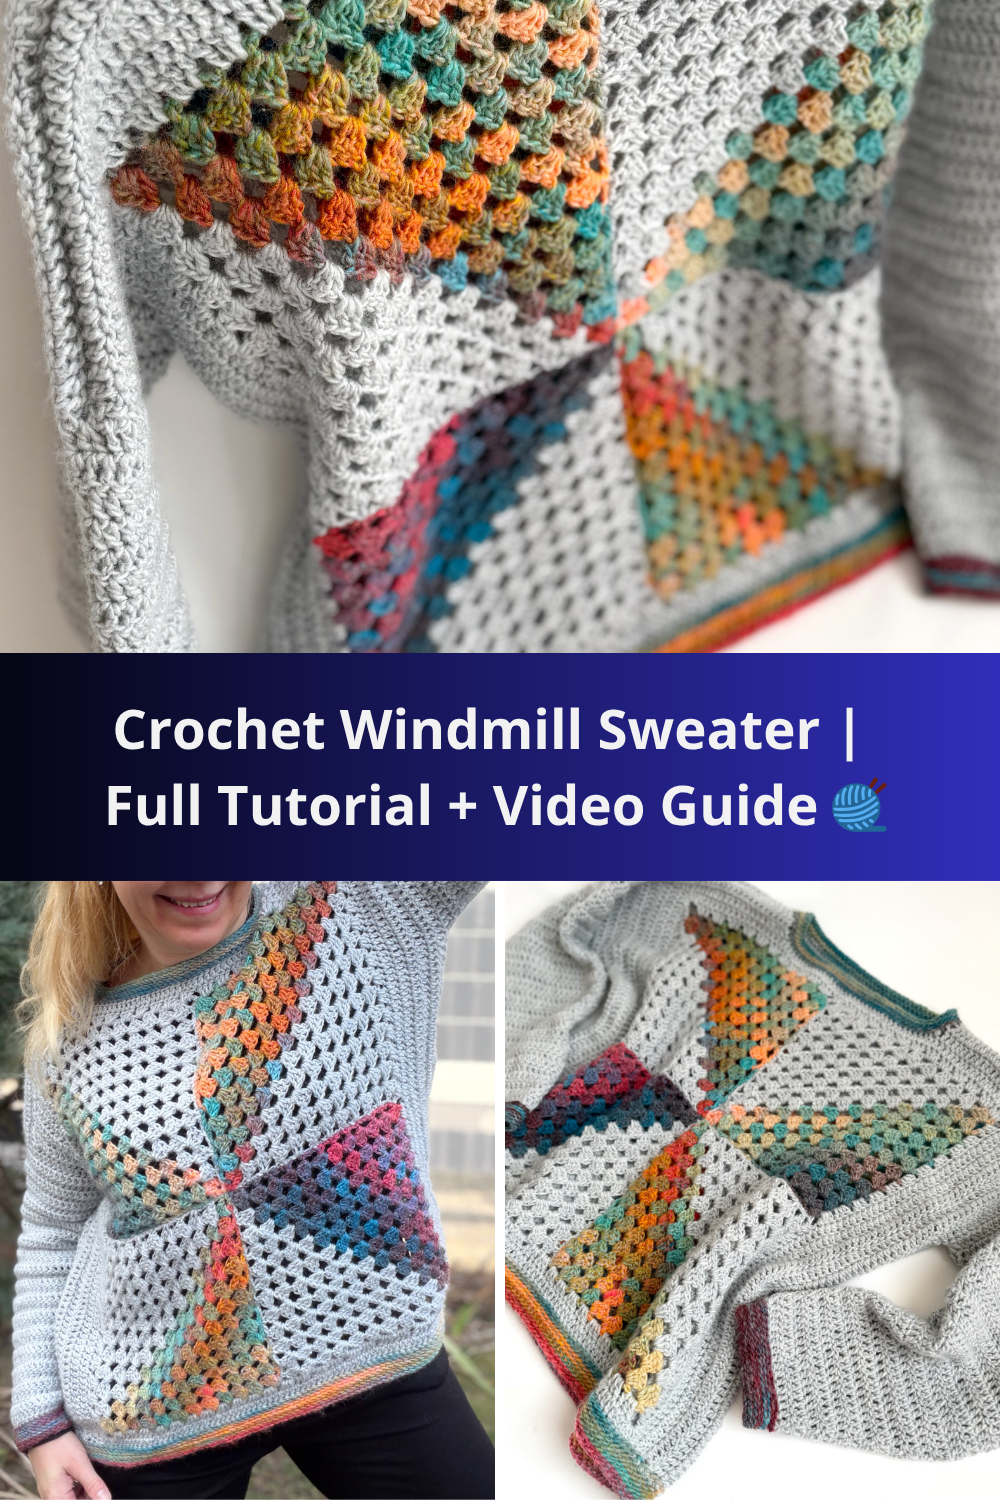
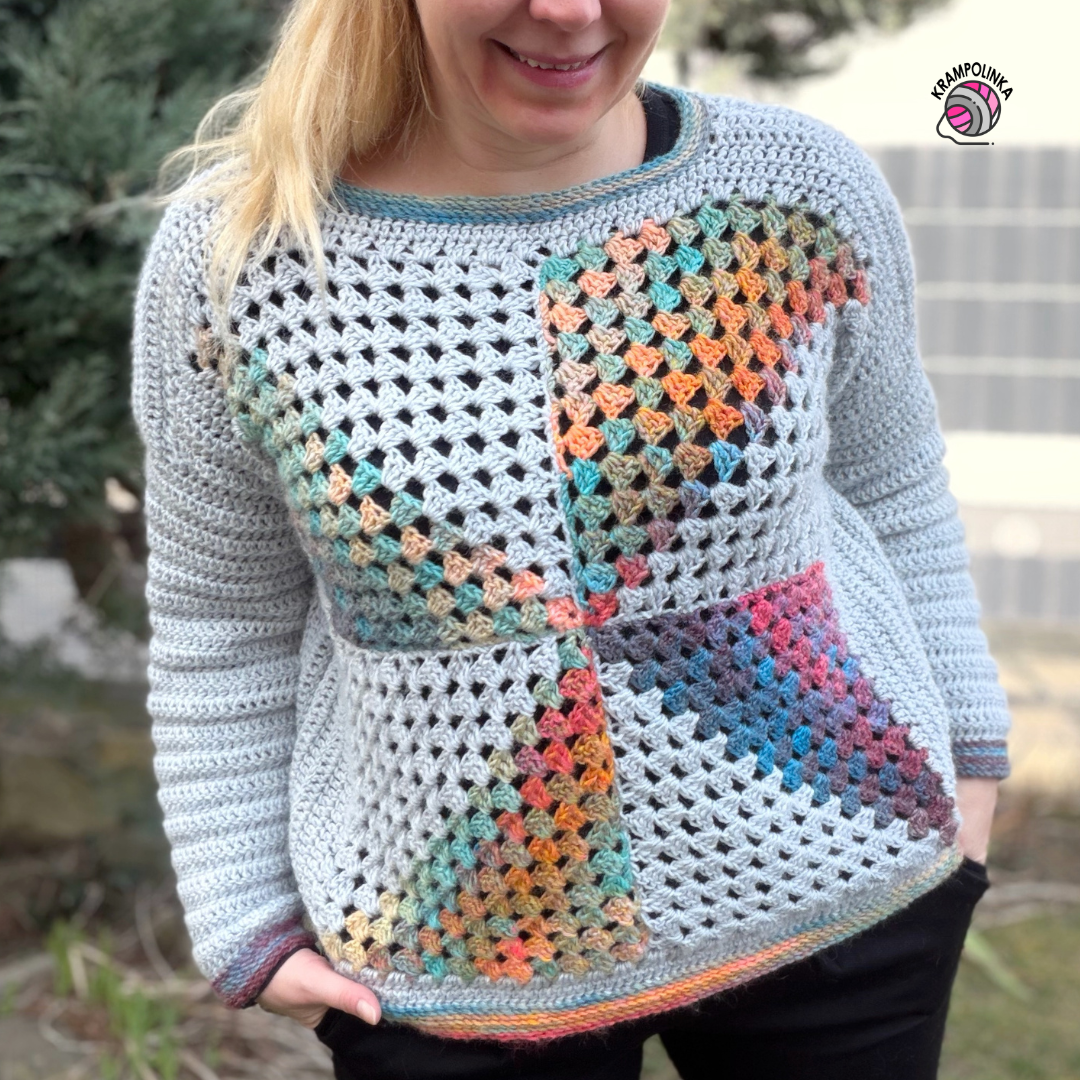
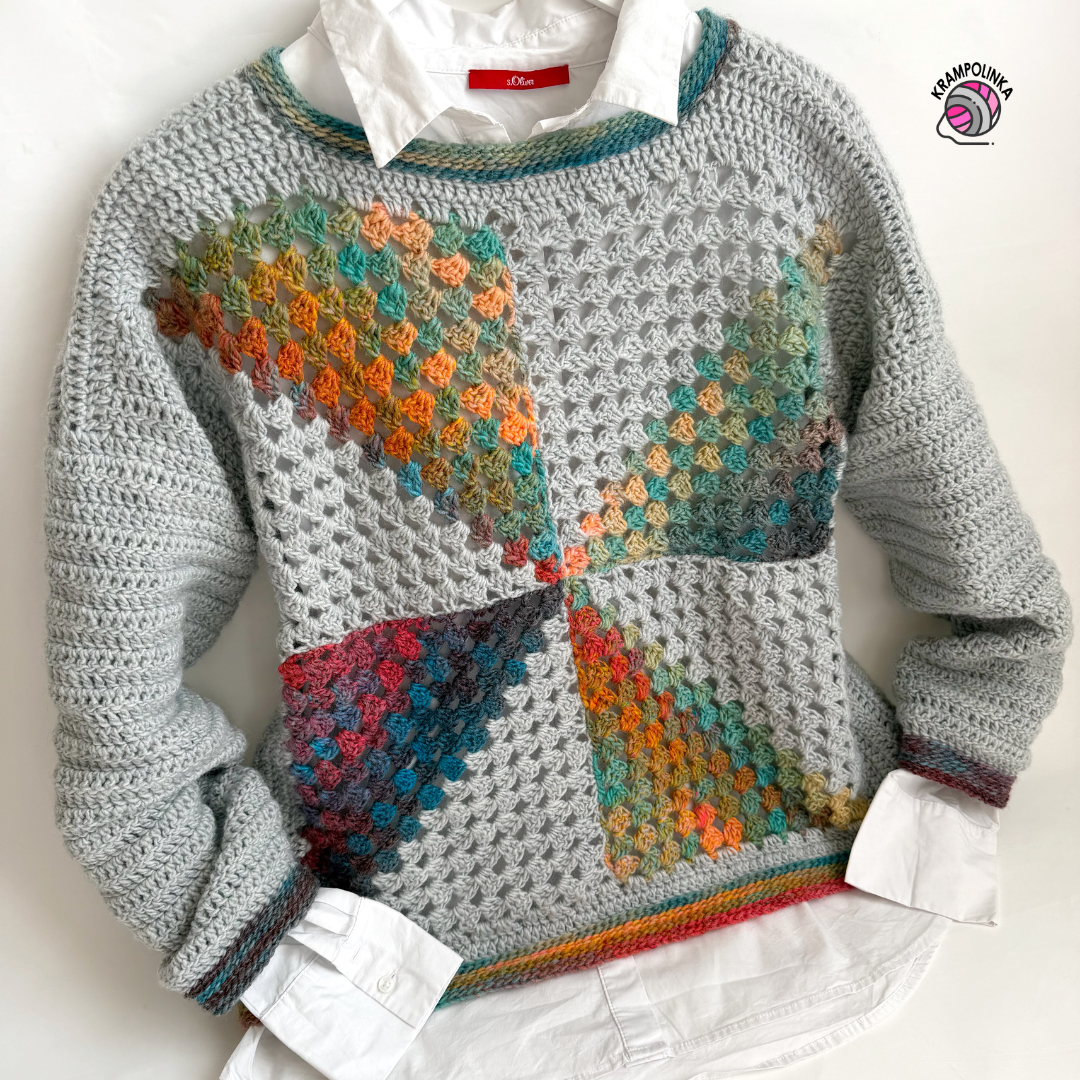
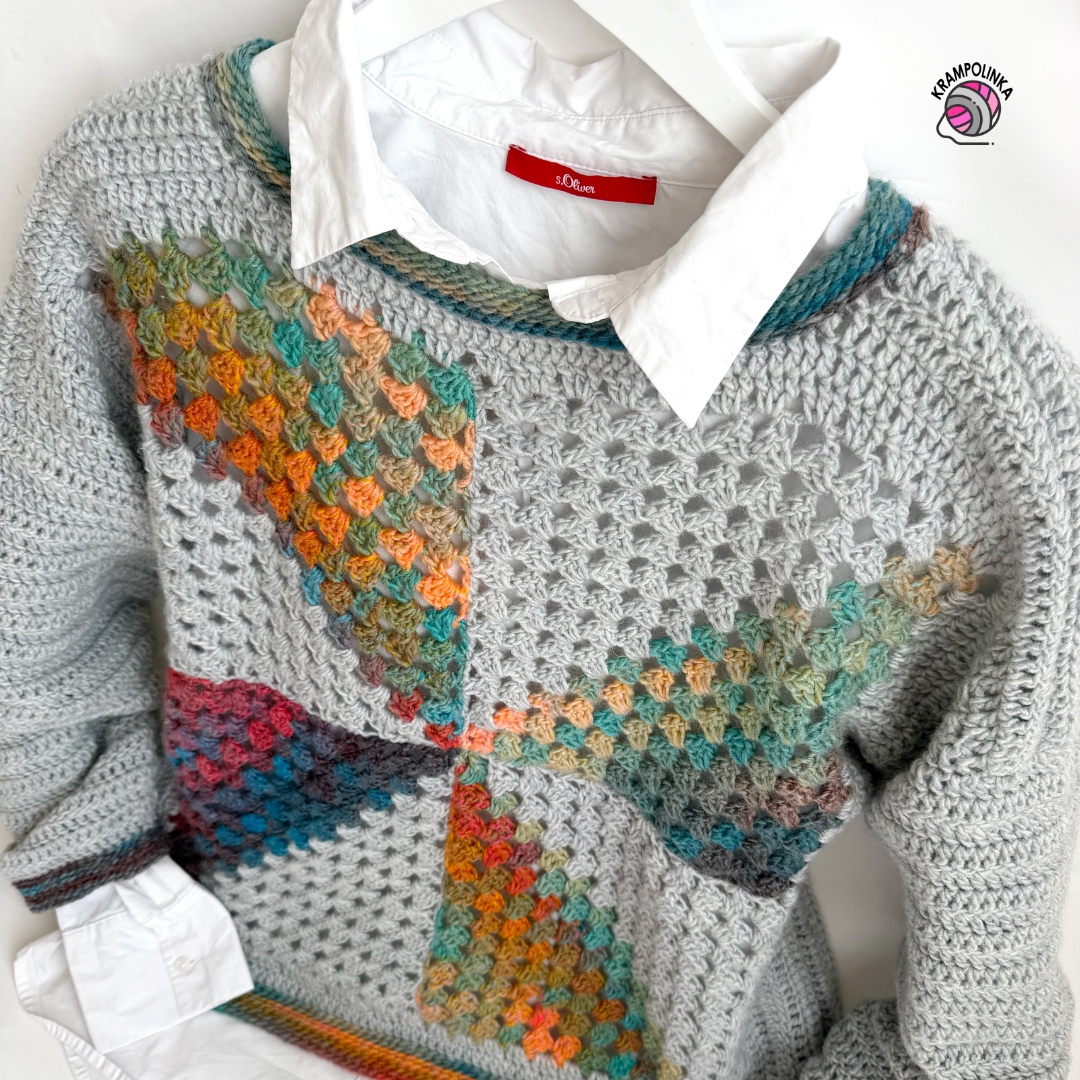
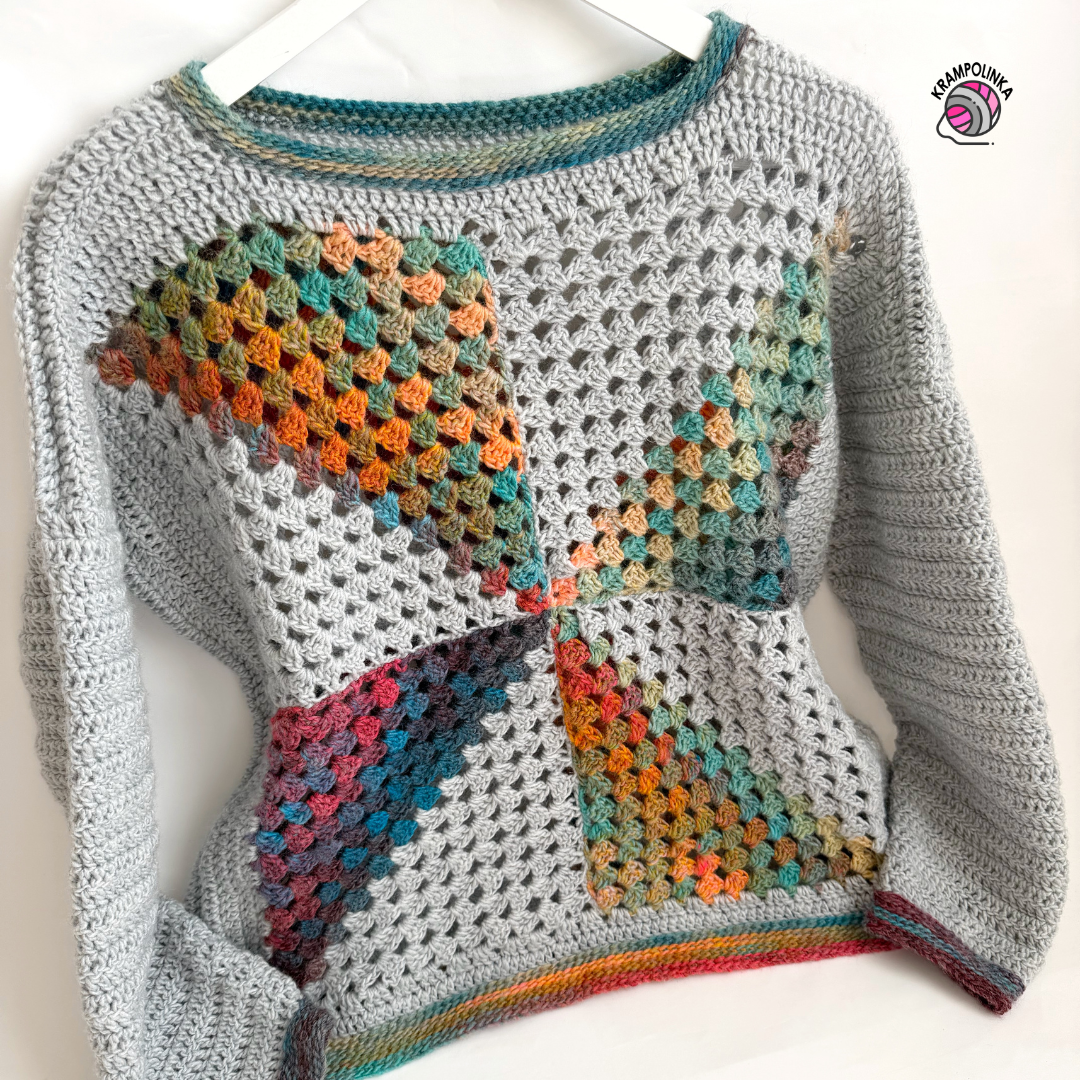
Granny Square Windmill Sweater Tutorial – this crochet sweater made from granny squares is a stylish and versatile piece you can wear from autumn to spring. This easy crochet pattern is suitable even for beginners and combines a unique windmill design with a modern handmade look.
Sometimes all it takes is one idea and suddenly you know you won’t be doing anything else that day. That’s exactly how this windmill-motif sweater came to life—a piece you can wear almost all year round. For this project, I used two solid-color skeins of VlnaHep Sierra and one variegated Sierra Color. Each skein has a yardage of 150 g / 450 m and is made of 80% acrylic and 20% wool. These yarns are suitable for both crochet and knitting—perfect for sweaters, cardigans, blankets, pillows, as well as dresses and tunics. The fiber content makes them especially suitable for cooler seasons. From this yarn, we’ve already made a lovely Sierra sweater and a practical retro Sierra cowl.
You can find the unboxing of the new Sierra Color shades in the podcast “Povídání u klubíčka” episode 122 and in the article here.
-
- PIN pattern for later Sweater Wind-Mill
VIDEO TUTORIAL PREMIERE now includes automatically generated subtitles. Did you know you can slow down the video on YouTube and adjust it to your own crocheting pace?
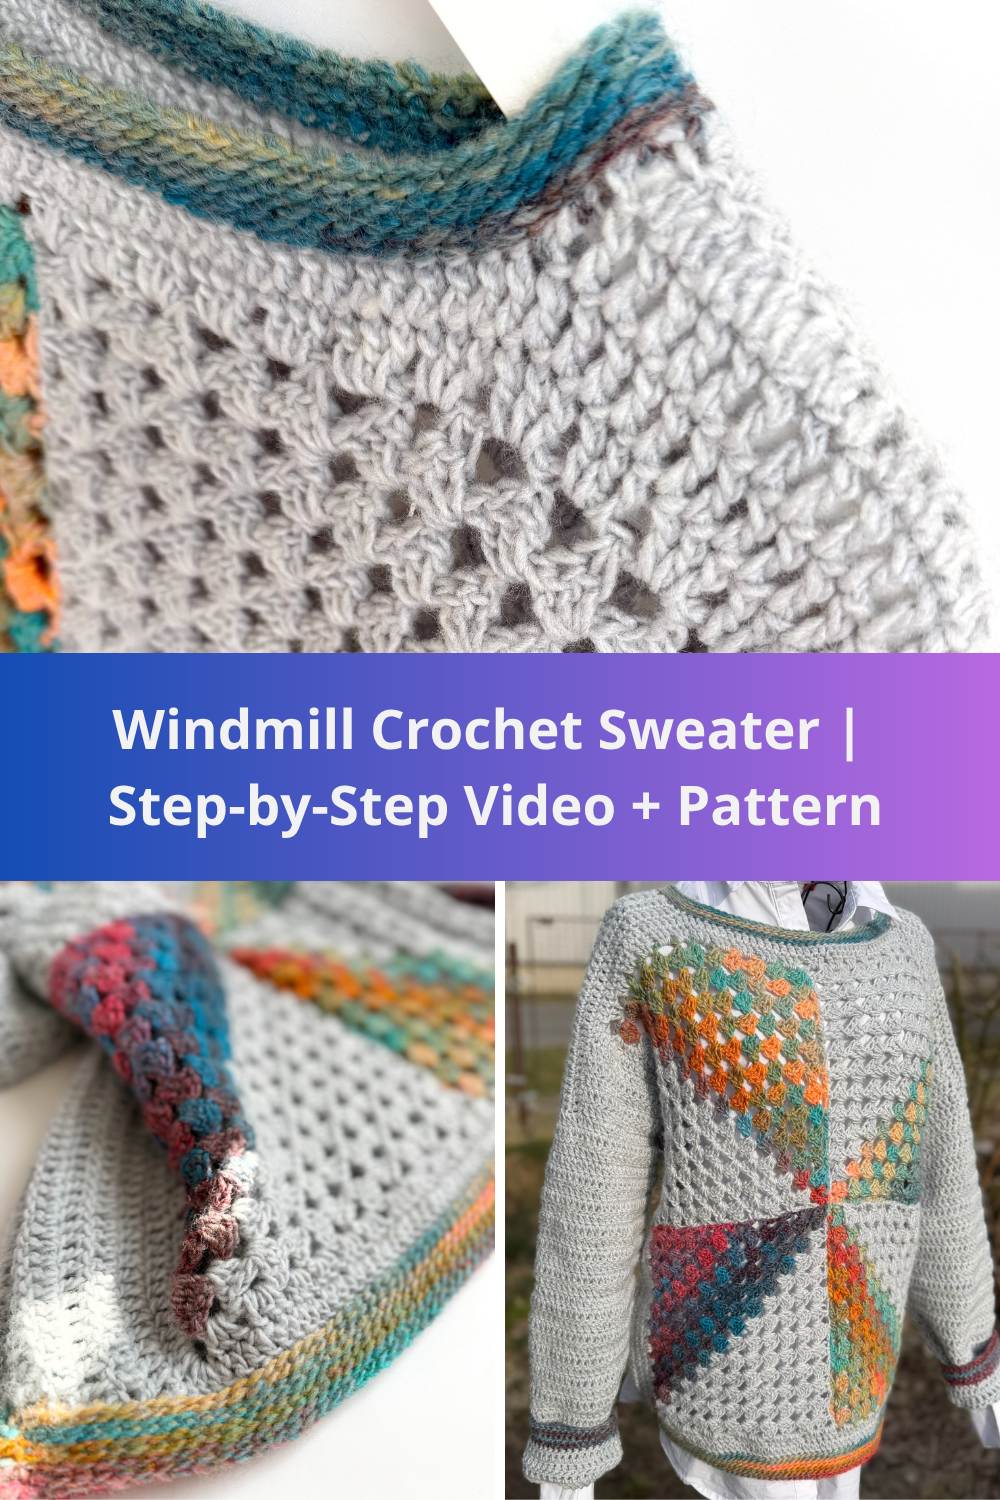
The sweater is made from two panels. The base of each panel consists of four two-color squares, which are first crocheted separately and then sewn together. The resulting piece is then edged with a border and expanded on the sides into a rectangular shape. In the next stage, the neckline is shaped. The finished panels are joined together at the shoulders and sides, and sleeves are then crocheted into the armholes. The entire sweater is finished with colorful borders.
The squares are crocheted starting from the bottom corner using variegated yarn. The first stitches are worked into a magic ring. The work is done in rows back and forth—first increasing, and after changing color, decreasing according to the pattern. Each row begins with three chain stitches as a substitute for the first double crochet and ends with a treble crochet worked in two steps.
The pattern is simple and suitable even for intermediate beginners. It uses only double crochet, single crochet, and chain stitches. For the borders, I used the herringbone single crochet, which gives the project an interesting texture. The variegated yarn creates a beautiful effect both in the squares and along the edges.
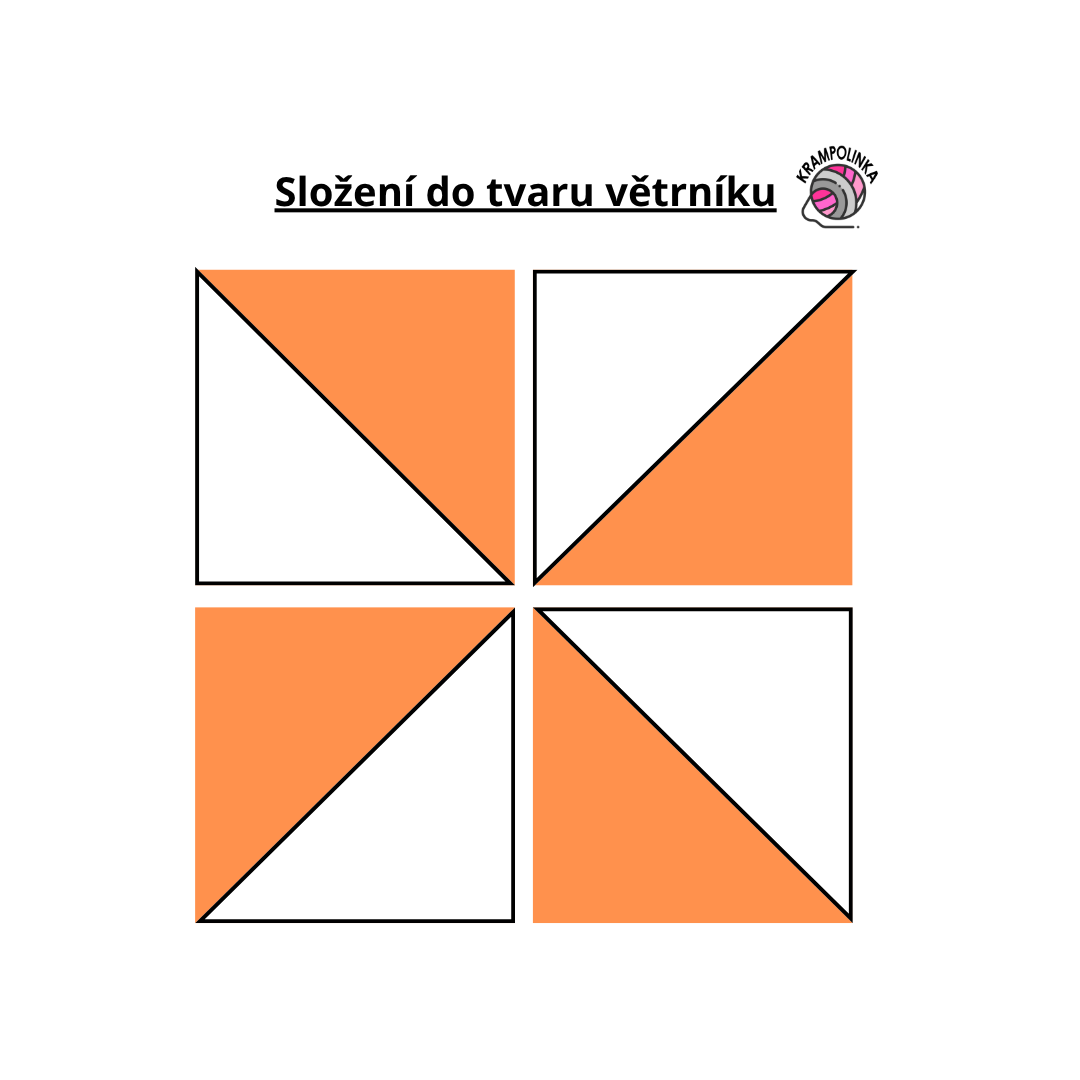
TIP: Pay close attention to assembling the four two-color squares correctly to achieve the characteristic windmill motif. You can easily adjust the size of the sweater by changing the number of rows in the squares—crochet more or fewer rows as needed. I recommend comparing it regularly with your favorite loose-fitting sweater.
I hope your Windmill Sweater turns out beautifully and that you wear it with joy. If you’d like to inspire others or share your experience with crocheting or styling the sweater, I would be very happy to see your photos. You can share your photos in the Krampolinka Facebook group. On Instagram, please use the hashtag #svetrikvetrnik so others can easily find your projects. If you tag me in your creations made using my patterns, I can reshare them in my Instagram Stories to inspire others.
WINDMILL SWEATER
Yarn: Vlna Hep Sierra and Sierra Color
Yarn usage: 2 skeins grey no. 6230, 1 skein variegated no. 7214
Hook: 5 mm and 6 mm
Size: 42–44, height 168 cm
Measurements: width 64 cm, front length 57 cm, sleeve length 45 cm
Other supplies: tapestry needle (large eye), decorative label, needle and thread matching the yarn
Time required: approx. 15 hours
Skill level: beginner
Abbreviations:
ch – chain stitch
MR – magic ring
dc – double crochet
sc – single crochet
tr – treble crochet (double yarn over)
hsc (herringbone single crochet) – recommended to watch the video tutorial
-
- PIN it for later. Your Windmill Sweater Pattern
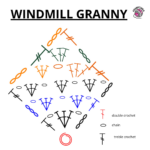
Square, hook 5 mm, variegated yarn, make 8 pieces
Row 1: Into MR crochet 3 ch as a substitute for the first dc, ch, 3 dc, ch, tr (worked in two steps), turn. Place stitch markers under the chain spaces. Turn.
Row 2: 3 ch as dc, ch. Under the chain space (with marker) crochet 3 dc, ch, 3 dc under the next chain space (with marker), ch and tr into the third chain of the turning chain. Turn.
Rows 3–12: 3 ch as first dc, ch. The pattern consists of 3 dc under chain space and ch. The row ends with a tr into the third chain of the turning chain. Turn. You will have 12 pattern groups in a row. In the last row, finish the final tr using solid color yarn. Width is approx. 22 cm.
Decreasing in the square, hook 5 mm, solid color yarn
Row 13: 3/4 ch as a substitute for dc, skip the first chain and crochet 3 dc between stitches. At the end of the row crochet 2 dc into the second-to-last space and leave the third dc unfinished on the hook. Crochet a tr (worked in three steps) into the third chain of the turning chain and finish all together, turn.
Rows 14–23: same as row 13. Crochet 3 dc only between stitches. Each row begins with 3/4 ch and ends with tr into the third chain of the turning chain, turn.
Row 24: 3 ch as first dc and tr (worked in two steps) into the third chain of the turning chain. Fasten off.
Make 8 squares in total, four for the front panel and four for the back panel. Arrange them according to the picture or video into a windmill shape. Sew the squares together using a needle and thread. On the wrong side, press the seam through a cloth.
Back and front panel, hook 5 mm, solid color yarn
Row 1: Join yarn in the upper corner under the edge stitch, crochet 2 ch as dc and 2 dc. Then crochet 3 dc all around the joined squares under each edge stitch. In the corners crochet 3 ch. At the end of the row crochet ch and dc so you remain in the corner.
Row 2: 3 ch as dc and 2 dc under the corner space. Then dc in each dc. In the corner crochet 3 dc, ch, 3 dc. At the end crochet 3 dc, ch and sc and finish in the middle of the corner space or join with ch and slip stitch. Do not fasten off.
Side extension of panel, hook 5 mm, solid color yarn
Row 1: 2 ch as dc, dc in each dc. Count stitches. At the end crochet dc into the chain space, turn.
Rows 2–5: 2 ch as dc, dc in each dc. Count stitches. At the end crochet dc into the second chain of the turning chain. Turn. Fasten off.
Repeat on the opposite side of the panel, but join yarn at the bottom corner to keep the pattern symmetrical. After finishing the second side, do not fasten off.
Note: Adjust the number of side rows to achieve the desired panel width.
Back neckline, hook 5 mm, solid color yarn
Rows 1–2: 2 ch as dc, then dc in each dc. At the end crochet dc into the second chain, turn.
Row 3: 2 ch, then crochet 31 dc (32 stitches total). Fasten off. Skip 36 stitches for neckline. Join yarn, 2 ch as dc and crochet 31 dc from neckline toward the edge. Fasten off.
Front neckline, hook 5 mm, solid color yarn
Rows 1–3: 2 ch as dc, then 31 dc. Turn. Fasten off, skip 36 stitches for neckline. Join yarn, 2 ch as dc and crochet 31 dc from neckline toward the edge. Turn. Do not fasten off in the last row and continue joining shoulders.
Joining shoulders, hook 5 mm, solid color yarn
Place both panels right sides together. Join shoulders on the wrong side using slip stitches. Insert hook into a stitch on one panel and the corresponding stitch on the other panel and crochet loose slip stitches. Make sure to match correct stitches. Fasten off at neckline. Repeat on the other side.
Joining sides, hook 5 mm, solid color yarn
Place both panels right sides together. Join sides on the wrong side. Start at the bottom edge using slip stitches and work upward toward the armhole. Insert hook into corresponding stitches on both panels and crochet loose slip stitches. Adjust armhole height according to arm width or desired sleeve fit. I joined 58 stitches, the rest forms the armhole. Do not fasten off, bring yarn to the right side and continue with sleeve. Repeat on the other side.
Sleeve, hook 5 mm, solid color yarn
Row 1: 3 ch as dc, dc in each stitch. In horizontal rows crochet 2 dc per row. Join with slip stitch into second chain, turn and work in the opposite direction to keep seam straight.
Rows 2–12: 3 ch as dc, dc in each stitch. Join with slip stitch, turn.
Row 13: Decrease – 3 ch as dc, crochet second and third stitch together, mark, then dc in each stitch. Join with slip stitch, turn.
Row 14: same as row 13.
Rows 15–16: same as row 2.
Rows 17–18: same as rows 13–14.
Rows 19–20: same as rows 13–14.
Rows 21–22: same as row 2.
Rows 23–24: same as rows 13–14.
Row 25: same as row 2.
Rows 26–27: same as rows 13–14.
Row 28: same as row 2.
Rows 29–30: same as rows 13–14.
Rows 31–32: same as rows 13–14.
Row 33: same as row 2. Change yarn color when making slip stitch.
Note: Adjust number of rows to sleeve length and modify decreases if needed.
Sleeve edging, hook 5 mm, variegated yarn
Row 1: ch as sc, insert hook behind chain, then into dc stitch or back loop, pull yarn through two loops, yarn over and finish sc. Continue with herringbone single crochet. Join with slip stitch.
Rows 2–4: ch as sc, continue herringbone single crochet in back loop. Join with slip stitch. Fasten off.
Neckline edging, hook 5 mm, variegated yarn
Row 1: Join yarn at back neckline. ch as sc, insert hook behind chain, then into dc or edge stitch, pull yarn through two loops, yarn over and finish sc. Continue herringbone single crochet. Work two stitches per horizontal row. Join with slip stitch.
Rows 2–3: ch as sc, continue herringbone single crochet in back loop. Join with slip stitch. Fasten off.
Bottom edging, hook 5 or 6 mm, variegated yarn
Row 1: Join yarn at side seam. ch as sc, insert hook behind chain, then into dc or edge stitch, pull yarn through two loops, yarn over and finish sc. Continue herringbone single crochet. Work two stitches per horizontal row. Join with slip stitch.
Rows 2–4: ch as sc, continue herringbone single crochet in back loop. Join with slip stitch. Fasten off.
Finishing
Weave in loose ends. Add decorative label.
Copyright Notice
This pattern is for personal use only. For commercial use, please contact me directly. Always include the source credit: www.krampolinka.com. The pattern is designed specifically for this yarn, hook size, and my personal tension. If you use a different yarn, hook, or tension, your final product may vary in size or shape.
Enjoy this free pattern and you can follow my latest projects, tutorials, ideas, reviews, video podcasts, tips, and tricks:
- Krampolinka YouTube videos (subtitled since 2024)
- Krampolinka Instagram
- Krampolinka FB group
-

- Crochet Windmill Sweater in Soft Colors
-

- Handmade Granny Square Sweater with Windmill Pattern
-

- Cozy Crochet Sweater – Windmill Design Outfit
-

- Stylish Crochet Sweater from Granny Squares
-
- Granny square crochet diagram

-
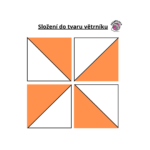
- How to turn granny squares to windmill look
No Comments