
Wrap Cardigan or All-Season Blouse – Delicate Elegance with a Floral Stitch Pattern and the Pastel Rainbow Yarn LÉTO from Lara
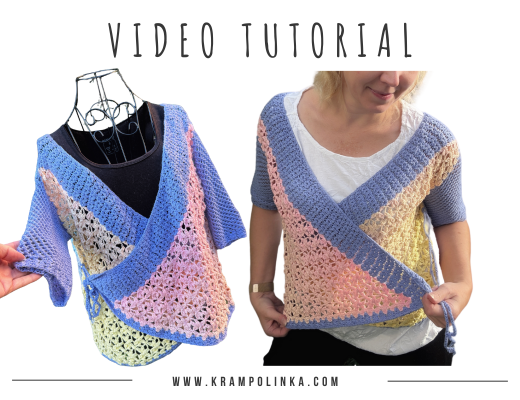
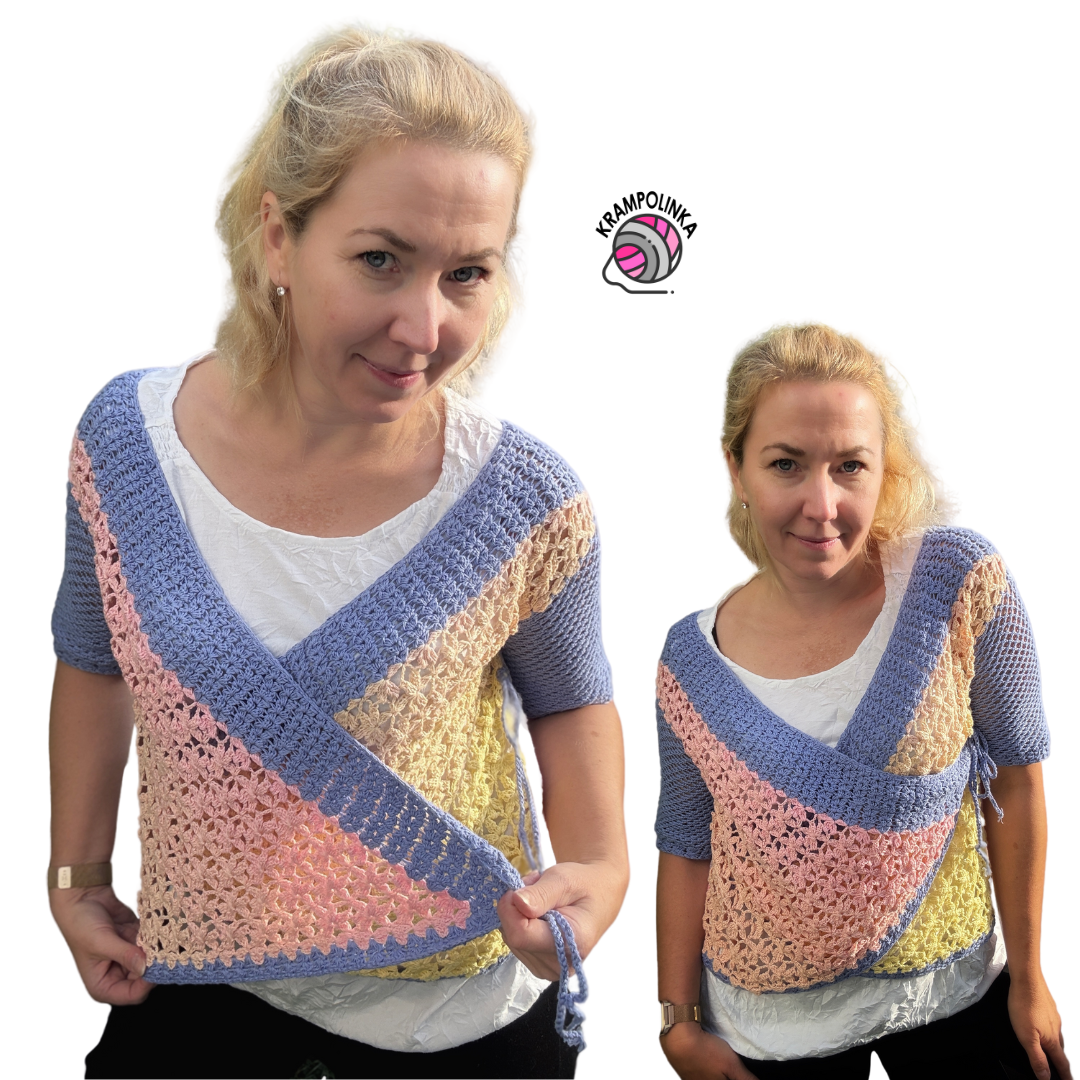
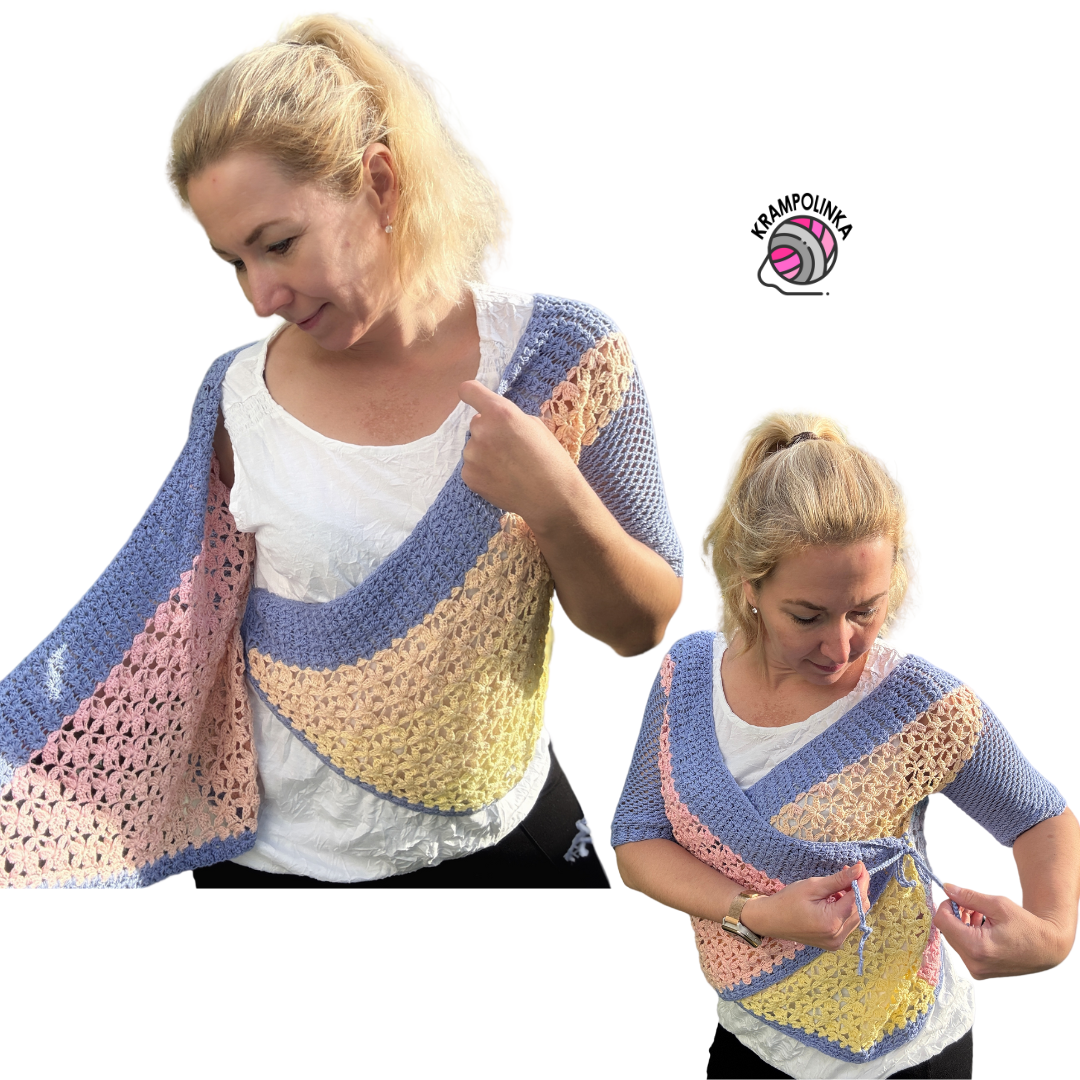
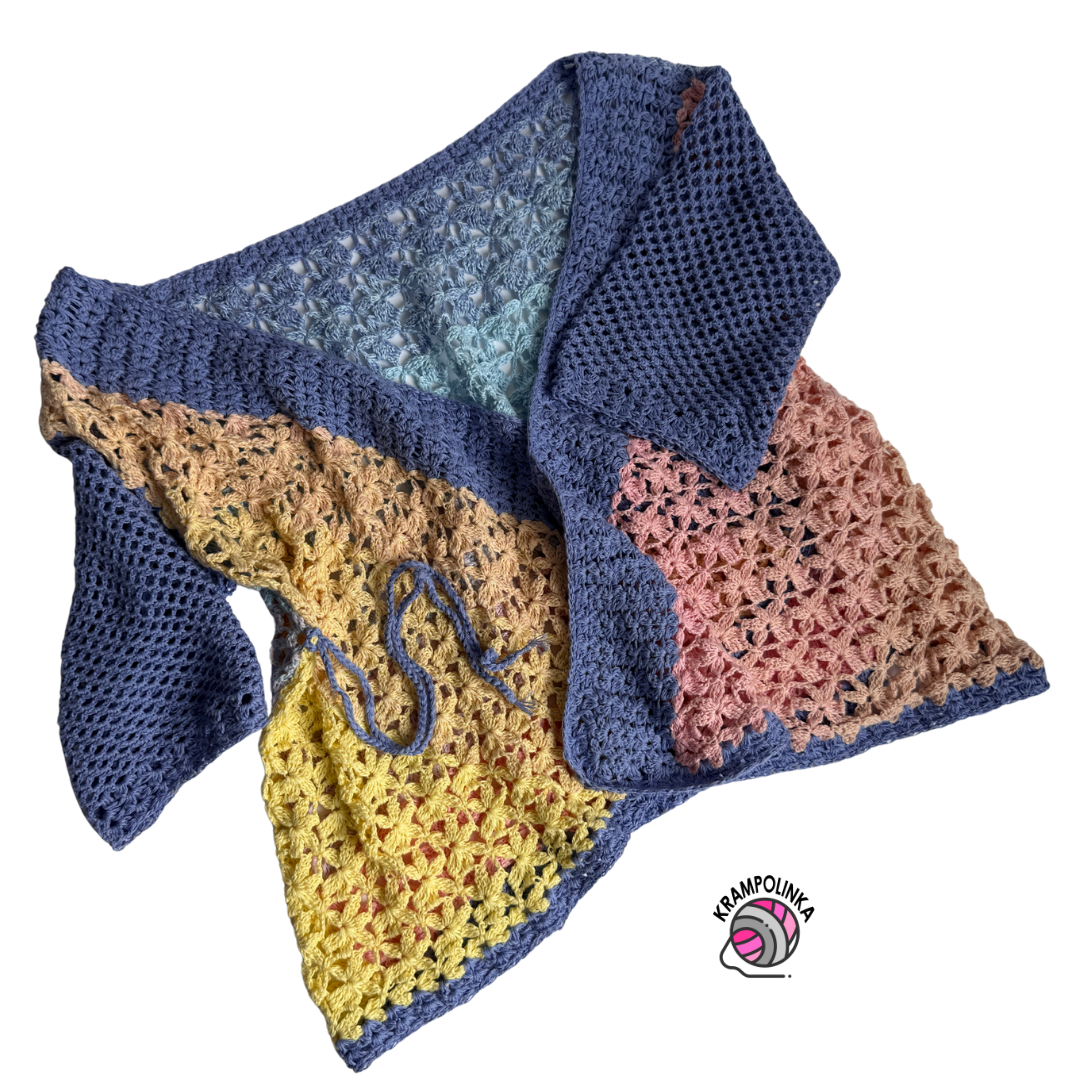
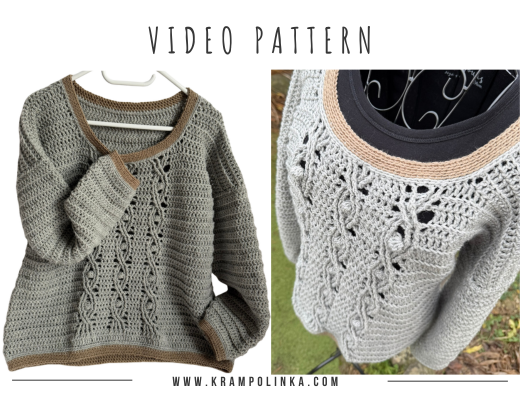
From the cotton gradient yarn ball available at the Klubka od Lary e-shop, I created a crocheted wrap cardigan with short sleeves during the summer season. Thanks to its versatile design, it can also be worn as a blouse. A timeless piece you’ll reach for all year round, especially from spring through early autumn.
For size 42, I used approximately 1,500 meters of a 3-ply gradient yarn called LÉTO, made of 100% cotton. In the Klubka od Lary e-shop, you can also choose other 3-ply beauties, blended yarns (50% cotton and 50% acrylic), that are just as perfect for crocheting your own cardigan or blouse. I recommend lovely pastel shades.
VIDEO TUTORIAL PREMIERE – WEDNESDAY, SEPTEMBER 3, 2025 at 7:00 PM
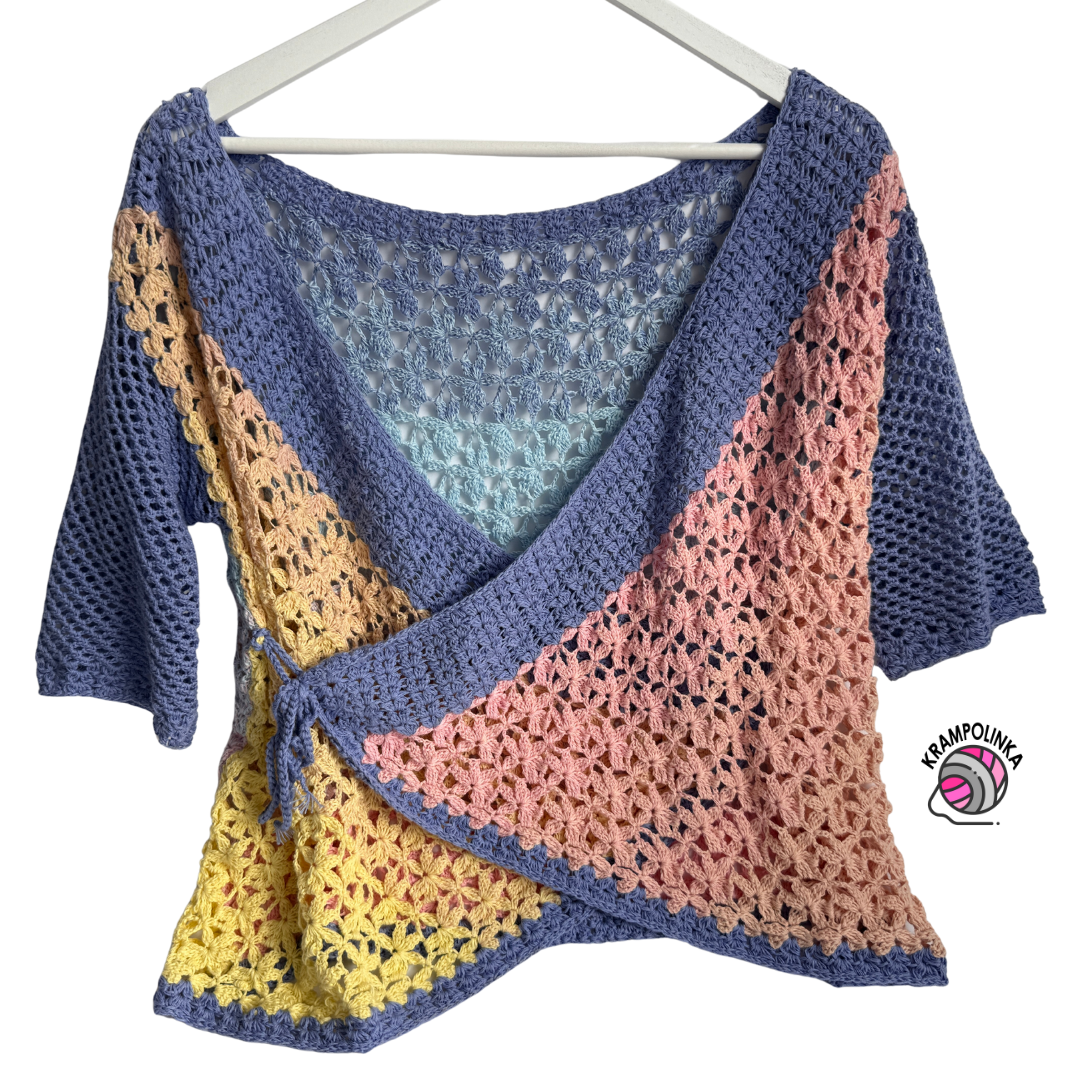
We crochet the cardigan using a romantic floral stitch pattern. First, make the back panel, then crochet the two front panels in the shape of triangles. I recommend making the back panel slightly narrower, because the cardigan or blouse should gently hug the figure. The best way to determine the width of the back is to measure it against a favorite fitted sweater or top. The shape of the back panel is something between a square and a slight rectangle.
For the front panels, add a wide edging along the neckline. This edging replaces the shoulder section and should measure about 7–10 cm (3–4 in). Its length needs to match the back panel. The wider the back, the longer the edging must be, otherwise the cardigan may slip off the shoulders.
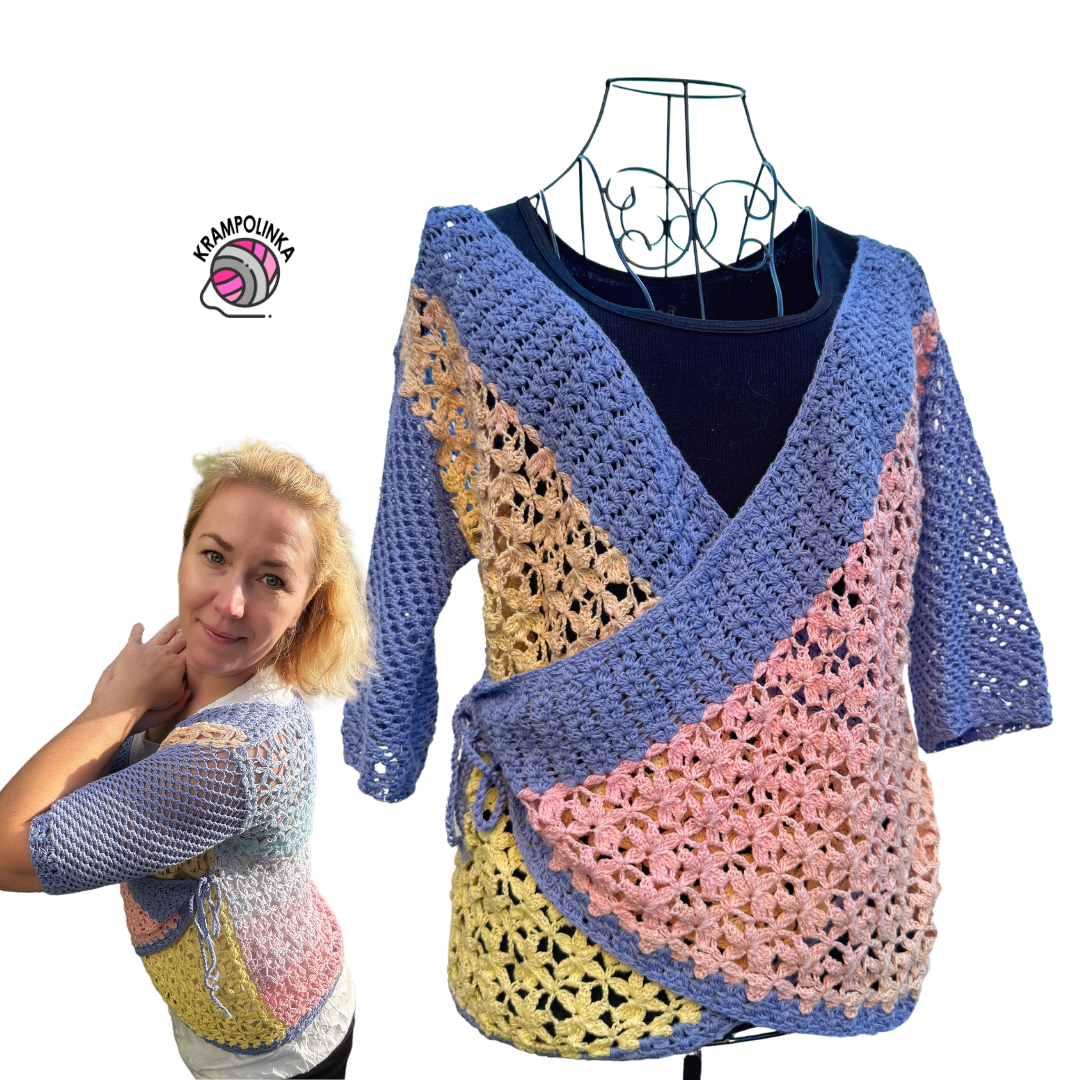
To crochet the back panel, make a starting chain with a stitch count that is a multiple of 8 + 2 edge stitches. After joining the panels at the shoulders, crochet an edging all around the cardigan in the same stitch pattern. I sewed the side seams using a needle and thread. One front panel tip is stitched on the inside to the side seam, while the other front panel forms the wrap-over part. Crochet a cord and attach it to the side seam of the cardigan with a lark’s head knot – this will serve as the tie for the wrap.
Finally, crochet the sleeves. Since I ran out of yarn, I made short sleeves. If you’d like longer sleeves, I recommend buying more yarn.
💡 TIP: I crocheted both the back and the front panels directly from the gradient yarn ball, without unwinding or rearranging the colors. For this project, I recommend a gradient yarn cake with at least 1000 m (1090 yds) and an extra 500 m (545 yds) of the last shade from the cake for the edgings and sleeves – this will give the cardigan a uniform color effect.
CROCHET TIPS and TRICKS for crochet wrap cardigan LARA – ENGLISH subtitles
I hope your Lara cardigan or blouse turns out beautifully and that you wear your handmade piece with joy. Would you like to inspire others or share your own experiences with crocheting or styling this cardigan or blouse? You can post your photos in the Krampolinka Facebook group. On Instagram, please use the tags #svetriklara and #larablouse for easy searching. If you tag me in your creations made from my patterns, I can share them in my Instagram Stories to inspire others.
SVETRIK LARA
Yarn: Gradient yarn cake, 1500 m, from Klubka od Lary
Yardage used: approx. 1000 m for back and front panels, 500 m for edgings and short sleeves
Hook sizes: 2.0 mm and 2.5 mm
Measurements: back panel height 42 cm (16.5 in), back panel width 52 cm (20.5 in), total front length of the cardigan approx. 48 cm (19 in), sleeve length 23 cm (9 in)
Size: designed for EU size 42 / bust circumference 96 cm (38 in)
Notions: tapestry needle, decorative label, stitch markers
Time estimate: approx. 50 hours
Skill level: adventurous beginner
Abbreviations (US terms): CH – chain, SL ST – slip stitch, DC – double crochet, SC – single crochet, TR – treble crochet (double treble in UK terms), MR – magic ring
Stitch notes (flower motif): Petal – CH 4 and 2 TR, or 3 TR worked together (cluster).
Bottom half of flower – CH 4 and 2 TR cluster, 3 TR cluster, 3 TR cluster, or 3 × 3 TR clusters, all joined together with 1 CH securing stitch, plus 1 petal worked into the center of the cluster.
Top half of flower – petal, CH 6, petal, all crocheted into the center of the flower from the previous row.
Cardigan – Back Panel (Hook 2.5 mm for foundation, then 2.0 mm)
Row 1 (foundation chain, 2.5 mm hook): Chain 113. I always make 1–2 extra chains; if I accidentally skip a stitch when working the first flower row, I can unravel the excess at the end. Turn.
-
112 + 1 CH for size 42–44 = 14 flowers
-
104 + 1 CH for size 42 = 13 flowers
-
96 + 1 CH for size 40 = 12 flowers
-
88 + 1 CH for size 36–38 = 11 flowers
Row 2 (switch to 2.0 mm hook): Begin with the edge pattern: CH 4 (counts as first TR), in the 5th CH from the hook work [2 TR cluster, CH 1, 3 TR cluster]. Flower pattern: CH 4, insert hook into the cluster stitch, work 2 TR (leave on hook), then 3 TR into the chain stitch (leave on hook), then 3 TR into the 8th chain from hook (leave on hook). Draw through all loops, CH 1. Into the CH-1 space make 1 petal (CH 4 + 2 TR, joined together). Into the same stitch where the third petal was worked, add 1 TR (this is done only in this row). Repeat flower pattern across. At the end, finish with the edge pattern [3 TR cluster, CH 1, 3 TR cluster] into last stitch. You should have 14 flowers for size 42–44. Turn.
Row 3: CH 1, SL ST under the CH of the edge. Edge pattern: CH 4 (counts as TR), then into 5th CH work [2 TR cluster, CH 1, 3 TR cluster]. Flower pattern: Into the center of each flower from previous row work the upper half – petal, CH 6, petal, then SC. Next: CH 5, SC into TR (in later rows into SC), CH 5. Repeat across. Finish with edge pattern [3 TR cluster, CH 1, 3 TR cluster] into CH space of previous edge. Turn.
Row 4: CH 1, SL ST under the CH of the edge. Edge pattern: CH 4 (counts as TR), then [2 TR cluster, CH 1, 3 TR cluster]. Flower pattern: Work 1 petal into the cluster stitch of edge, SC under next chain space, then crochet the lower half of the flower:
-
First petal into SC,
-
Second petal under first chain arch,
-
Third petal under second chain arch.
Cluster them together, CH 1. Into this CH make 1 petal. End with SC under arch of CH-6. Repeat across. Finish with a single petal at the end. Edge pattern: [3 TR cluster, CH 1, 3 TR cluster] into CH space of previous row. Turn.
Row 5: CH 1, SL ST under CH of edge. Edge pattern as before. Flower pattern: CH 5, SC into SC, CH 5, then into center of previous flower work upper half (petal, CH 6, petal). Repeat across. At the end work CH 5, SC into SC, CH 5. Finish edge as before. Turn.
Row 6: Same as Row 2. Start with edge pattern. Flower pattern: Work 1 petal into edge cluster stitch, 1 petal under first arch, 1 petal under second arch, cluster together, CH 1. Into the flower center crochet 1 petal, then SC under arch of CH-6. Repeat across. Edge pattern to finish. Turn.
Rows 7–32: Repeat Rows 3–6. End with a bottom row of flowers (straight edge). Fasten off.
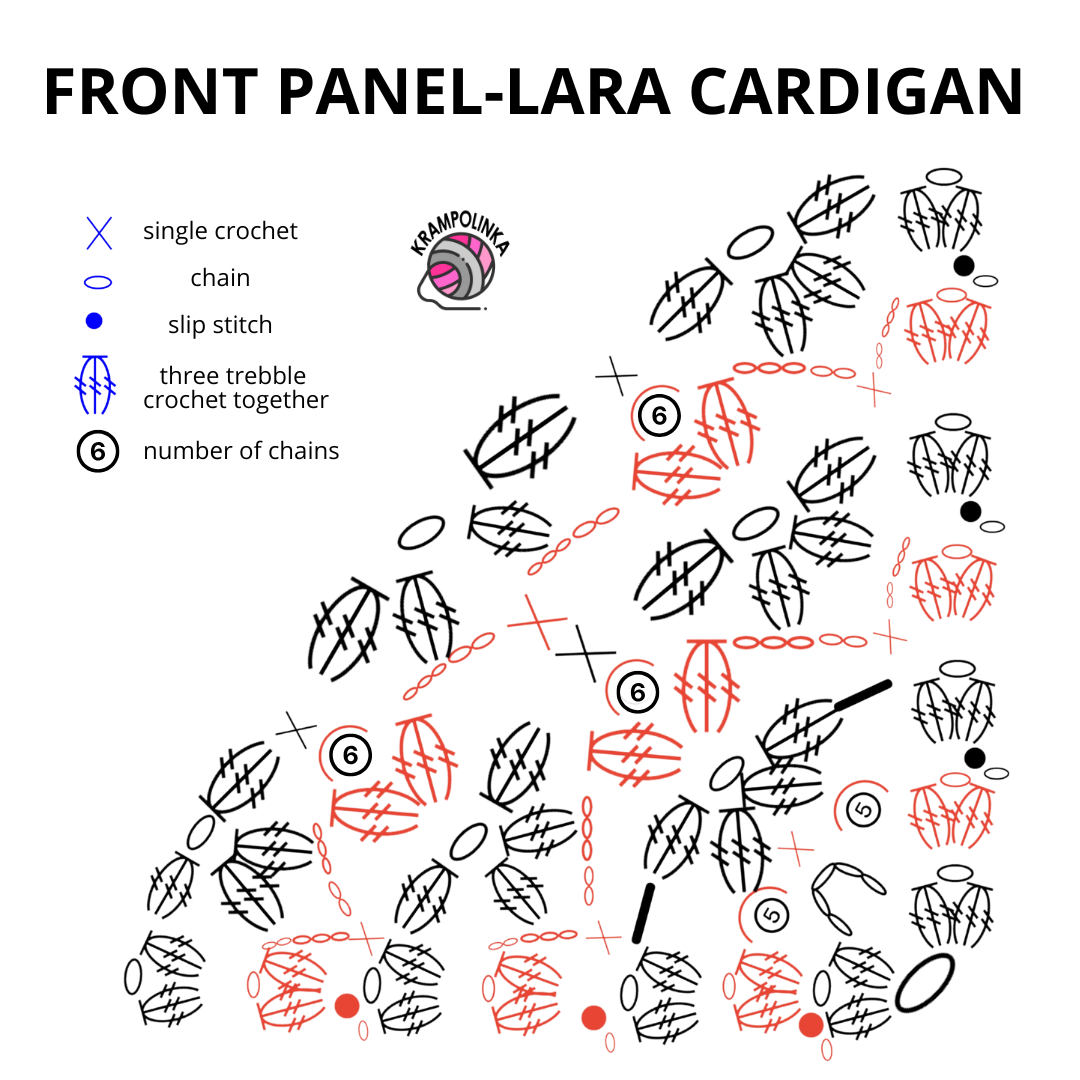
Cardigan – Front Panels (Hook 2.0 mm)
Row 1: Into a magic ring (MR) work [petal, CH 1, petal], CH 5, [petal, CH 1, petal]. Turn.
Row 2: CH 1, SL ST into CH space. Edge pattern = [petal, CH 1, petal]. Center pattern: CH 5, SC under arch, CH 5. End with edge pattern [petal, CH 1, petal]. Turn.
Row 3: CH 1, SL ST into CH space. Edge pattern = [petal, CH 1, petal]. Pattern: Work the lower half of flower:
-
First petal into petal of edge pattern,
-
Second petal under first arch,
-
Third petal under second arch, cluster together, CH 1.
-
Fourth petal into flower center.
End with edge pattern [petal, CH 1, petal]. Turn.
Row 4: CH 1, SL ST into CH space. Edge pattern = [petal, CH 1, petal]. Pattern: At the beginning of every even row, work CH 5, SC into joined petal of edge pattern. Then CH 5 and crochet the upper half of flower (petal, CH 6, petal) into flower center. Continue with CH 5, SC into joined petal of edge pattern, CH 5. End with edge pattern. Turn.
Row 5: CH 1, SL ST into CH space. Edge pattern = [petal, CH 1, petal]. Pattern: Work lower half of flower:
-
First petal into petal of edge pattern,
-
Second petal under next arch,
-
Third petal under following arch, cluster together, CH 1.
-
Fourth petal into flower center, then SC under CH-6 arch from previous row.
Work the second flower the same way. End with edge pattern. Turn.
Row 6: CH 1, SL ST into CH space. Edge pattern = [petal, CH 1, petal]. Pattern: As in all even rows, start with CH 5, SC into joined petal of edge pattern. Crochet CH 5, work upper half of flower into flower center. CH 5, SC into SC, CH 5, work another upper half of flower into flower center. CH 5, SC into joined petal of edge pattern, CH 5. End with edge pattern. Turn.
Rows 7–31: Repeat Rows 3–6. End with a lower row of flowers (straight edge). Note: The front panels have one row less than the back panel, because the first row was worked directly into a magic ring.
Sew the side seams on the wrong side using a needle and thread. Press the seam gently through a towel. Sew up to the desired armhole depth – this will vary depending on the width of your arms. In my sample, I sewed up to the height of the 20th row of the edge pattern.
Front panel edging, hook 2.5 mm.
Row 1: Work a wide edging along both front panels. On one panel, begin crocheting from the top down on the right side; on the other panel, begin from the bottom up on the right side. Join yarn into the edge pattern and crochet CH 3 (counts as DC), then [2 DC cluster, CH 1, 3 DC cluster]. Continue pattern into the flower centers and SC stitches. At the end of the row, turn.
Rows 2–6: CH 1, SL ST into CH space. Work CH 3 (counts as DC), then [2 DC cluster, CH 1, 3 DC cluster]. Continue pattern into the CH spaces from previous row. Turn at the end of each row. Fasten off and repeat edging for the second front panel.
Note: Adjust the number of edging rows so that after seaming the shoulders, the cardigan does not slip off the shoulders. If it does, the back panel is too wide and you need to crochet more edging rows on the front panels.
Sew the shoulder seams on the wrong side with needle and thread. Press the seam gently through a towel. My shoulder seam length is approx. 7 cm (2.75 in).
Edging of the whole cardigan, hook 2.5 mm.
Row 1: Join yarn in the side seam at the bottom into the CH space of the edge pattern. Crochet CH 3 (counts as DC), then [2 DC cluster, CH 1, 3 DC cluster]. Continue with [3 DC cluster, CH 1, 3 DC cluster] into each CH space, and [3 DC cluster, CH 1, 3 DC cluster] into the stitch where a TR was worked. When you reach the bottom of the front panel, work the pattern into the edge stitches where the CH was made. At the bottom corner, crochet [3 DC, CH 1, 3 DC, CH 1, 3 DC], and continue up along the front panel toward the neckline. Here, work into the CH spaces of the previous row. Across the back panel, crochet into the flower centers and SC stitches.
On the opposite front panel, crochet into the CH spaces as before, working in mirror image. Finish the round with a SL ST.
Row 2: Slip stitch into the next CH space. Crochet CH 3 (counts as DC), then [2 DC cluster, CH 1, 3 DC cluster]. Work the pattern into CH spaces all around. At the bottom corner, crochet [3 DC, CH 1, 3 DC, CH 1, 3 DC]. Finish the round with a SL ST. Adjust the number of edging rows as needed.
Short sleeve, hook 2.5 mm.
Row 1: Join yarn under the arm. CH 1 (counts as SC), SC in the same stitch. CH 4, 2 SC under next CH space of the edge pattern. Repeat around. At the end of the round, CH 4 and place 2 SC under the first arch. Crochet in continuous rounds without joining, working seamlessly.
Rows 2–40: Crochet CH 4, 2 SC under next arch. At the end of the round under the arm, work CH 2, 2 SC under arch, CH 1, SL ST into SC.
Row 41: CH 2 (counts as DC), then work [2 DC cluster, CH 2, 3 DC cluster] into one arch, then [3 DC cluster] into next arch, CH 2, 3 DC cluster into next arch. Repeat to end of round. SL ST to join.
Rows 42–43: SL ST into next CH space. CH 3 (counts as DC), then [2 DC cluster, CH 2, 3 DC cluster]. Continue with [3 DC cluster, CH 2, 3 DC cluster] into each CH space around. Finish with SL ST. Fasten off. Repeat for the second sleeve.
Note: If you have enough yarn, add more rows to adjust sleeve length as desired.
Cord, hook 2 mm.
Cut 2 strands, each 8 meters long. Fold in half to create a 12-strand thread. Crochet a chain approx. 200 CH long. Attach to the side seam behind the edge pattern using a lark’s head knot. Thread the free end through the tip of the front panel and tie into a bow.
Finishing
Weave in all loose ends.
Usage and Permissions
This pattern is intended for personal use only. If you would like to use it for commercial purposes, please contact me first. Always include the source link: www.krampolinka.cz when sharing your projects online. The pattern is specifically written for the yarn, hook size, and tension used in this sample. If you use a different yarn or hook, your final bag size and shape may vary.
Enjoy this free pattern and you can follow my latest projects, tutorials, ideas, reviews, video podcasts, tips, and tricks:
- Krampolinka YouTube videos (subtitled since 2024)
- Krampolinka Instagram
- Krampolinka FB group
-

- Wrap summer cardi Lara
-

- Lara Cardigan is crocheted from gradient yarn
-
- The inner part is sewn in
-
- Perfect over dress or top
-
- Adjustable front panel
-
- 100% cotton

-
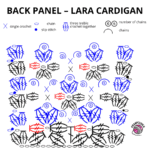
- Back panel Lara

-
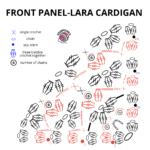
- Front Panel Lara

1 Comment
[…] The Lara Wrap Bow Cardigan is a floral-stitch wrap with a long crocheted cord that threads through and ties in a bow at the front. Worked in a gradient cotton cake, it drapes beautifully over dresses or tanks. The pattern uses a repeating flower motif and detailed written instructions, plus a video tutorial, so you can follow along row by row. Be sure to measure your back width and adjust the panel length as suggested. The finishing steps explain exactly how to tie the bow. See the Lara Wrap Cardigan Tutorial. […]