
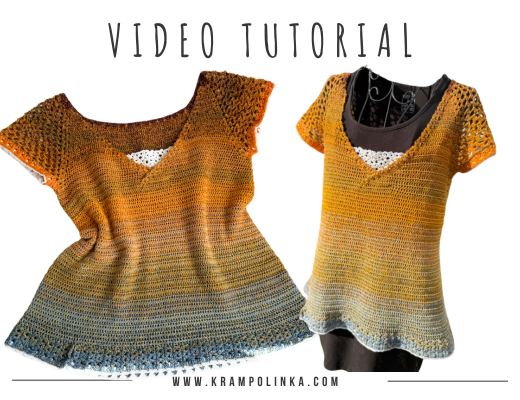
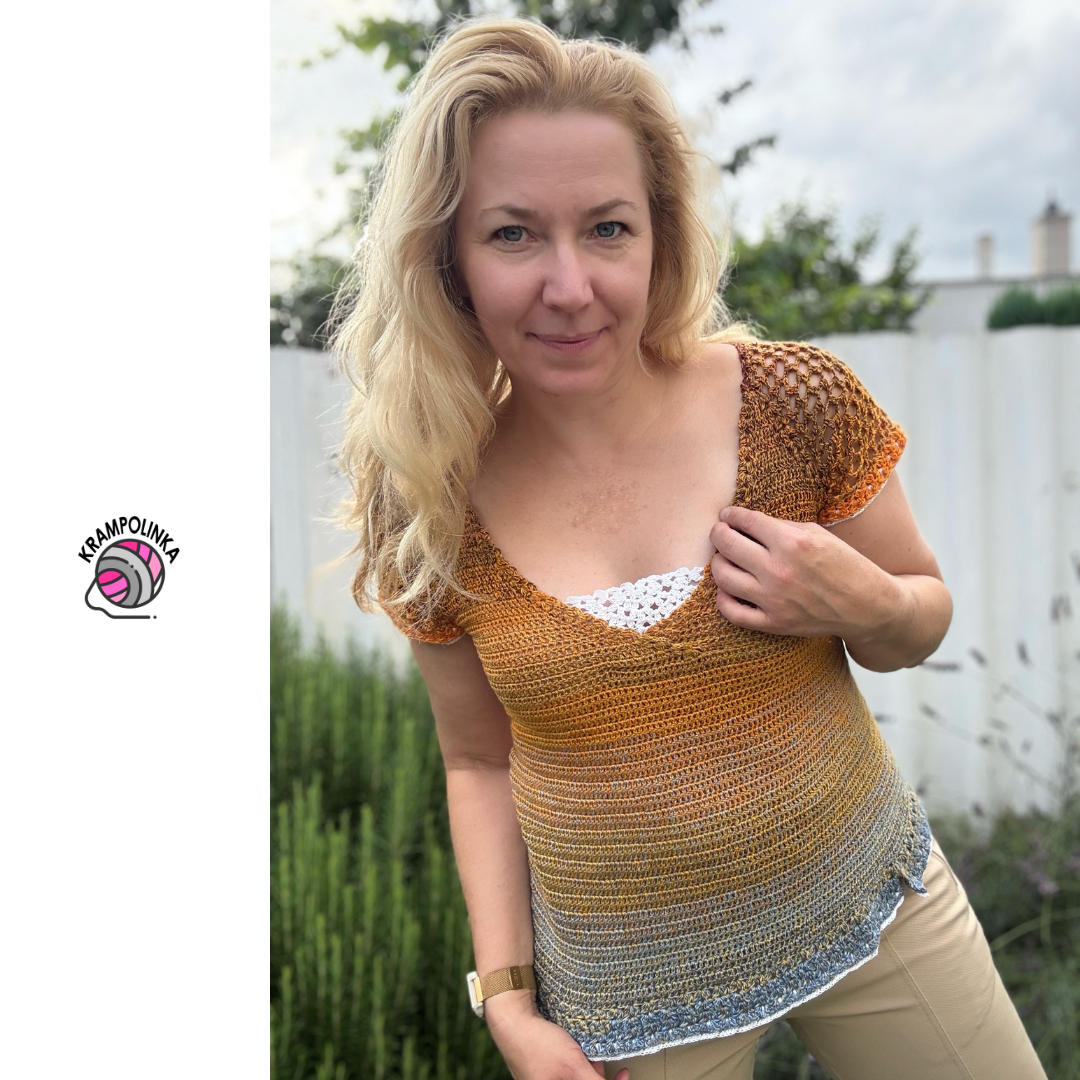
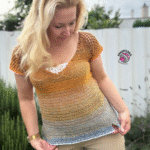
One gradient yarn cake, a bit of white yarn, and a holiday idea – that’s how the Larch Top was born, and you’re going to love it!
Sometimes all it takes is a single skein, a sea view, and a peaceful moment with a hook in hand – and inspiration strikes. That’s exactly how this summer top came to life during my holiday in Bulgaria. I crocheted it from a stunning gradient yarn cake by Design Yarn – Larches by the Lake – a delicate 3-ply blend with viscose fiber in a warm curry shade. The yarn has a beautiful sheen and smooth color transitions, giving the finished piece a unique character. You can find this yarn and many more at Hravá klubka.cz.
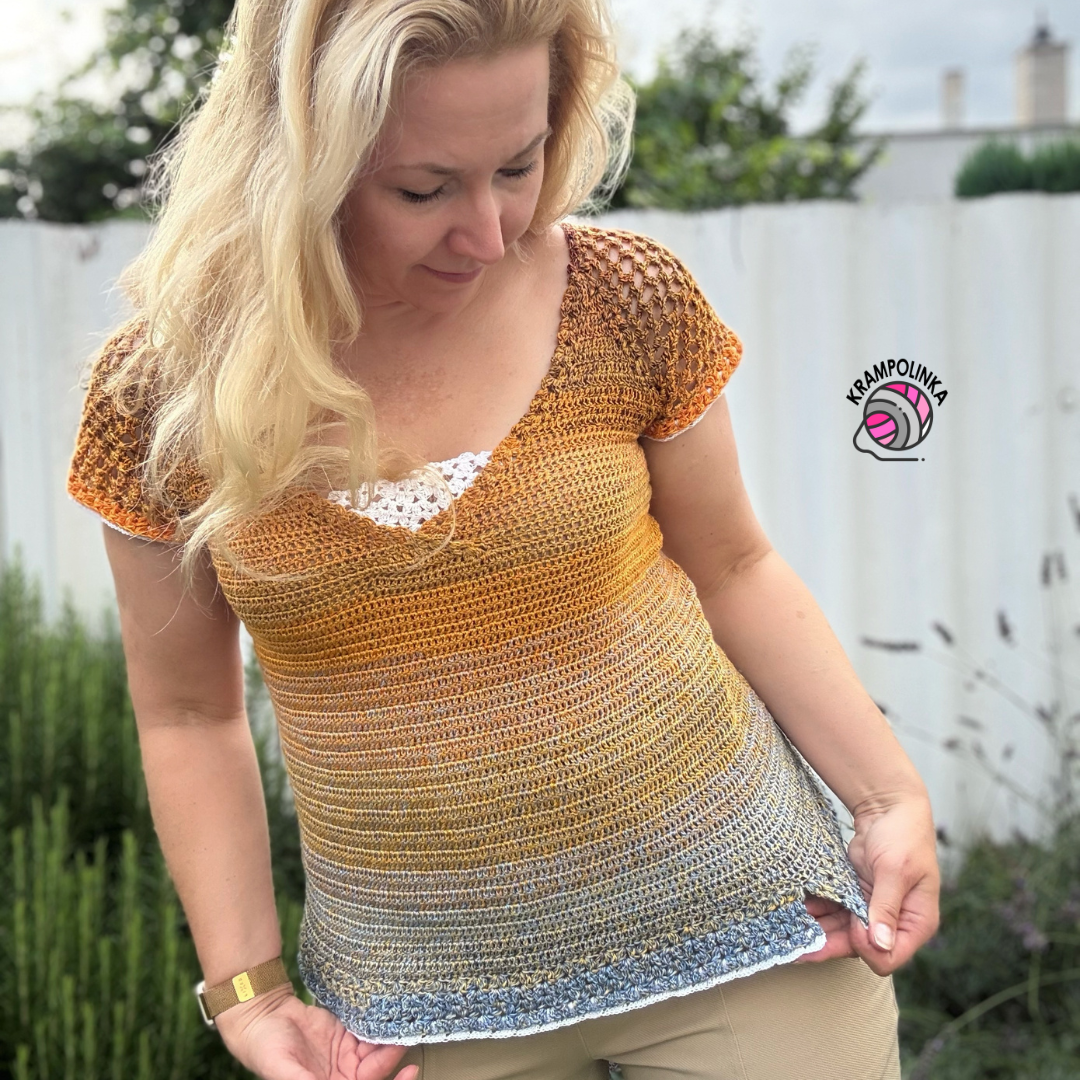
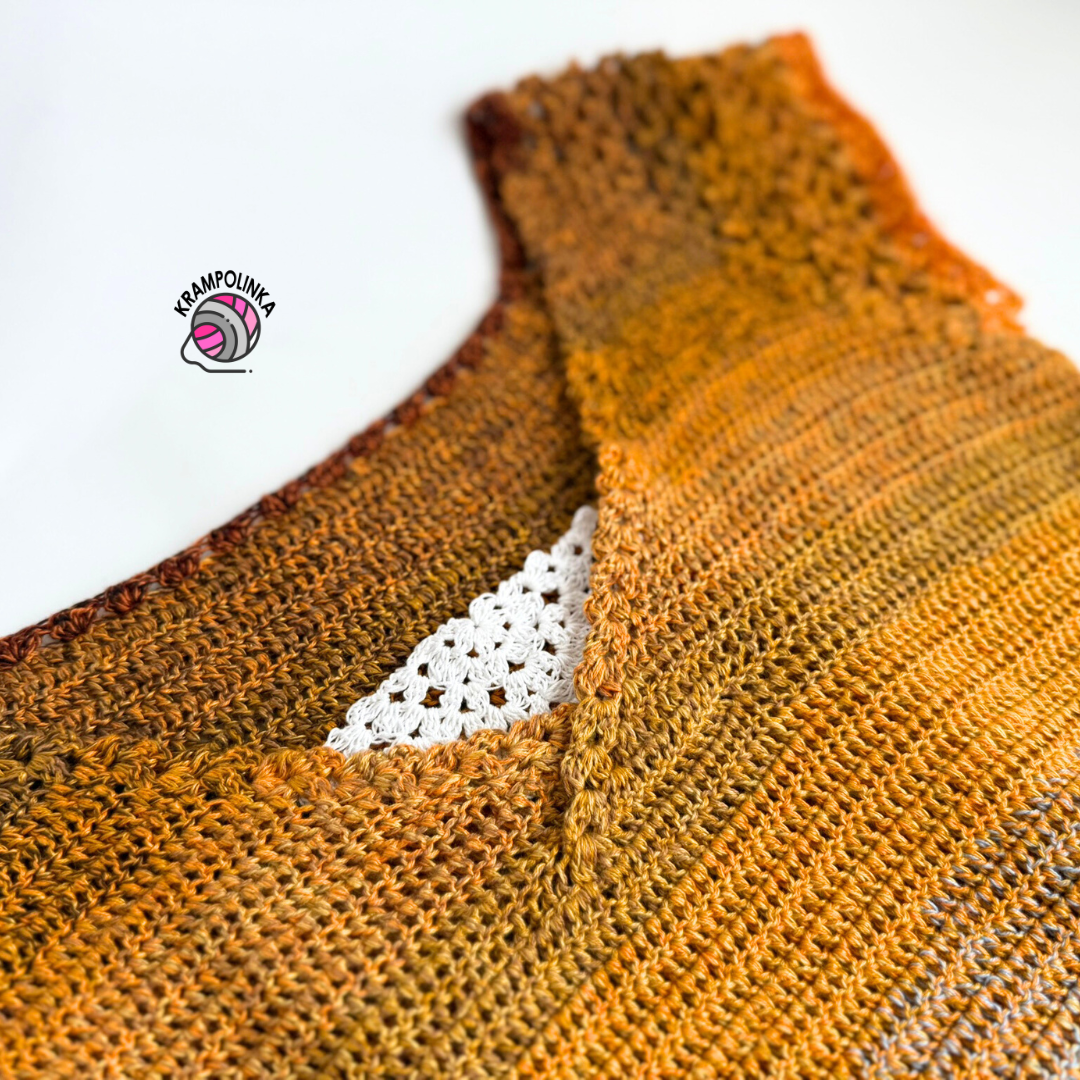
The top is worked from a raglan yoke downwards. Top´s neckline forms an elegant V-shape with a stylish crossover, adding a refined and feminine touch. Sleeves are worked in a different stitch pattern from the body, creating a pleasant contrast and making each piece truly original.
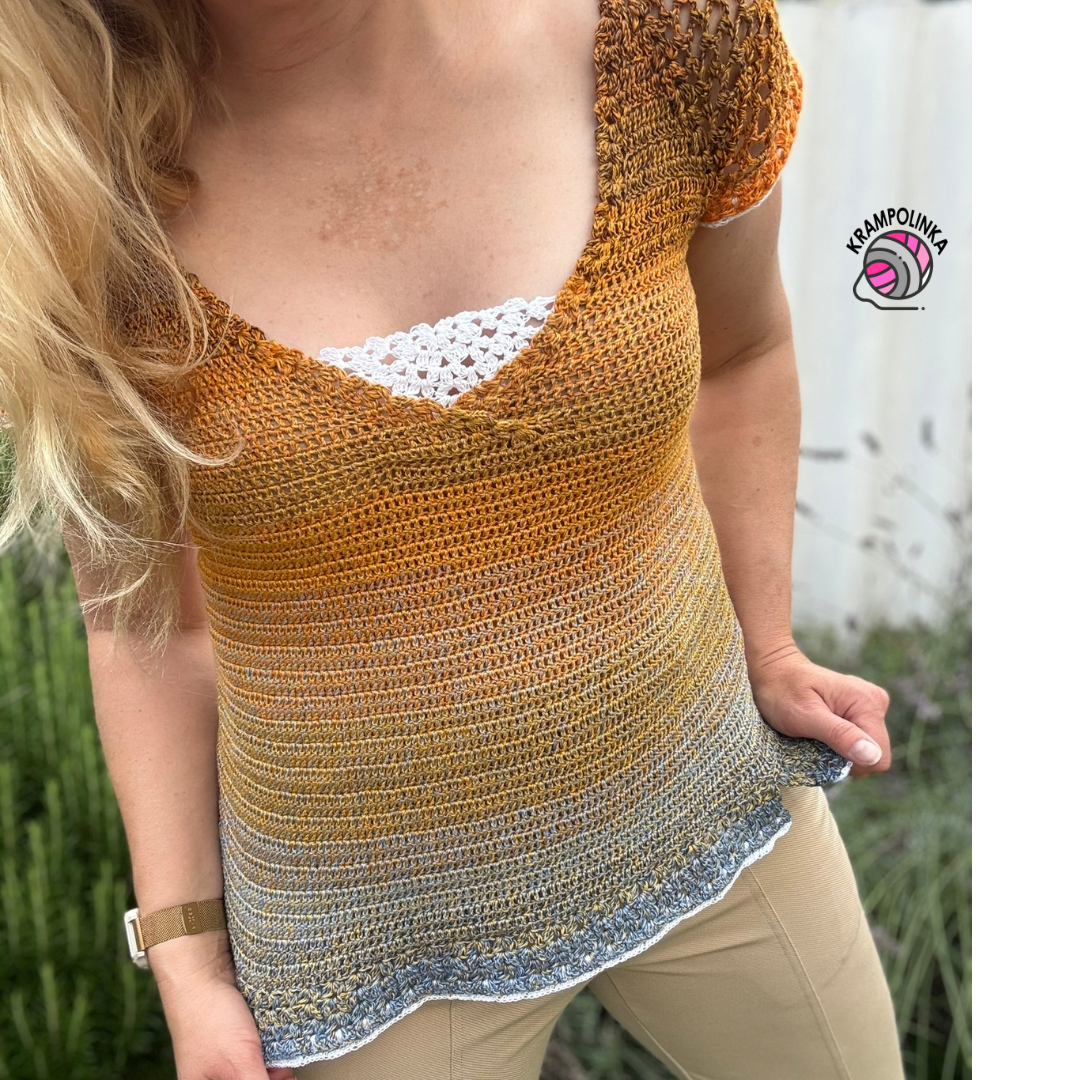
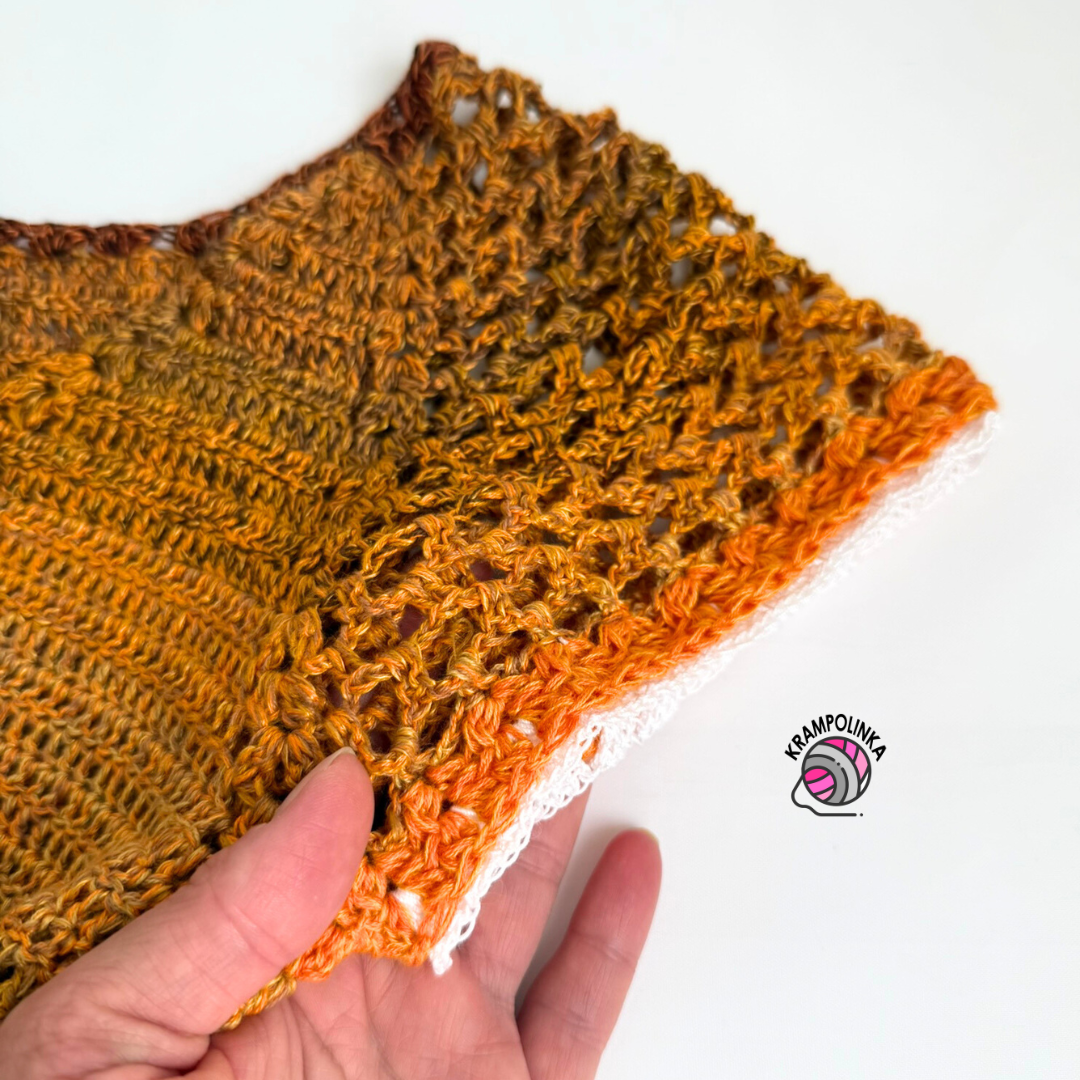
A special detail is the crocheted insert made from white Vlna Hep Moonlight yarn, which decorates the neckline. I also used the same white yarn to trim the sleeves and hem, finishing the bottom edge with a subtle slit for extra comfort.
The top is made in a dense stitch pattern using double crochet stitches, so it’s not see-through and works perfectly worn on its own. In its shorter version, it also looks lovely as a layering piece over a strappy dress. The pattern is easy and suitable even for beginners. I only needed one gradient yarn cake of 1000 m (3-ply with viscose) for the entire top. I recommend winding off about half of the first color transition – you can then use the smaller cake to create the neckline and sleeve edging. The white edging is optional but adds a soft, elegant finish.
Since I didn’t film the original holiday project, I decided to make a second version of this top and record the process in detail – and that’s the one featured in this video tutorial I’m so excited to share with you.
VIDEO TUTORIAL – English Subtitles
How to Crochet the Top – Step by Step
The yoke of the top forms three sides of a raglan and is worked in rows, back and forth. This naturally adds stitches at the neckline on the front panel. Once you reach an armhole depth of about 20–21 cm (8–8.25″), join the yoke and continue working back and forth in rows.
When the front tips of the V-neck are long enough, cross them over and join them together with slip stitches in the next row. Fasten off the yarn, then reattach it under the arm at the side – this is where the main body of the top begins.
Continue crocheting back and forth, shaping the top to fit your body, and pay attention to keeping the side seam straight.
TIP: I found it works best to chain three at the start of the row instead of the first DC, and insert the slip stitch at the end of the row into the second chain of that turning chain – this keeps the seam neat and straight. Turn your work at the end of every row.
If you prefer to avoid a seam altogether, you can work in joined rounds. In that case, the stitch pattern will be slightly different from the one used for the yoke.
Edging and Details
The hem of the top and the sleeves are finished with the same stitch pattern used at the edges of the V-neckline, which gives the top a cohesive and elegant look. I used shells made of treble crochet stitches (US: double treble) to create a light, flared finish. The edging is worked in white yarn (Vlna Hep Moonlight), the same one used for the neckline insert.
TIP: If you prefer a shallower neckline, in the first row of the front panel simply crochet about five double crochets (US terms) on each side before starting the border pattern. This way, the neckline will meet in the center sooner and won’t be as deep.
I hope your crochet top turn out beautifully. Do you feel like inspiring others or sharing your experience with crocheting the Larch Top? Please share photos of your top in the Krampolinka Facebook group. On Instagram, for easy searching, please use the tag #topmodrin. And if you tag me in your creations made from my patterns, I’d be happy to share them in my Insta stories to inspire others too!
TIPS and TRICKS for crocheting LARCH TOP – English Subtitles
LARCH TOP
Yarn: Gradient yarn cake Design Yarn – Larches by the Lake (Modříny nad jezerem), available at Hravá klubka; Vlna Hep Moonlight in white
Yardage: 1000 m / 3-ply + viscose (color: curry) + an additional ball wound from the first color section you will start with
Hook sizes: 2.5 mm and 2.0 mm
Size: Fits EU size 42 (bust circumference 96 cm / 38″)
Notions: Yarn needle with large eye, decorative label, stitch markers
Time estimate: approx. 50 hours
Skill level: Absolute beginner friendly
Abbreviations (US terms):
CH – chain stitch
SL ST – slip stitch
DC – double crochet
SC – single crochet
TR – treble crochet (double treble in UK terms)
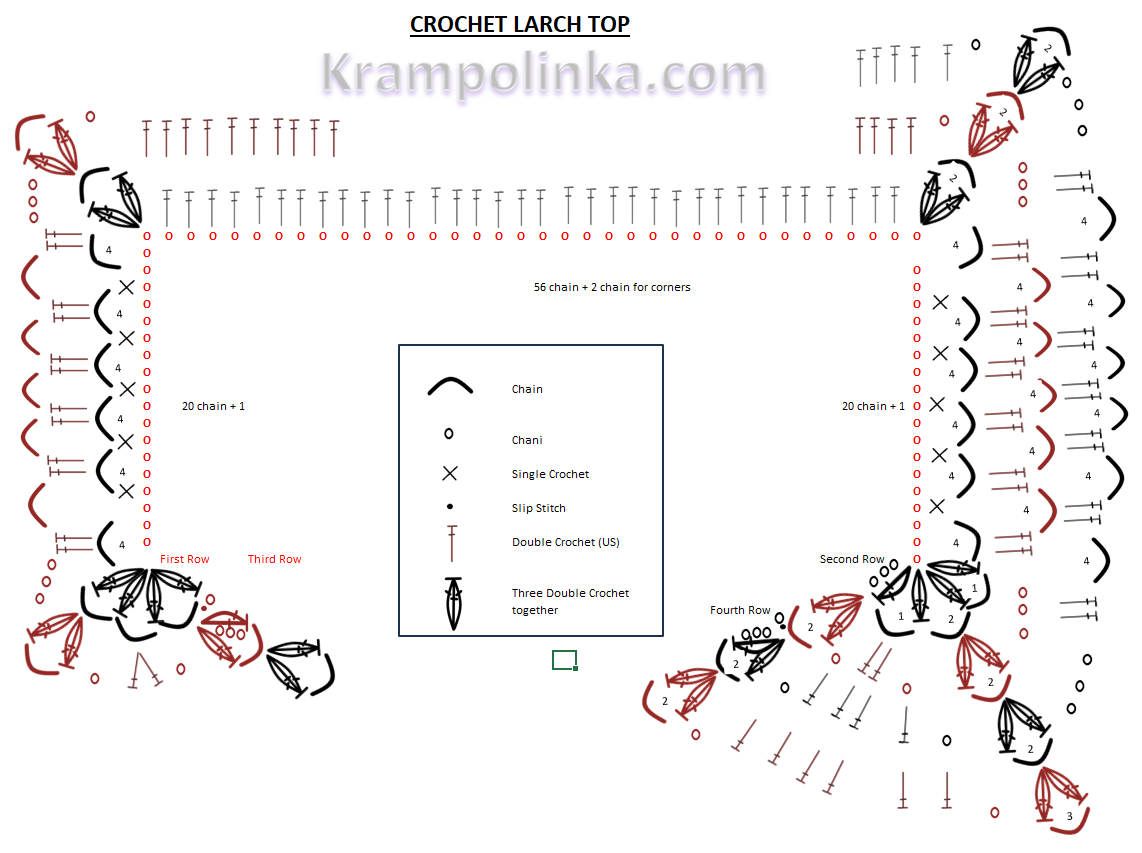
Neckline border stitch pattern: 3 DC cluster – CH 1 – 3 DC cluster
Raglan corner: 3 DC cluster – CH 2 – 3 DC cluster
Larch Top – Yoke (Hook 2.5 mm)
Row 1: Chain 100, turn.
Larch Top – Yoke, hook 2 mm
Row 2: For the neckline edging, chain 4 instead of a double crochet and insert the hook into the 4th chain to work 2 DC together – CH 1 – 3 DC together. Then CH 2 and in the same stitch as the neckline edging, work the raglan corner: 3 DC together – CH 2 – 3 DC together. For the sleeve section, CH 4, skip 2 stitches, SC into the third stitch (repeat 6 times). Finish with CH 4 and in the third stitch work the raglan corner (3 DC together – CH 2 – 3 DC together), CH 1. For the back section, work DC into each chain stitch (56 times). End with CH 1. Next comes the raglan corner: 3 DC together – CH 2 – 3 DC together.
Continue with the sleeve section: CH 4, skip 2 stitches, SC into the third stitch (repeat 6 times). Finish with CH 4 and in the last stitch work the raglan corner (3 DC together – CH 2 – 3 DC together) and at the same time the neckline edging (3 DC together – CH 1 – 3 DC together). Turn.
Note: The yoke can also be described like this: neckline stitch and raglan corner + 20 stitches for sleeve + raglan corner stitch + 56 stitches for back + raglan corner stitch + 20 stitches for sleeve + raglan corner stitch and neckline stitch.
Row 3: Work the front panel, starting with the neckline edging, which is always CH 1 and SL ST into the CH 1 space from the previous row. Substitute the first DC with CH 3, then work 2 DC together – CH 1 – 3 DC together, CH 1. Into the CH 1 space, make 2 DC, CH 1. Raglan corner: 3 DC together – CH 2 – 3 DC together. Sleeve: CH 3, 2 DC into the first chain space from the previous row, then CH 4 and 2 DC into the chain space. The sleeve section ends with 2 DC into the chain space and CH 3.
Raglan corner: 3 DC together – CH 2 – 3 DC together. Back panel: CH 1, DC into the CH 1 space, then DC into each DC. End the back panel with DC into CH 1 space, CH 1. Raglan corner: 3 DC together – CH 2 – 3 DC together.
Sleeve: CH 3, 2 DC into the first chain space from the previous row, then CH 4 and 2 DC into the chain space. The sleeve section ends with 2 DC into the chain space and CH 3. Raglan corner: 3 DC together – CH 2 – 3 DC together. Front panel: CH 1, 2 DC into the CH 1 space, CH 1 and finish with the neckline edging (3 DC together – CH 1 – 3 DC together). Turn.
Row 4: Work the front panel, starting with the neckline edging (always CH 1 and SL ST into the CH 1 space from the previous row). Substitute the first DC with CH 3, then work 2 DC together – CH 1 – 3 DC together. CH 1 and DC into the CH 1 space from the previous row. Then DC into each DC. End the front panel with DC into CH 1 space and CH 1. Raglan corner: 3 DC together – CH 2 – 3 DC together. Sleeve: CH 3, 2 DC into the first chain space from the previous row, then CH 4 and 2 DC into the chain space.
The sleeve section ends with 2 DC into the chain space and CH 3. Raglan corner: 3 DC together – CH 2 – 3 DC together. Back panel: CH 1 and DC into CH 1 space, then DC into each DC. End the back panel with DC into CH 1 space and CH 1.
Raglan corner: 3 DC together – CH 2 – 3 DC together. Sleeve: CH 3, 2 DC into the first chain space from the previous row, then CH 4 and 2 DC into the chain space. The sleeve section ends with 2 DC into the chain space and CH 3. Raglan corner: 3 DC together – CH 2 – 3 DC together. Front panel: CH 1, DC into CH 1 space, DC into each DC, DC into CH 1 space, CH 1 and finish with the neckline edging (3 DC together – CH 1 – 3 DC together). Turn.
Rows 5–17: Work the same as Row 4.
Joining the Yoke, hook 2 mm
Row 18: Work the front panel, starting with the neckline edging, which is always CH 1 and SL ST into the CH 1 space from the previous row. Substitute the first DC with CH 3, then work 2 DC together – CH 1 – 3 DC together. CH 1, DC into the CH 1 space, then DC into each DC. End the front panel with DC into the CH 1 space, CH 1. Work the raglan corner: 3 DC together – CH 2 – 3 DC together, CH 1. Skip the sleeve section, CH 1 at the underarm, and work the next corner: 3 DC together – CH 2 – 3 DC together. Continue with the back panel: CH 1, DC into the CH 1 space, DC into each DC, ending with DC into the CH 1 space, CH 1. Work the corner: 3 DC together – CH 2 – 3 DC together, CH 1.
Skip the sleeve section, CH 1 at the underarm, and work the next corner: 3 DC together – CH 2 – 3 DC together. Continue with the front panel: CH 1, DC into the CH 1 space, DC into each DC, ending with DC into the CH 1 space, CH 1, then work the neckline edging (3 DC together – CH 1 – 3 DC together). Turn.
Row 19: Work the front panel, starting with the neckline edging (CH 1 and SL ST into the CH 1 space from the previous row). Substitute the first DC with CH 3, then work 2 DC together – CH 1 – 3 DC together. CH 1, DC into the CH 1 space, then DC into each DC. End the front panel with DC into the CH 1 space, CH 1. In the raglan corner pattern from the previous row, work DC into the 3-DC cluster, 2 DC into the CH 1 space, DC into the 3-DC cluster. Then make 2 DC into the underarm chain space.
Mirror this when working into the next raglan corner pattern: DC into the 3-DC cluster, 2 DC into the CH 1 space, DC into the 3-DC cluster, and DC into the CH 1 space. Continue with DC into each DC. Repeat the same steps for the opposite armhole and front panel. Turn.
Rows 20–24: Work the same as Row 19, remembering to turn at the end of each row.
Joining the Front Panels and Main Body, hook 2 mm
Row 25: In this row, cross the front panels so that they overlap by 12 double crochets. Work the front panel, starting with the neckline edging (CH 1 and SL ST into the CH 1 space from the previous row), inserting the hook under the CH 1 space and at the same time into the twelfth stitch of the overlapped panel. Make the first DC substitute: CH 3, 2 DC together – CH 1 – 3 DC together, all under the CH 1 space and into the twelfth stitch of the overlapped panel. The next 11 DC are worked through both layers. Continue working DC into DC. In this row, increase at the same time.
The first increase (2 DC into the same stitch) is worked into the 45th DC from the previous row, which should be approximately at the underarm. Then work 2 DC into every 15th stitch and finish with the last increase at the underarm. Continue to the end of the row and finish with a SL ST. Fasten off.
Row 26: Attach yarn at the side, in line with the armhole. CH 3 instead of the first DC. Place a stitch marker into the second chain of the turning chain. Continue working DC into DC. At the front neckline edging, work DC into the 3-DC cluster, DC into the CH 1 space, and DC into the next 3-DC cluster. End the row with a SL ST into the stitch with the marker. Turn.
Rows 27–46: Work in rows back and forth. CH 3 instead of the first DC, placing a marker into the second chain of the turning chain. Work DC into DC. End each row with a SL ST into the stitch with the marker. Turn.
Row 47: Increase in every 20th stitch.
Rows 48–50: Work as in Row 27, remembering to turn.
Row 51: Increase in every 20th stitch.
Rows 52–66: Work as in Row 27, remembering to turn. Fasten off at the end of the last row.
Note: Adjust the frequency of increases to suit your own body shape. I usually start increasing from the lower ribcage. The total number of rows depends on your height and on having enough yarn.
Bottom Hem of the Top, hook 2 or 2.5 mm
Row 67: The hem is worked using the last two color transitions. Attach yarn on the front panel about 25 stitches from the side seam. CH 3 instead of DC, 2 DC together – CH 1 – 3 DC together, skip two stitches. Into every third stitch, work (3 DC together – CH 1 – 3 DC together). At the end of the row, turn.
Rows 68–70: CH 1 and SL ST into the CH 1 space. CH 3 instead of DC, 2 DC together – CH 1 – 3 DC together, then into each CH 1 space of the pattern, work (3 DC together – CH 1 – 3 DC together). At the end of the row, turn.
Sleeve Hem, hook 2 mm
Row 1: Using the extra yarn from the color transition, attach at the underarm into the CH 1 space. CH 3 instead of DC, 2 DC together. Insert hook into the raglan corner and work 3 DC together. Next, insert hook into the second DC and work the pattern: (3 DC together – CH 1 – 3 DC together). At the end of the row, work 3 DC together into the raglan corner and finish the row with a SL ST. Do not turn.
Row 2: With SL ST, move to the CH 1 space of the first pattern repeat. CH 3 instead of DC, 2 DC together – CH 1 – 3 DC together. Continue working the pattern (3 DC together – CH 1 – 3 DC together) into each CH 1 space. End the row with a SL ST.
Repeat the same process for the opposite sleeve.
Neckline Edging, hook 2 mm
Row 1: Attach yarn into the first stitch of the yoke. CH 3 instead of DC, 2 DC together – CH 1 – 3 DC together. Continue the pattern (3 DC together – CH 1 – 3 DC together) into each stitch where a SC was made. End the row with CH 3 and SL ST. Fasten off.
Decorative Edging, white yarn Moonlight/Maxi/Scarlett, hook 2 mm
Row 1: Attach yarn into the CH 1 space at the center of a pattern repeat from the previous row. CH 5, then in the same space work 4 TR (US: double treble crochet). In the next CH 1 space, work 5 TR. Refer to the video tutorial for the exact hook placement.
Neckline Insert, white yarn Moonlight, hook 2 mm
Row 1: Into a magic ring, CH 3 and 2 DC together – CH 1 – 3 DC together – CH 1. Work the tip of the insert: 3 DC together – CH 3 – 3 DC together – CH 1. Finish with 3 DC together – CH 1 – 3 DC together. Turn.
Row 2: CH 1 and SL ST into the CH 1 space between clusters. In this space, work CH 3 and 2 DC together – CH 1 – 3 DC together – CH 1. Into the next CH 1 space between clusters, work 3 DC together – CH 1 – 3 DC together. At the tip, work 3 DC together – CH 3 – 3 DC together – CH 1. Continue with 3 DC together – CH 1 – 3 DC together into the CH 1 space between clusters, CH 1, and finish with 3 DC together – CH 1 – 3 DC together into the last CH 1 space. Turn.
Row 3: CH 1 and SL ST into the CH 1 space between clusters. In this space, work CH 3 and 2 DC together – CH 1 – 3 DC together – CH 2. Into the next CH 1 space, work 3 DC together – CH 1 – 3 DC together – CH 2. At the tip, work 3 DC together – CH 2 – 3 DC together – CH 2 – 3 DC together. Then CH 2 and work 3 DC together – CH 1 – 3 DC together into the next CH 1 space, CH 2. Finish with 3 DC together – CH 1 – 3 DC together into the last CH 1 space. Turn.
Row 4: CH 1 and SL ST into the CH 1 space between clusters. In this space, work CH 3 and 2 DC together – CH 1 – 3 DC together – CH 1. Work (3 DC together – CH 1 – 3 DC together) into each CH 1 space in the pattern and between clusters. At the tip, work into the middle DC of the cluster: 3 DC together – CH 3 – 3 DC together – CH 1. Continue symmetrically for the other half of the insert. Turn.
Row 5: CH 1 and SL ST into the CH 1 space between clusters. In this space, work CH 3 and 2 DC together – CH 1 – 3 DC together – CH 2. Only into CH 1 spaces in the pattern, work 3 DC together – CH 1 – 3 DC together – CH 2. At the tip, work 3 DC together – CH 2 – 3 DC together – CH 2 – 3 DC together – CH 2. Continue symmetrically for the other half of the insert. Turn.
Row 6: CH 1 and SL ST into the CH 1 space between clusters. In this space, work CH 3 and 2 DC together – CH 1 – 3 DC together – CH 1. Work (3 DC together – CH 1 – 3 DC together) into each CH 1 space in the pattern and between clusters. At the tip, work into the middle DC of the cluster: 3 DC together – CH 3 – 3 DC together – CH 1. Continue symmetrically for the other half of the insert. If the edge starts to ripple, skip working into the CH 1 space between clusters once on each side. Fasten off.
Finishing
Weave in all loose ends.
Usage and Permissions
This pattern is intended for personal use only. If you would like to use it for commercial purposes, please contact me first. Always include the source link: www.krampolinka.cz when sharing your projects online. The pattern is specifically written for the yarn, hook size, and tension used in this sample. If you use a different yarn or hook, your final bag size and shape may vary.
Enjoy this free pattern and you can follow my latest projects, tutorials, ideas, reviews, video podcasts, tips, and tricks:
- Krampolinka YouTube videos (subtitled since 2024)
- Krampolinka Instagram
- Krampolinka FB group
-
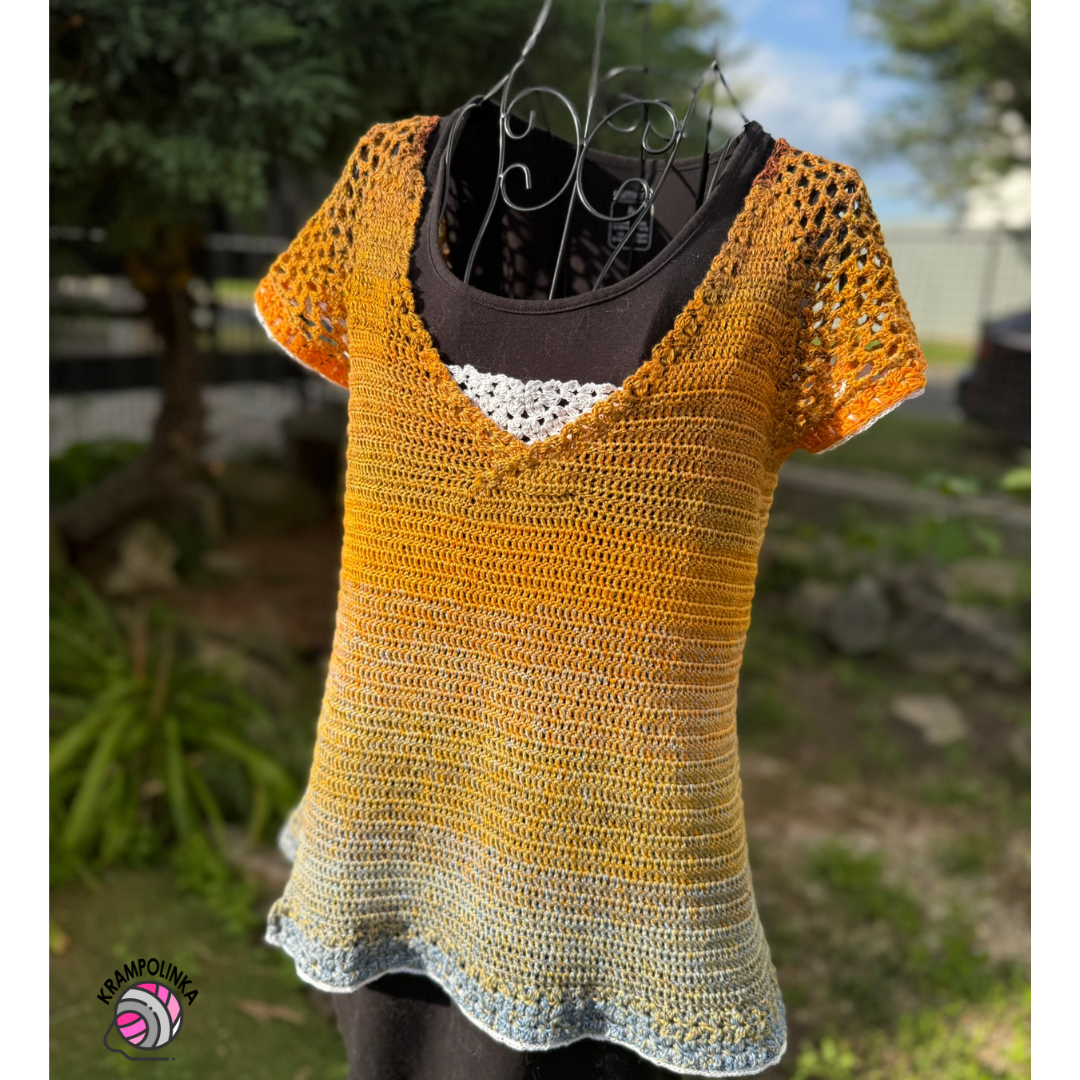
- Front view of the Larch Top on a mannequin, highlighting the flattering V-neck crossover design.
-
- Full outfit shot – the Larch Top as the statement piece, perfect for a handmade summer wardrobe.
-

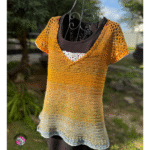
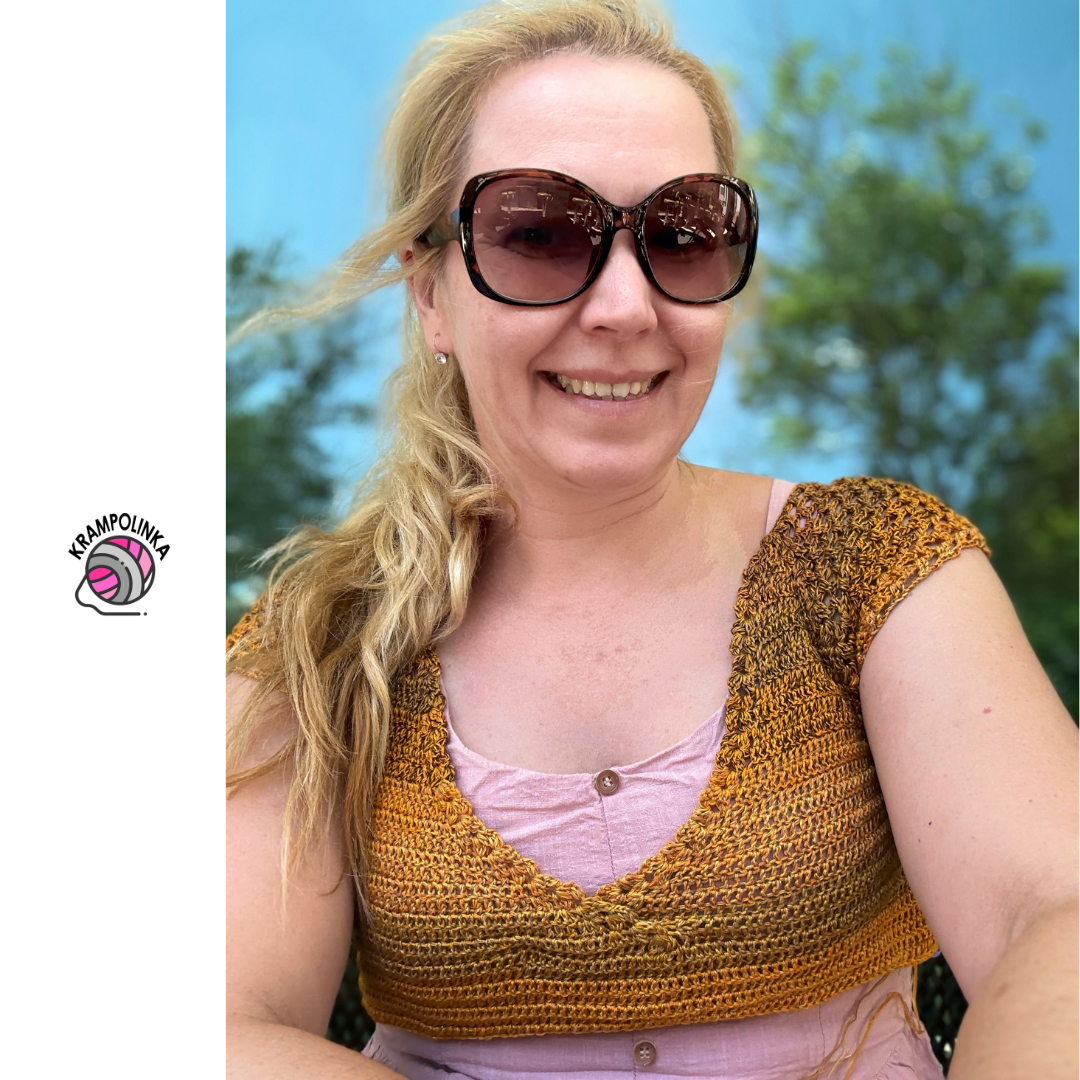
- Cropped Version of Larch Top
-
- Larch Top without Inset
-
- The Larch Top – feminine and breezy look for warm days.
-
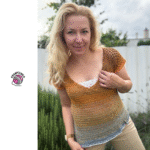
- The Larch Top on a model, paired with jeans – casual summer elegance.
-

- Detail of the decorative edging
-
- Close-up of the lace neckline insert
-
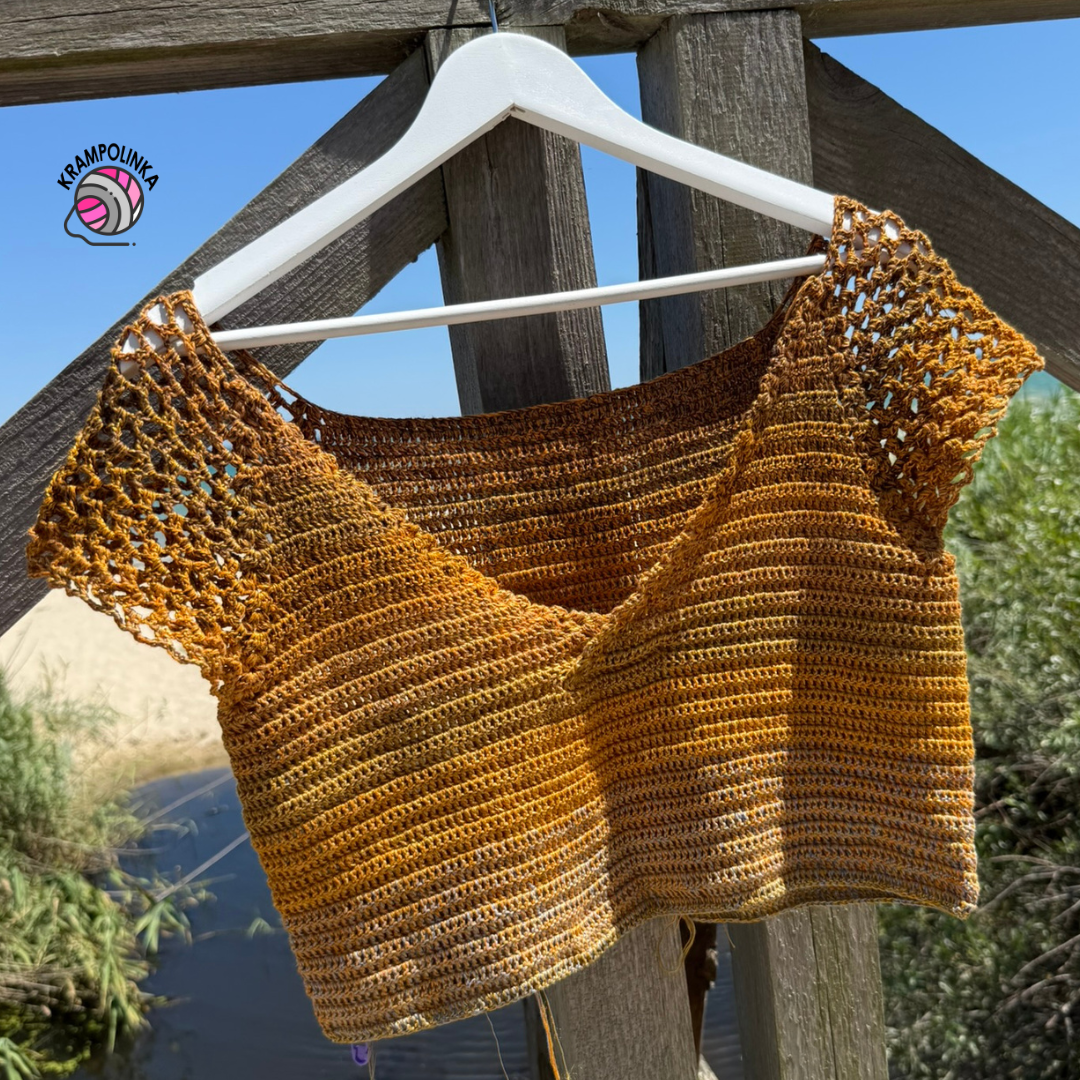
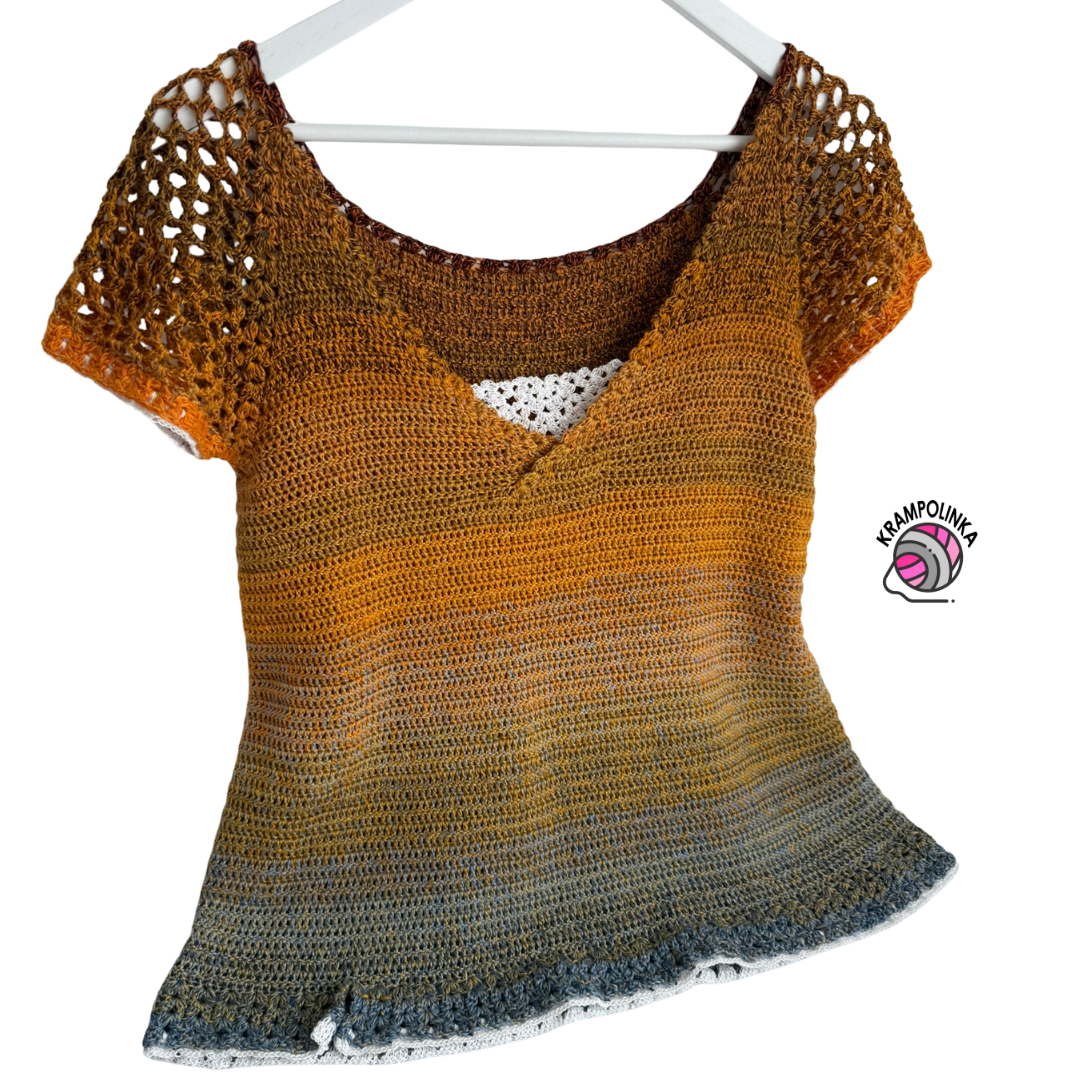
- The Larch Top hanging on a wooden hanger, showing its flowing drape and smooth color transitions.
-
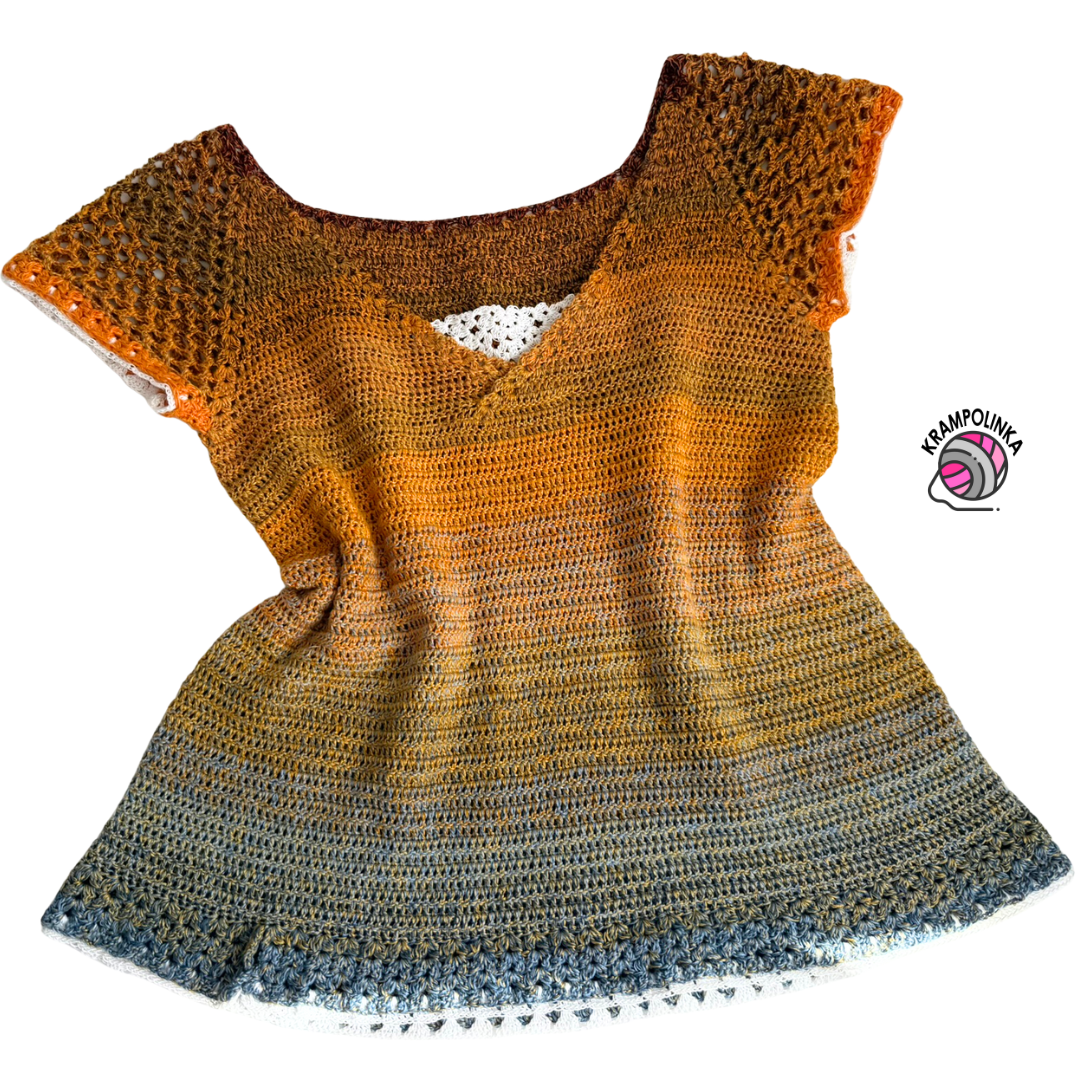
- Flat lay of the Larch Top on a light background, with the lace insert and edging clearly visible.
-
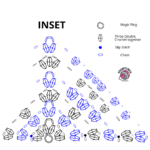
- Graph for Inset

-
- Graph for Yoke

No Comments