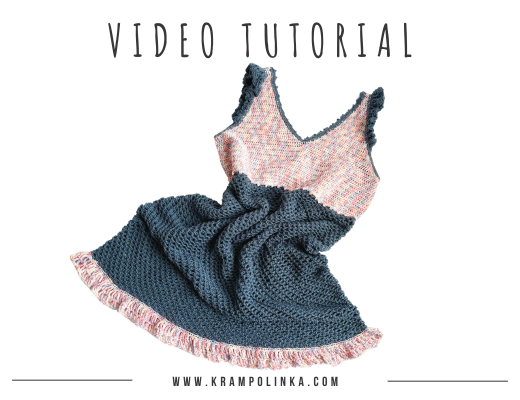
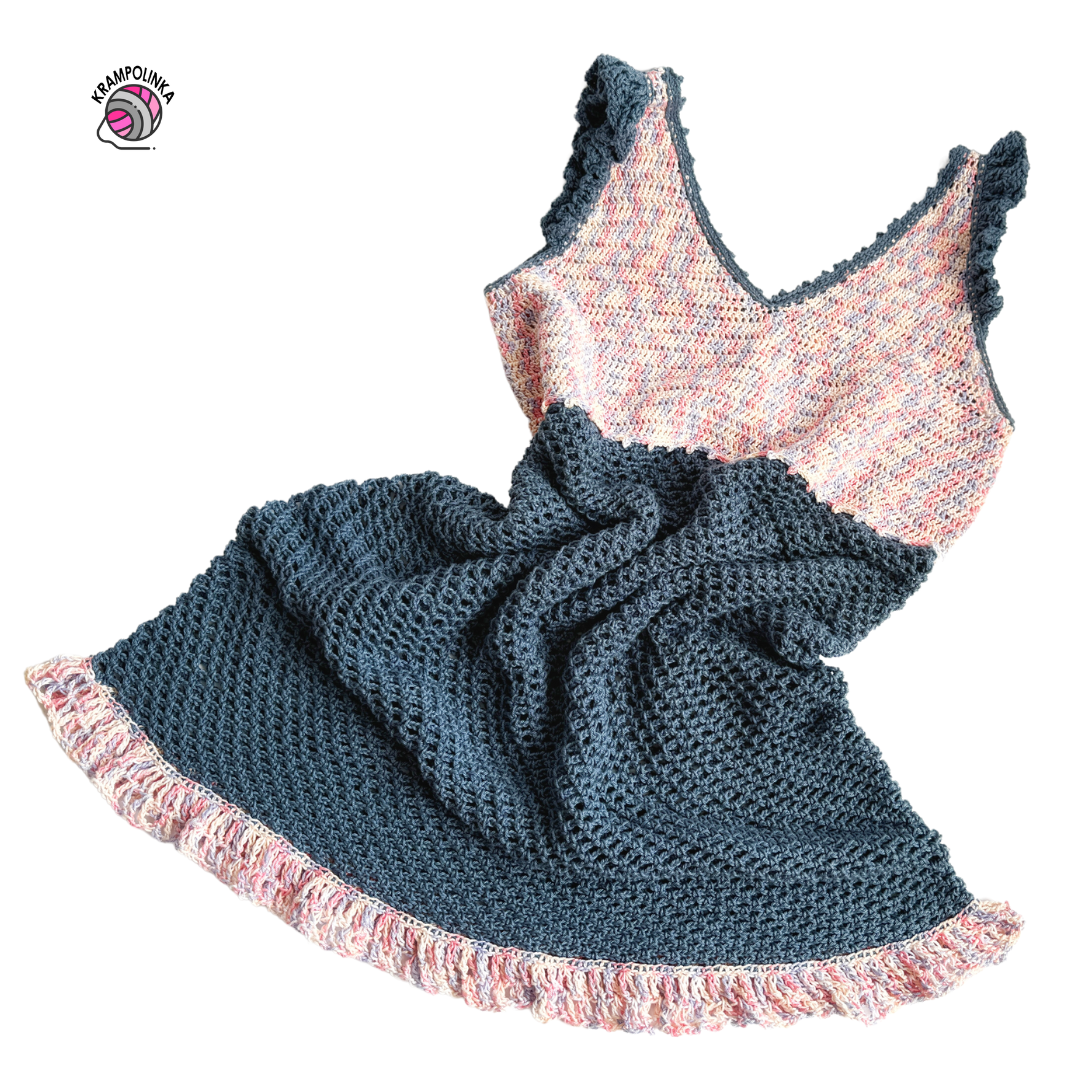
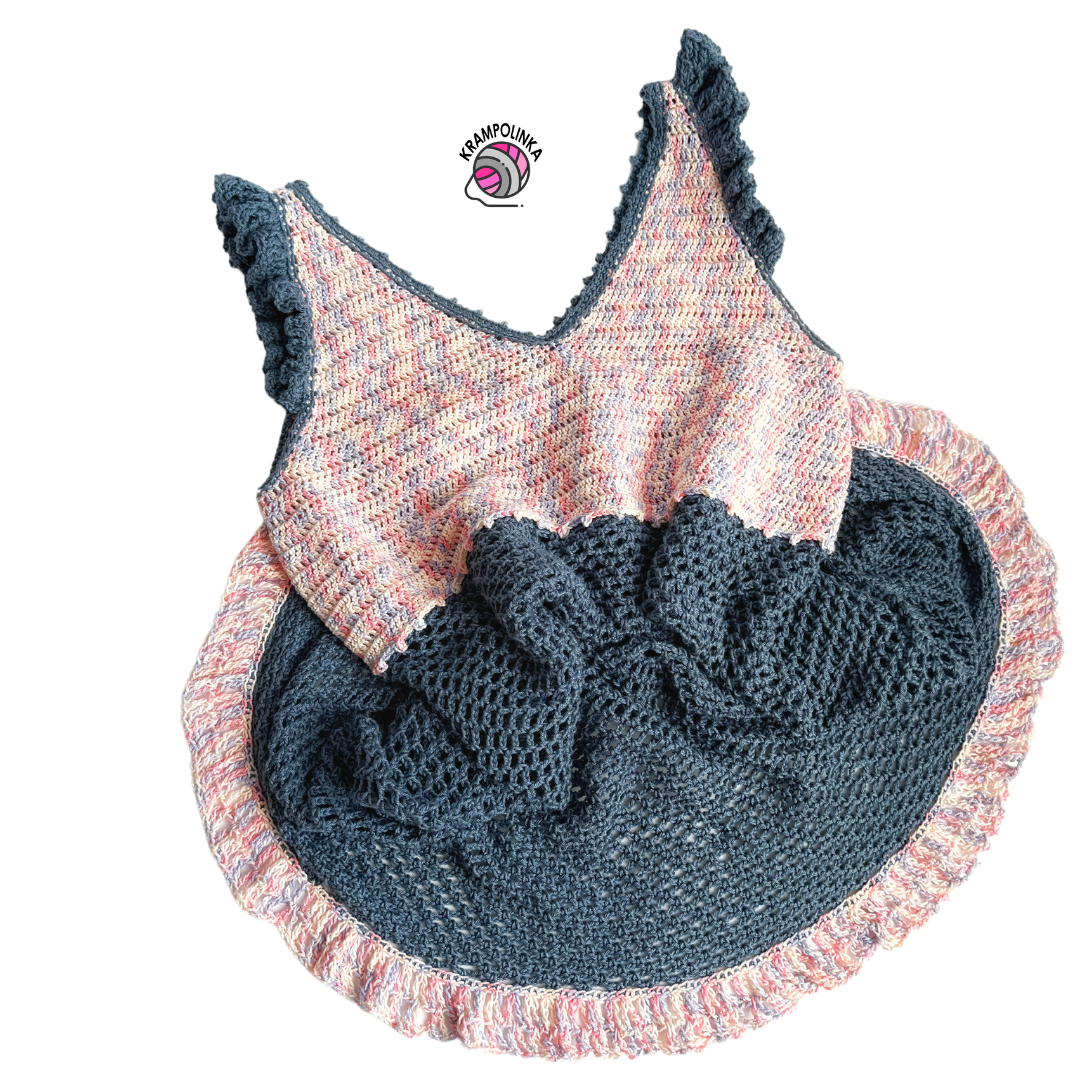
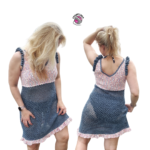
In today’s video tutorial, we will crochet a quick swimsuit cover-up dress using Schachenmayr Catania cotton yarn.
Here is the translation of your crochet pattern description:
Schachenmayr Catania is a 50g skein with a length of 125 meters, made of 100% combed Egyptian cotton. Egyptian cotton is generally considered the highest quality cotton fiber. It is long, beautifully absorbs color, and the fiber does not need to go through mercerization. After being worked into a product, it is recommended to wash it at more than 60° to make the fiber soften nicely and stabilize and set the color. Catania is available in solid colors and in the COLOR variant, which is variegated. Each year, Catania expands its color palette with trendy new shades. The Color line includes both variegated and self-patterning options. Both yarns can be combined, allowing you to create not only beautiful colorful clothing but also home decor or toys. Catania is certified by OEKOTEX 100 and is suitable for children under three years old.
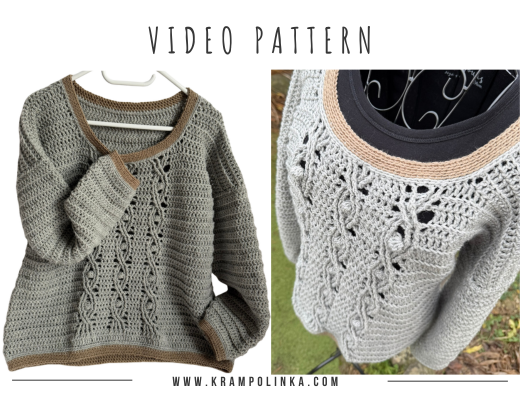
VIDEO PATTERN (CZECH WITH ENGLISH SUBTITLES)
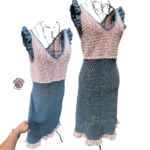
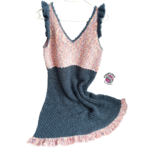
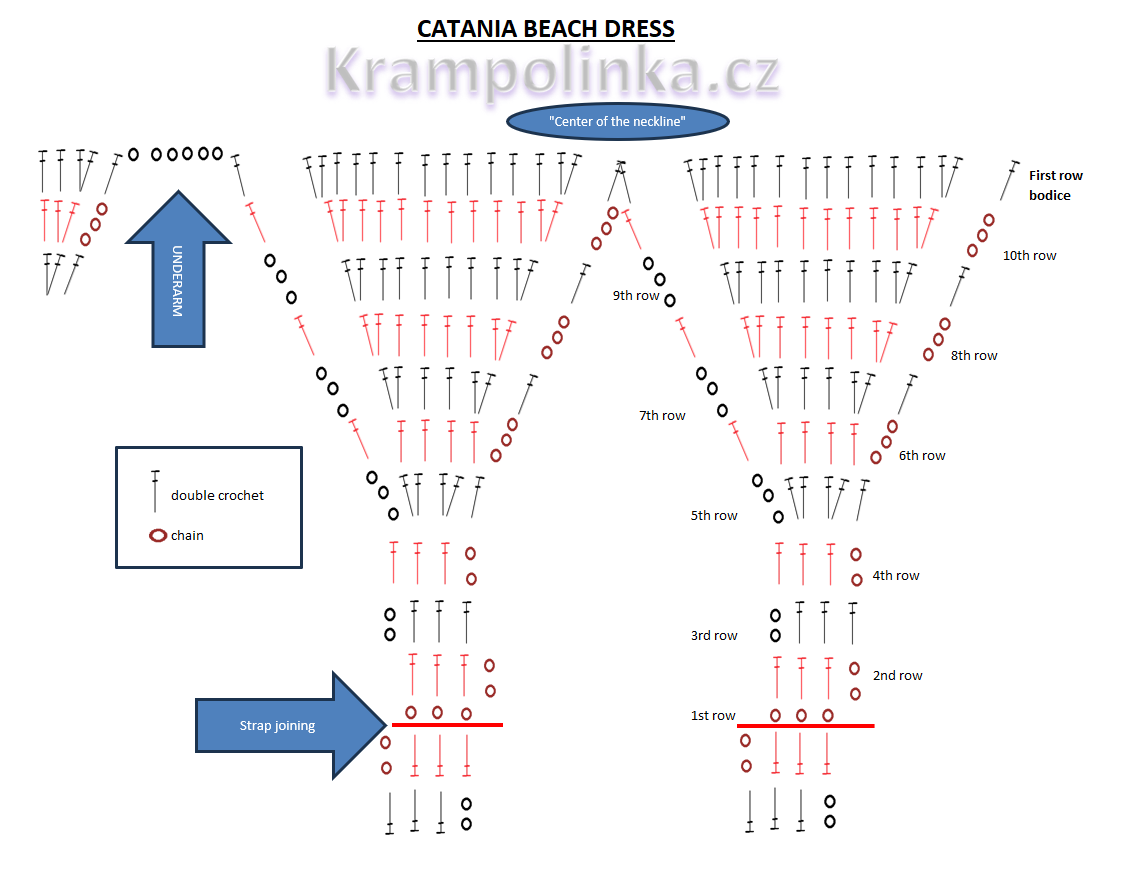
As for the dress, we first crochet the bodice, which consists of four triangles. The bodice is then crocheted with a mesh pattern for the dress body. Once straps are crocheted, optional ruffle can be added. The number of rows in the bodice triangles determines the depth of the neckline. By adding stitches in the triangle rows, the top part of the bodice can be expanded to a larger circumference. Further expansion of the circumference can be done after joining the triangles at the armhole area. The armhole is approximately 20 cm long. When I measured the number of stitches for my tension, I had 10 double crochet stitches in 5 cm.
For the pattern, we crochet double crochet stitches for the bodice, a mesh pattern for the body of the dress, and treble crochet stitches for the ruffles. I used a 3 mm hook for the upper part and a 4 mm hook for the mesh part of the dress. Note – the dress will stretch by approximately 7-10 cm due to its weight. It is necessary to adjust the number of rows to your height and account for possible stretching. I would recommend this dress for sizes up to 42. For larger sizes, more yarn will be needed and the dress will be heavier. When I measured the arches, I had 7 arches in 10 cm.
Regarding size adjustment, this pattern is very flexible. More rows in the bodice triangles or more stitches in the triangle will result in a wider circumference. If you crochet fewer rows in the triangle, you will get a size suitable for girls and children. The dress can be made in crop top, top, or tunic length, depending on how much yarn you have.
TIPS FOR YOU:
Measure and try on as you go. If you want a tunnel under the bust, you can get inspiration from the Romantika top pattern.
Do you want to inspire others or share your experiences with making the Catania top, tunic, or dress? Please post your photos in the KRAMPOLINKA GROUP on Facebook. On Instagram, for easy searching, please use the tags #topcatania, #tunikacatania, #satycatania.
PATTERN INSTRUCTION CATANIA DRESS
Yarn: Schachenmayr Catania and Catania Color
Consumption: 4 x Catania Color, 6 x Catania
Size: 42 EU, figure height 168 cm
Dimensions: Front length 92 cm, with 33 cm being the length of the bodice. Width across the bust is 47 cm, width under the bust is 45 cm, and hip width is 55 cm – the dress is elastic!
Hook: 3 mm and 4 mm
Needle and thread in yarn color, stitch marker
Time budget: approx. 24 hours
For beginners
US: chain stitch (ch), slip stitch (sl st), double crochet (dc), half double crochet (hdc), single crochet (sc), herringbone single crochet, insert hook behind the yarn of the previous stitch, yarn over from the back loop, pull through two loops, finish the single crochet with a yarn over (hsc), treble crochet (tr)
Bodice, 3 mm hookRow 1: Chain 3, turn and crochet 2 chain stitches (ch) instead of a double crochet (dc), dc in the third chain from the hook, dc in each of the next two chains, and dc in the last chain, turn.
Rows 2 – 4: Chain 2 instead of a dc, then dc in each dc, end the row with a dc in the second chain of the turning chain, turn. (4 stitches)
Row 5: Chain 3 instead of a dc, then 2 dc in the first dc, 2 dc in the second dc. End with a dc in the second chain of the turning chain, turn. (6 stitches)
Row 6: Chain 3, then dc in each dc. End with a dc in the second chain of the turning chain, turn. (6 stitches)
Row 7: Chain 3 instead of a dc, then 2 dc in the first dc, dc in each dc, 2 dc in the second to last dc. End with a dc in the second chain of the turning chain, turn. (8 stitches)
Row 8: Chain 3 instead of a dc, then 2 dc in the first dc, dc in each dc, 2 dc in the second to last dc. End with a dc in the second chain of the turning chain, turn. (10 stitches)
Row 9: Chain 3 instead of a dc, then 2 dc in the first dc, dc in each dc, 2 dc in the second to last dc. End with a dc in the second chain of the turning chain, turn. (12 stitches)
Row 10: Chain 3 instead of a dc, then 2 dc in the first dc, dc in each dc, 2 dc in the second to last dc. End with a dc in the second chain of the turning chain, turn. (14 stitches)
Row 11: Chain 3, then dc in each dc. End with a dc in the second chain of the turning chain, turn. (14 stitches)
Row 12: Chain 3 instead of a dc, then 2 dc in the first dc, dc in each dc, 2 dc in the second to last dc. End with a dc in the second chain of the turning chain, turn. (16 stitches)
Row 13: Chain 3, then dc in each dc. End with a dc in the second chain of the turning chain, turn. (16 stitches)
Row 14: Chain 3 instead of a dc, then 2 dc in the first dc, dc in each dc, 2 dc in the second to last dc. End with a dc in the second chain of the turning chain, turn. (18 stitches)
Row 15: Chain 3 instead of a dc, then 2 dc in the first dc, dc in each dc, 2 dc in the second to last dc. End with a dc in the second chain of the turning chain, turn. (20 stitches)
Row 16: Chain 3 instead of a dc, then 2 dc in the first dc, dc in each dc, 2 dc in the second to last dc. End with a dc in the second chain of the turning chain, turn. (22 stitches)
Row 17: Chain 3 instead of a dc, then 2 dc in the first dc, dc in each dc, 2 dc in the second to last dc. End with a dc in the second chain of the turning chain, turn. (24 stitches)
Row 18: Chain 3 instead of a dc, then 2 dc in the first dc, dc in each dc, 2 dc in the second to last dc. End with a dc in the second chain of the turning chain, turn. (26 stitches)
Row 19: Chain 3 instead of a dc, then 2 dc in the first dc, dc in each dc, 2 dc in the second to last dc. End with a dc in the second chain of the turning chain, turn. (28 stitches)
Row 20: Chain 3 instead of a dc, then 2 dc in the first dc, dc in each dc, 2 dc in the second to last dc. End with a dc in the second chain of the turning chain, turn. (30 stitches)
Row 21: Chain 3 instead of a dc, then 2 dc in the first dc, dc in each dc, 2 dc in the second to last dc. End with a dc in the second chain of the turning chain, turn. (32 stitches)
Row 22: Chain 3 instead of a dc, then 2 dc in the first dc, dc in each dc, 2 dc in the second to last dc. End with a dc in the second chain of the turning chain, turn. (34 stitches)
Row 23: Chain 3 instead of a dc, then 2 dc in the first dc, dc in each dc, 2 dc in the second to last dc. End with a dc in the second chain of the turning chain, turn. (36 stitches)
Note: Crochet 2 identical pieces. Attach the counterpart to these two triangles. When attaching, crochet into row 1 and continue with row 2. Do not fasten off the yarn at the end of the last row of the counterpart.
Bodice Body, Variegated Yarn, 3 mm HookRow 1: Fold the foundation of the yoke on itself, with the unfinished yarn end on the outside. Crochet on the wrong side. Chain 2 instead of a double crochet (dc), 2 dc in the first dc. Continue with dc in each dc. In the second to last dc, crochet 2 dc. For joining in the center neckline area, crochet a dc halfway on one piece, insert the hook into the third chain of the turning chain, and crochet a dc halfway, yarn over and complete both dc together. Continue crocheting, i.e., 2 dc in the first dc, dc in each dc, 2 dc in the second to last dc, dc in the third chain of the turning chain.
At the underarm, crochet helper chains and then 5 stitches of a flexible chain. Join the front and back parts, i.e., crochet a dc in the third chain of the turning chain, 2 dc in the next dc, dc in each dc, dc in the second to last dc. Half dc in the third chain of the turning chain and half dc in the third chain of the turning chain on the next piece, crochet together and continue crocheting, i.e., 2 dc in the first dc, dc in each dc, 2 dc in the second to last dc, dc in the third chain of the turning chain. At the underarm, chain and then 5 stitches of a flexible chain. End with a slip stitch (sl st).
Row 2: If you want to crochet continuously without a seam, chain 1 and single crochet (sc) into the same stitch, then half double crochet (hdc) in the next stitch, and continue with dc in each dc around. At the underarm, increase in the second and fourth stitches by crocheting 2 dc into one stitch. At the end of the row, crochet sc into sc, hdc into hdc. For the next row, switch to the pattern and continue crocheting dc in each dc. This type of crochet does not have a seam, but the pattern looks different than on the upper part of the bodice. If you want the same pattern, crochet 2 chains instead of a dc, continue with dc in each dc, and increase in the second and fourth stitches under the arm by crocheting two dc into one stitch.
End the row with a sl st. Turn. This pattern will be the same as on the upper part of the bodice. I ended up crocheting back and forth in rows. The seam is on the back side of the bodice. Thanks to turning back and forth, it is relatively straight.
Row 3: Chain 2 instead of a dc, then dc in each dc. End the row with a sl st. Turn.
Row 4: Chain 2 instead of a dc, then dc in each dc. Under the arm, increase twice, i.e., crochet two dc into one stitch in two places. Between increases, crochet 2 dc in each dc. End the row with a sl st. Turn.
Row 5: Chain 2 instead of a dc, then dc in each dc. Under the arm, increase twice, i.e., crochet two dc into one stitch in two places. Between increases, crochet 3 dc in each dc. End the row with a sl st. Turn.
Row 6: Chain 2 instead of a dc, then dc in each dc. Under the arm, increase twice, i.e., crochet two dc into one stitch in two places. Between increases, crochet 4 dc in each dc. End the row with a sl st. Turn.
Row 7: Chain 2 instead of a dc, then dc in each dc. End the row with a sl st. Turn.
Row 8: Chain 2 instead of a dc, then dc in each dc. Under the arm, increase twice, i.e., crochet two dc into one stitch in two places. Between increases, crochet 5 dc in each dc. End the row with a sl st. Turn.
Rows 9 – 17: Chain 2 instead of a dc, then dc in each dc. End the row with a sl st. When finishing, switch to a solid color yarn.
Note: The edge of the bodice must end below the bust. Adjust the length according to your own circumference and bust by adding or subtracting rows from the bodice.
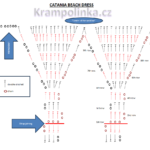
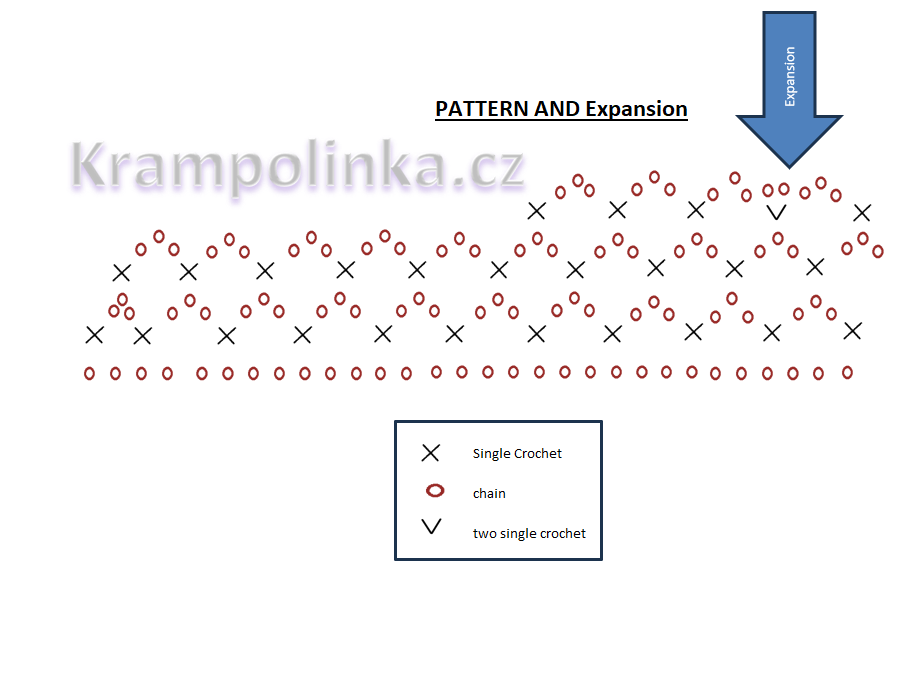
Dress Pattern, 4 mm HookRow 1: Crochet 2 chains (ch) instead of a double crochet (dc), then dc in the back loop only. End the row with a slip stitch (sl st).
Row 2: From this point, crochet in the round without ending the row. Chain 1 (ch) as a replacement for a single crochet (sc) and sc in the same stitch. Then, 9 times: *3 ch, skip two stitches, sc in the third stitch.* Once: *3 ch, skip one stitch, sc in the second stitch.* Repeat the pattern to the end of the row. End with a sc in the last stitch of the row. Transition to the next row with the pattern. Mark the last loop with a stitch marker.
Rows 3 – 19: 3 ch, sc under the chain space. Crochet continuously without ending the row, always in the same direction.
Row 20: Expansion. For expansion, crochet *sc-ch-sc* under one loop. Expand every eleventh loop.
Rows 21 – 70: Crochet 3 ch and sc under the chain space. Crochet continuously without ending the row, always in the same direction. In the last row, at the end, crochet *ch, sc under the loop, sc under the loop, and sl st into the sc*.
Note: Try the dress on regularly. If needed, expand once more in the lower waist area for the hips. Crochet the dress slightly shorter as it will stretch due to its weight.
Bottom Ruffle of the Dress, Variegated Yarn, 4 mm HookRow 1: Chain 1 (ch) instead of a single crochet (sc), yarn over (yo), insert the hook into the back loop of the sc, pull the yarn through two loops, yarn over, and complete the sc. Continue with herringbone single crochet (hsc) under the loop. In this row, crochet the pattern hsc in hsc, 3 hsc under the loop. End the row with a slip stitch (sl st).
Row 2: Chain 4 (ch) as a replacement for the first stitch, chain 1 (ch) in the pattern, treble crochet (tr) in the first stitch. Crochet „V“ stitches, which consist of *tr-ch-tr* in one stitch, skip the next stitch. Repeat to the end of the row. End with a sl st.
Row 3: Using sl st, move to the center of the loop. Chain 4 (ch) as a replacement for the first stitch, chain 1 (ch) in the pattern, tr under the loop. Continue crocheting „V“ stitches, which consist of *tr-ch-tr* under the loop from the previous row. End with a sl st. Fasten off the yarn.
Neckline Edge, Blue Yarn, 4 mm HookRow 1: Start at the shoulder. Chain 1 (ch) as a replacement for a single crochet (sc), yarn over (yo), insert the hook into the edge stitch, pull the yarn through two loops, yo, and complete the sc. Continue with herringbone single crochet (hsc). For each horizontal row, crochet 2 hsc. At the bottom of the „V“ neckline on both the front and back pieces, crochet one hsc per row. End the row with a slip stitch (sl st).
Row 2: Start with a chain 1 (ch) as a replacement for a sc. Continue crocheting hsc in the back loop only, making a picot every fourth hsc. The picot consists of 2 ch and a sl st.
Sleeve Ruffle, Blue Yarn, 4 mm HookRow 1: Attach the yarn at the back of the armhole. Chain 1 (ch) as a replacement for a single crochet (sc), yarn over (yo), insert the hook into the flexible chain, pull the yarn through two loops, yo, and complete the sc. Continue with herringbone single crochet (hsc) in the stitches of the flexible chain. On the yoke, crochet 2 hsc per horizontal row. End the row with a slip stitch (sl st). Fasten off the yarn.
Row 2: Attach the yarn in a stitch at the level of the 17th row of stitches. Chain 1 (ch) as a replacement for a sc, chain 1 (ch), sc in the same stitch. Crochet in the back loop only. Continue with 10 times half double crochet (hdc)-ch-hdc in the same stitch, 10 times double crochet (dc)-ch-dc in the same stitch, and 13 times treble crochet (tr)-ch-tr. Crochet in the same manner in a mirror image on the opposite side of the neckline (tr, dc, hdc, sc). End the row with a sl st. Fasten off the yarn.
Row 3: Attach the yarn on the right side under the chain space between the sc. Crochet 1 ch as a replacement for a sc, ch 1, sc under the ch space, ch 1. Continue crocheting under the chain space from the previous row: 10 times hdc-ch-hdc, ch 1, 10 times dc-ch-dc, ch 1, 13 times tr-ch-tr, ch 1. Crochet in the same manner in a mirror image on the opposite side of the neckline (tr, dc, hdc, sc). Remember to crochet a chain stitch between the patterns. End the row with a sl st. Fasten off the yarn. This creates the ruffle. Repeat the process on the opposite side.
Bodice Edge, Variegated Yarn, 4 mm HookRow 1: Attach the yarn in the armhole area in the front loop. Chain 1 (ch) as a replacement for a single crochet (sc). Continue with herringbone single crochet (hsc) in the front loop only. Crochet a picot above every fourth hsc. The picot consists of 2 chains (ch) and a slip stitch (sl st). End the row with a sl st.
Completion
Sew in loose ends. Sew on a label.
Copyright Please use this pattern for personal use only. For commercial use, please contact me. Always cite the SOURCE, i.e., www.krampolinka.com. This pattern is tailored for this specific yarn, hook, and my tightening technique. If you use a different yarn, hook, or have a different tightening technique than me, the final product and size may vary!
Enjoy this free pattern and you can follow my latest projects, tutorials, ideas, reviews, video podcasts, tips, and tricks:
Share Warning: Undefined variable $post in /data/web/virtuals/261661/virtual/www/domains/krampolinka.com/wp-content/plugins/rosemary-core/inc/social_share.php on line 26
Warning: Attempt to read property "ID" on null in /data/web/virtuals/261661/virtual/www/domains/krampolinka.com/wp-content/plugins/rosemary-core/inc/social_share.php on line 26


No Comments