
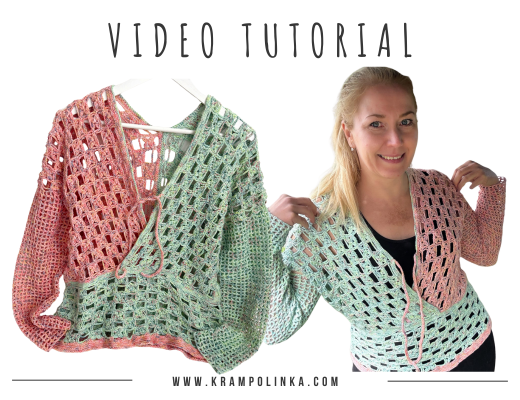
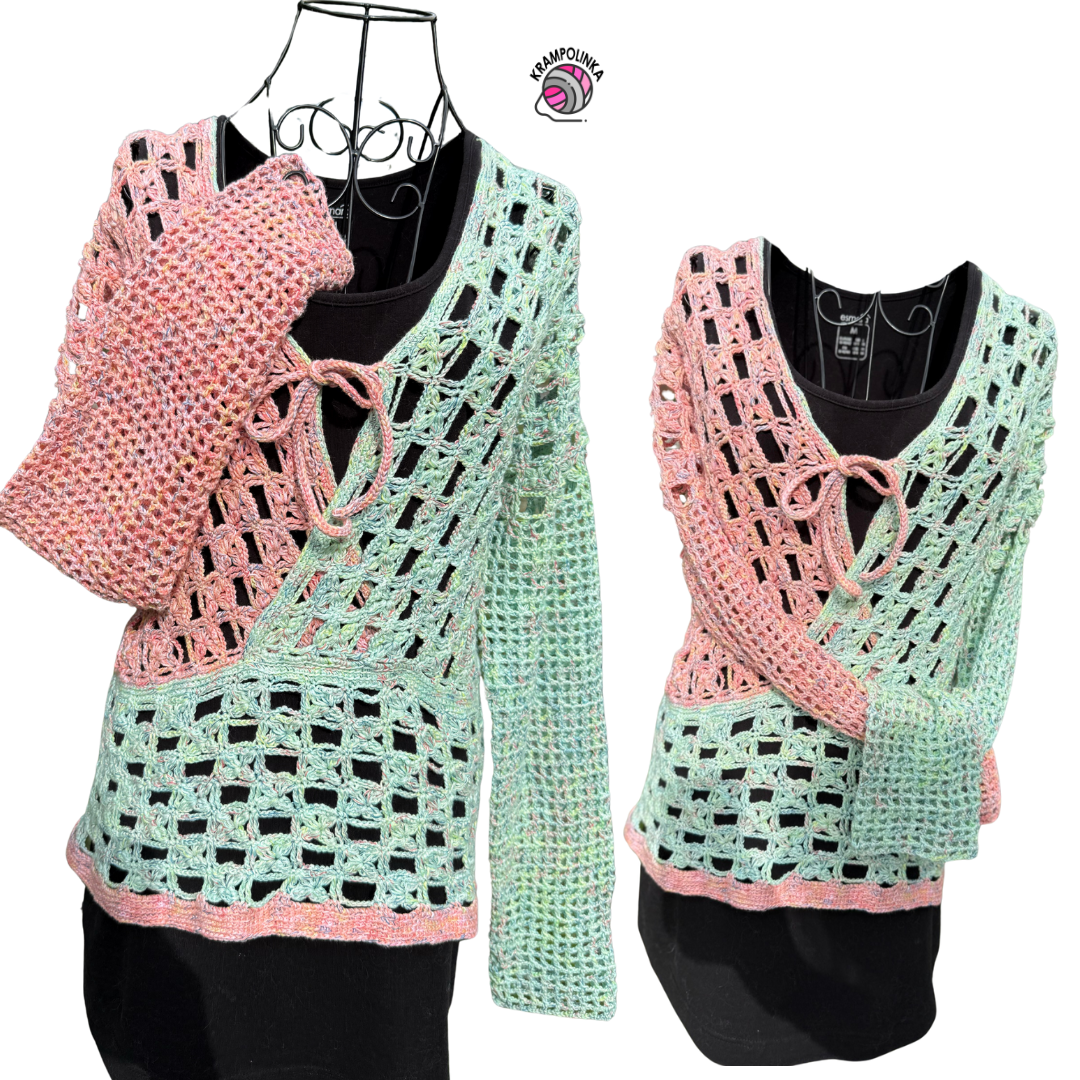
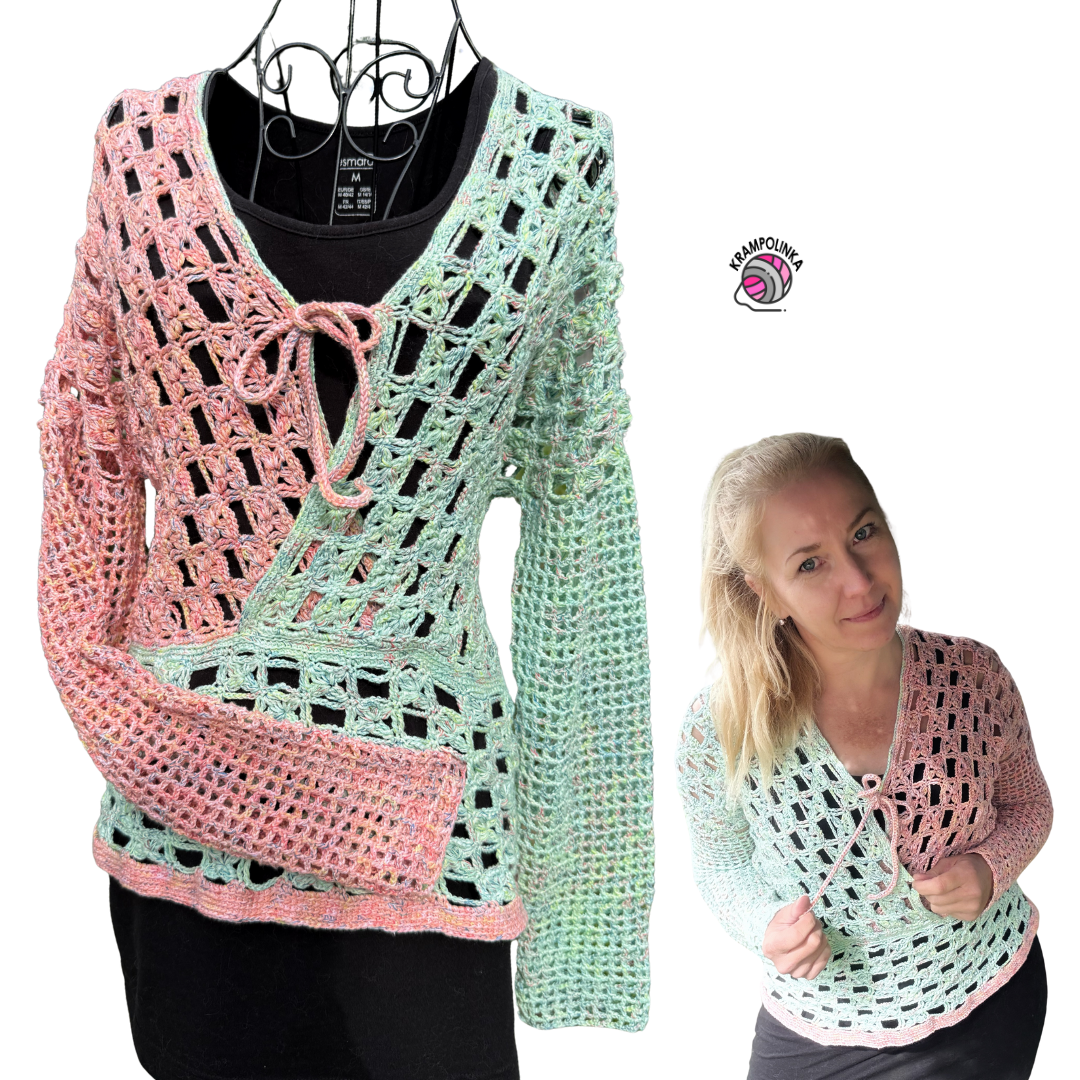
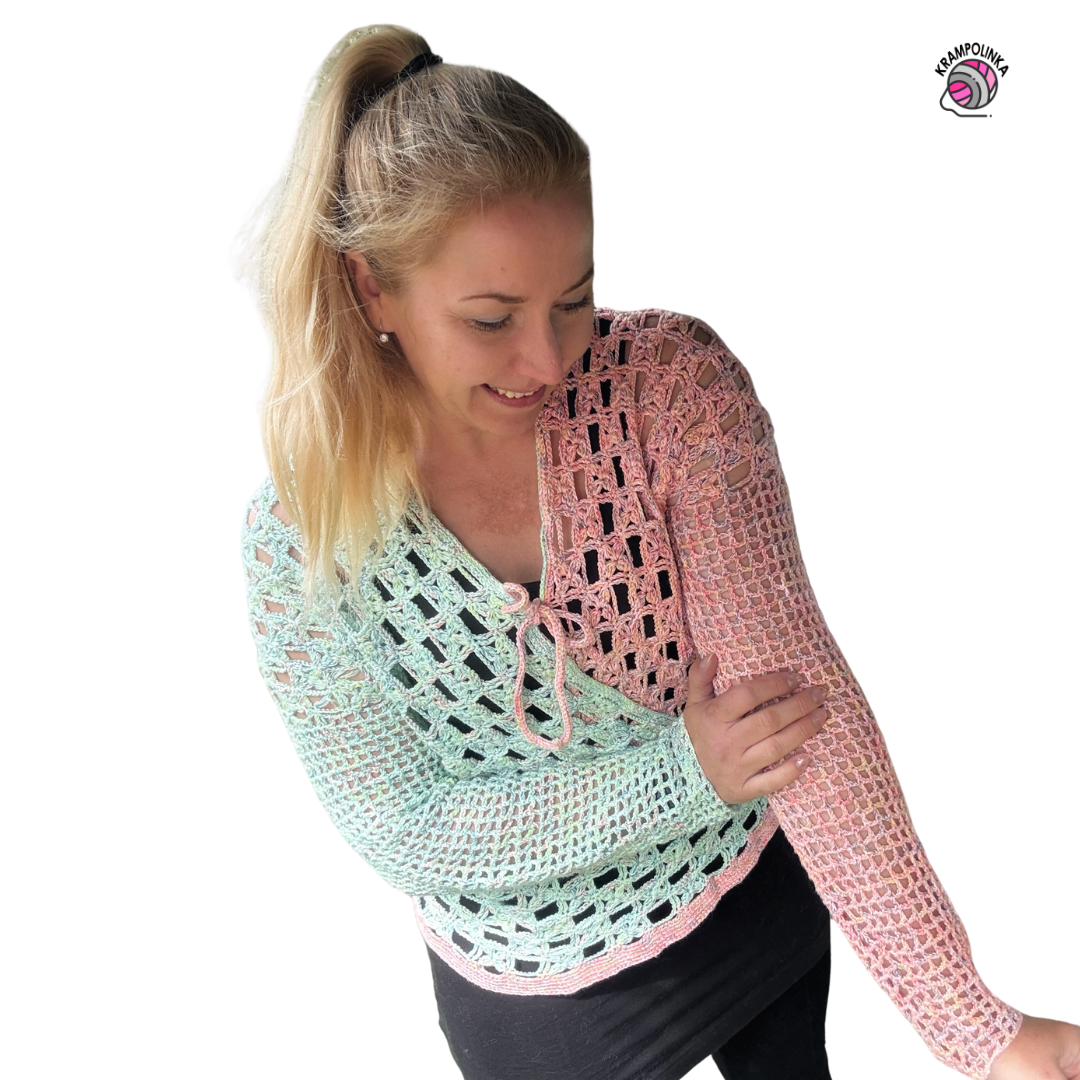
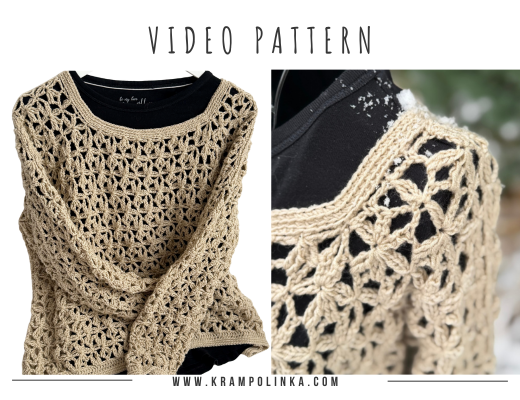
Come and crochet a pattern from 1914 and create a casual rainbow sweater using the beautiful BB Cake gradient yarn — perfect to wear all year round.
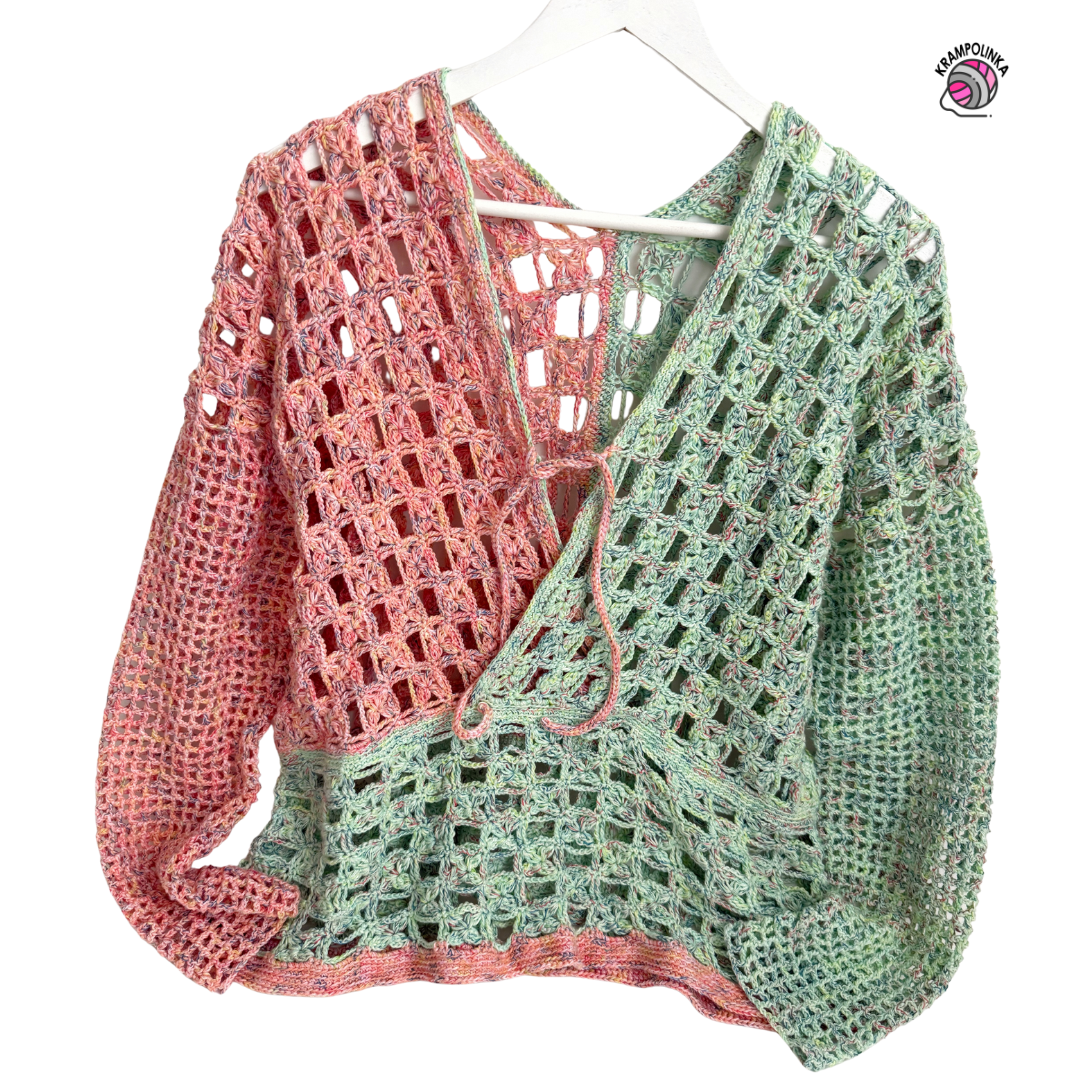
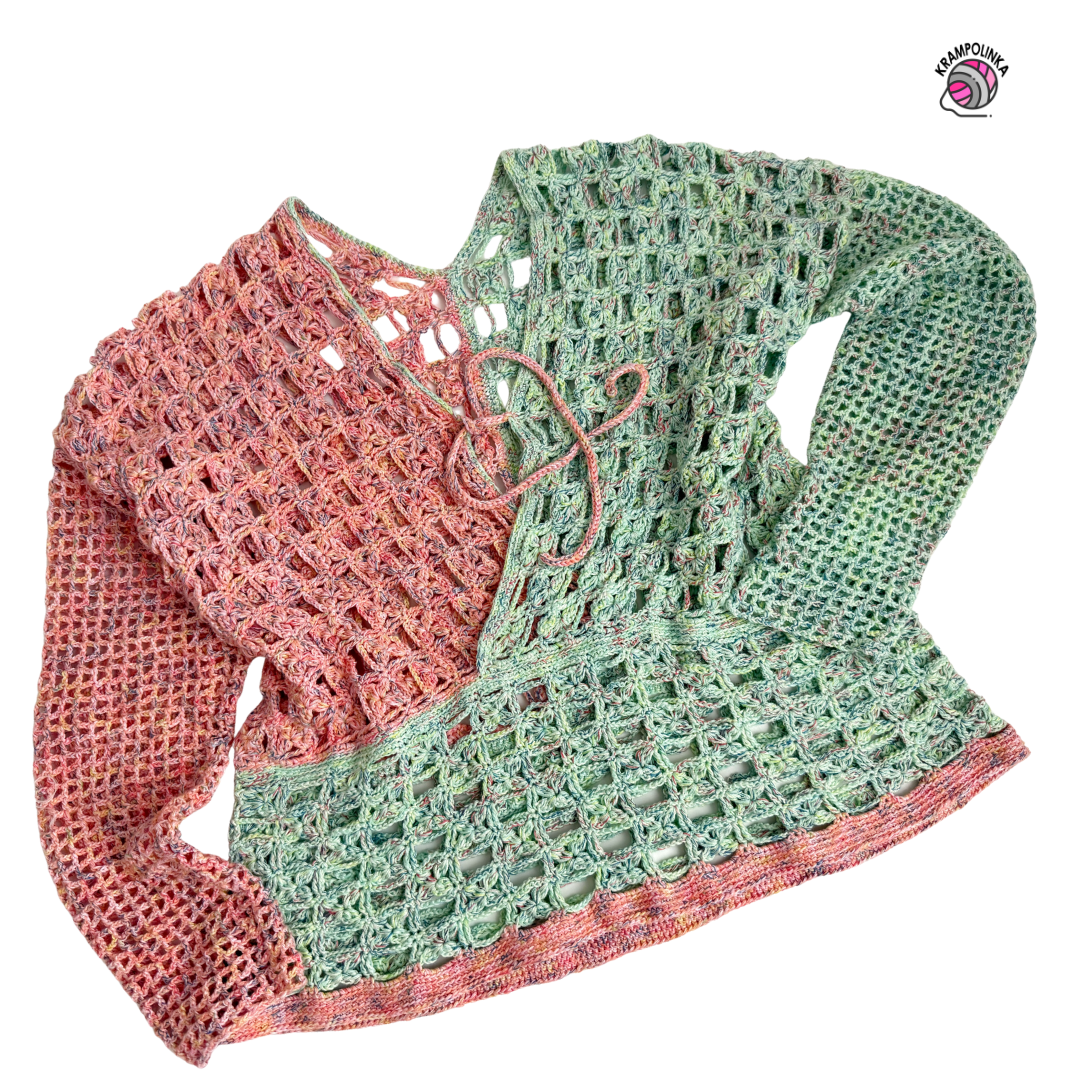
From a historic crochet book dated 1914, I tried to reconstruct a stitch pattern that resembles large filet squares – one filled with a delicate little flower, the next one left open. By alternating these two motifs, a stunning vintage-inspired texture emerges. I’ve already used this pattern in my Buena Vida Tunic, and now also in this cozy sweater.
We’ll crochet using five-strand gradient yarn BB Cake from the e-shop Pohoda na háčku. I used two cakes – Apricot Sorbet and Pistachio Temptation, each with 800 meters of yarn. I used up the entire green cake and about two-thirds of the apricot one, which means roughly 1400 meters of 5-ply yarn for size 42-44. If you prefer a single-color version, simply get one larger cake or two of the same color.
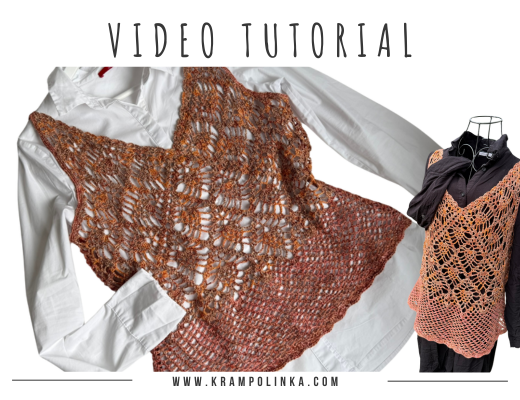
VIDEO TUTORIAL PREMIERE, October 29th, 2025 at 7:00 pm – WITH ENGLISH SUBTITLES
BB Cake Sweater is made up of two panels. First, crochet a foundation chain as long as you want the entire sweater to be — measure from the waist, over the shoulder, and down the back to the waist again. The chain should have a number of stitches divisible by 8, plus two edge stitches, and an odd number of filet squares. Crochet two identical panels.
Once a panel is finished, fold it in half and join the sides, leaving an opening for the armhole and sleeve. Continue directly with filet stitch sleeves, gradually narrowing them as you go. Adjust the sleeve length according to your arm.
Both panels are edged with single crochet to neatly finish the neckline. Then, join the two halves of the sweater across about two-thirds of the back. The front parts overlap slightly, creating a wrap effect, which you can secure by crocheting the bottom edge. For this lower pattern section, the stitch count should be divisible by 7, with an even number of filet squares.
💡 TIP: Crochet the panel a bit narrower, so the sweater fits better at the back. I recommend making a gauge swatch and choosing the hook size according to your tension. For this pattern and yarn, I used a 3 mm hook, since the double treble stitches looked neater with a smaller hook.
I hope your BB Cake Sweater turns out beautifully and that you wear it with joy! Would you like to inspire others or share your experience with crocheting or styling the BB Cake Sweater? Feel free to post your photos in the Krampolinka Facebook group. On Instagram, please use the hashtag #svetrikbbcake for easy searching. If you tag me in your projects made with my patterns, I may reshare them in my InstaStories to inspire others.
BB CAKE SWEATER
Yarn: Gradient yarn BB Cake from Pohodanahacku.cz
Yarn consumption: 1400 m / 400 g for size 42–44
Hook size: 3 mm
Measurements: Front length 56 cm, waist width 49 cm, bottom width 57 cm, sleeve length 43 cm
Size: Designed for size 42–44, bust circumference 96 cm
Additional tools: Yarn needle with a large eye, decorative label, stitch markers
Estimated time: approx. 50 hours
Skill level: Adventurous beginner
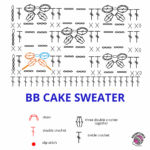
Abbreviations:
CH – chain stitch
SL ST – slip stitch
DC – double crochet
SC – single crochet
BLO SC – single crochet in back loop only
FH SC – fishbone single crochet
TR – treble crochet (double treble in UK terms)
BB Cake Sweater – Panel (make 2)
Hook: 3 mm (adjust to your tension, or use 4 mm if needed)
Row 1:
Chain 216 + 2 turning chains.
Row 2:
Ch 1, insert the hook into the second chain from the hook and make 1 SC. Place a stitch marker in this chain. Continue the pattern as follows: Ch 6, skip 6 sts, 1 SC in next st, 1 SC in next st. Repeat this pattern (Ch 6, skip 6, SC, SC) to the end of the row. Finish with 1 SC in the second to last ch and 1 SC in the last ch. You should have 27 filet squares (an odd number). Turn.
Row 3:
Ch 4–5 (counts as first TR), then 1 TR in next SC. In this row, alternate filled and empty squares.
A filled square (flower motif) consists of four petals — three worked together in the first step and the fourth separately in the second step.
- Petal 1: Ch 3, yarn over, insert hook into TR, work half of a DC (pull through two loops), repeat twice more — you have 3 loops on the hook.
- Petal 2: Yarn over, insert hook into the same SC where the TR was made, work half DC, repeat twice — now 6 loops on the hook.
- Petal 3: Yarn over, insert hook into the next SC, work half DC, repeat twice — now 9 loops on the hook. Yarn over and pull through all loops, ch 1.
- Petal 4: Ch 3, yarn over, insert hook into the center of the flower, work half DC twice, yarn over and pull through all 3 loops. Then 1 TR into each of the next 2 SCs.
An empty square = Ch 6, 1 TR in each of the next 2 SCs. Alternate filled and empty squares across the row. End with 1 TR in each of the last two SCs, the last one into the chain where the stitch marker is. Turn.
Row 4:
Ch 1 (mark it), 1 SC into TR from previous row, Ch 6, SC into next TR, SC into next TR, repeat to end of row. Turn.
Row 5:
Ch 5 (counts as TR + ch1), 1 TR in next SC. Above each filled square, crochet an empty one (Ch 6, TR in next 2 SC). Above each empty square, crochet a filled one (make 3 petals in the first step, the last petal separately, then 1 TR in next 2 SC). Alternate empty and filled squares across the row. End with TR in each of the last 2 SC, last one into the marked chain. Turn.
Row 6:
Ch 1 (mark it), SC in TR from previous row, Ch 6, SC in next TR, SC in next TR, repeat to end of row. Turn.
Rows 7–28:
Repeat Rows 3–6. Finish with a row of arches (Row 6 pattern).
You should have two identical panels, each measuring approximately 82 cm in length and 41 cm in width (a bit on the narrower side for better fit).
Joining the Side Seams – Hook 4 mm
Fold the panel in half. Join the sides on the wrong side of the work, starting from the bottom edge up toward the armhole, working a seam 8 filet squares high. Leave 11 filet squares unjoined for the sleeve opening.
Join both panels using slip stitches (SL ST). Then chain 1 and continue by inserting the hook through the SCs on both pieces and making single crochets (SC) across the seam. Next, make SCs into each chain space — the number of SCs should correspond to the number of chains in each space.
If the seam starts to ripple, adjust the stitch pattern as follows:
SC into the posts, 6 SC into chain space, SC into the posts, 5 SC into chain space.
Once you reach the armhole, turn the work to the right side and continue crocheting the sleeves. Repeat the same joining process for the second panel.
Sleeve – Hook 3 mm
Row 1:
Ch 3 (counts as first DC) and make 1 DC into the same stitch. Continue with Ch 2, DC under the next chain space, Ch 2, DC under the next chain space, Ch 2, DC into the next SC. Repeat this pattern across the row. End the row with a slip stitch (SL ST) and turn.
The row must lie flat — if it ripples, adjust the ratio to one filet square per section.
Note: The sleeves are gradually narrowed (decreased) in two steps: once at the end of a row, and again at the beginning of the next row (since the work is turned). Adjust the number and frequency of decreases to match your arm width.
Row 2:
Ch 3 (counts as DC), Ch 2 for pattern, DC in DC. The pattern for this row is Ch 2, DC in DC.
At the end of the row, decrease — in the last filet square, do not make 2 chains; instead, make 1 DC directly, and join with a SL ST into the second chain of the turning chain. Turn.
Row 3:
Continue decreasing — Ch 3 (counts as DC), DC in DC, then Ch 2, DC in DC across. End with SL ST into the second chain of the turning chain. Turn.
Row 4:
Ch 3 (counts as DC), Ch 2 for pattern, DC in DC. The pattern is Ch 2, DC in DC. End with SL ST into the second chain of the turning chain. Turn.
Rows 5–46:
Crochet all rows the same way as Row 4.
I decreased in rows 10–11, 14–15, 18–19, 22–23, 26–27, 31–32, 34–35, 36–37, 38–39, and 40–41, following the same method as in Rows 2 and 3.
Edging the Panels – Hook 3–4 mm (depending on your tension)
Attach the yarn at the side seam and work on the right side.
Ch 1 (counts as the first SC). Continue as follows: work 4 SCs around the edge of each TR/double treble or chain-5 section, and 1 SC around each edge SC or chain space.
If the fabric feels too tight or starts to ripple, adjust the number of SCs — add or reduce stitches as needed.
When you reach a corner, make 3 SCs in the same stitch, then continue crocheting along the longer edge. Crochet SCs into the stitches (a pointed hook works best). Alternate the pattern: 5 SC into one chain space, then 6 SC into the next chain space. Adjust the ratio according to your own tension.
At the corner, make 3 chains, and finish with a slip stitch (SL ST) at the side seam. Fasten off the yarn.
Repeat the edging process for the second panel.
Joining the Back Panels – Hook 3 mm
Join the two back panels on the right side of the work using slip stitches.
Start from the bottom edge and work up toward the neckline, joining across 11 filet squares in height.
Work the first SC by inserting the hook through the back loop of the first panel and the front loop of the second panel.
Then continue using the fishbone single crochet (FH SC):
insert the hook under the loop of the previous SC, then through both loops of the panels (back loop on one, front loop on the other), yarn over and pull through all loops, then make 1 SC.
Fasten off the yarn and press the seam gently with an iron over a towel to flatten it.
Edging the Front Panel – Hook 3 mm
Start from the bottom edge. Attach the yarn and chain 1. Continue crocheting single crochet in the back loop only (BLO SC) all around the front neckline. Fasten off.
Bottom Edge and Front Overlap – Hook 3 mm
Row 1: Cross the front panels over each other by 3–4 filet squares. Try it on to check the overlap and secure with stitch markers. Attach the yarn at the side seam, chain 1, and continue with BLO SC. At the crossing, crochet BLO SC through both layers together. End the row with a slip stitch (SL ST).
Rows 2–4: Chain 1 (counts as first SC), continue with BLO SC. End each row with SL ST. Work only on the right side. At the end of the last row, turn your work. Gradually increase the stitch count so that the total number of stitches is divisible by 14.
Pattern for the Bottom Section of the Sweater – Hook 3–4 mm
Row 5: Work on the wrong side. Chain 1 (counts as SC), then SC in each SC, and Ch 5, skip 5 stitches. The pattern for this row is SC in SC, SC in SC, Ch 5, skip 5. End the row with SL ST. You should have an even number of filet squares. Turn.
Row 6: Work on the right side. Chain 4–5 (counts as TR), TR in SC. Alternate filled and empty filet squares as in Row 3 of the main pattern. End with SL ST and turn.
Row 7: Work on the wrong side. Chain 1 (counts as SC), then SC in TR and Ch 6. The pattern is SC in TR, SC in TR, Ch 6, repeat to end, join with SL ST, turn.
Row 8: Work on the right side. Chain 4–5 (counts as TR), TR in SC. Alternate a filled square above an empty one and an empty square above a filled one, following the same method as in Row 3. End with SL ST and turn.
Row 9: Work on the wrong side. Chain 1 (counts as SC), SC in TR, SC in TR, Ch 6, repeat to end, SL ST, turn.
Rows 10–19: Repeat Rows 6–9. Finish with a row of arches.
Note: If you need to widen the bottom section, adjust the number of SCs in Rows 2–4 so that it is divisible by 13. Then in Row 5 alternate arches as follows: Ch 5, skip 5 and Ch 5, skip 4, maintaining an even number of squares. Alternatively, use a larger hook size.
Bottom Hem – Hook 3 mm
Row 1: Work on the right side. Chain 1 (counts as SC), make 6 SC under each arch and 1 SC between SCs. Repeat to the end of the row and join with SL ST.
Rows 2–4: Chain 1 (counts as SC), continue with BLO SC. Join each row with SL ST. Fasten off.
Drawstring – Hook 3 mm
Unwind yarn to about five arm spans and fold it in half. Attach it with a slipknot to the neckline at the level of the sixth filet square from the bottom hem. Crochet either a classic chain about 90 chains long or a flat cord: chain 90 and then work back with slip stitches (SL ST) into the back ridge of each chain (a pointed hook is recommended).
Finishing
Sew in all loose ends neatly and decorate the sweater with a label.
Usage and Permissions
This pattern is intended for personal use only. If you would like to use it for commercial purposes, please contact me first. Always include the source link: www.krampolinka.cz when sharing your projects online. The pattern is specifically written for the yarn, hook size, and tension used in this sample. If you use a different yarn or hook, your final bag size and shape may vary.
Enjoy this free pattern and you can follow my latest projects, tutorials, ideas, reviews, video podcasts, tips, and tricks:
- Krampolinka YouTube videos (subtitled since 2024)
- Krampolinka Instagram
- Krampolinka FB group
-
- Crochet BB Cake Sweater
-
- Simple to make
-
- Reconstructed pattern from 1914
-
- Crocheted in size 42–44 using five-strand BB Cake gradient yarn
-

- sleeves worked in filet pattern
-
- Graphic pattern for BB Cake Sweater


No Comments