
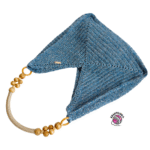
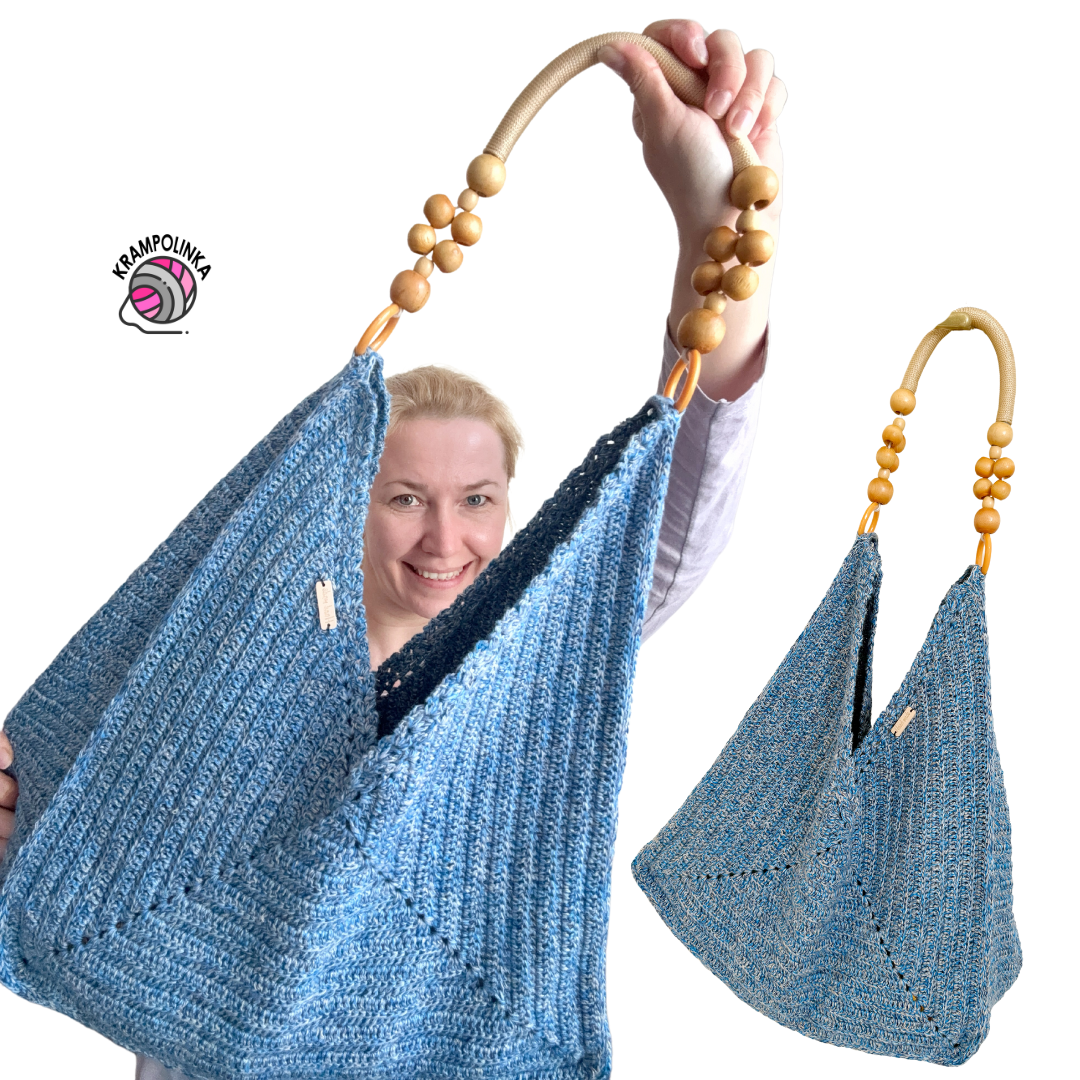
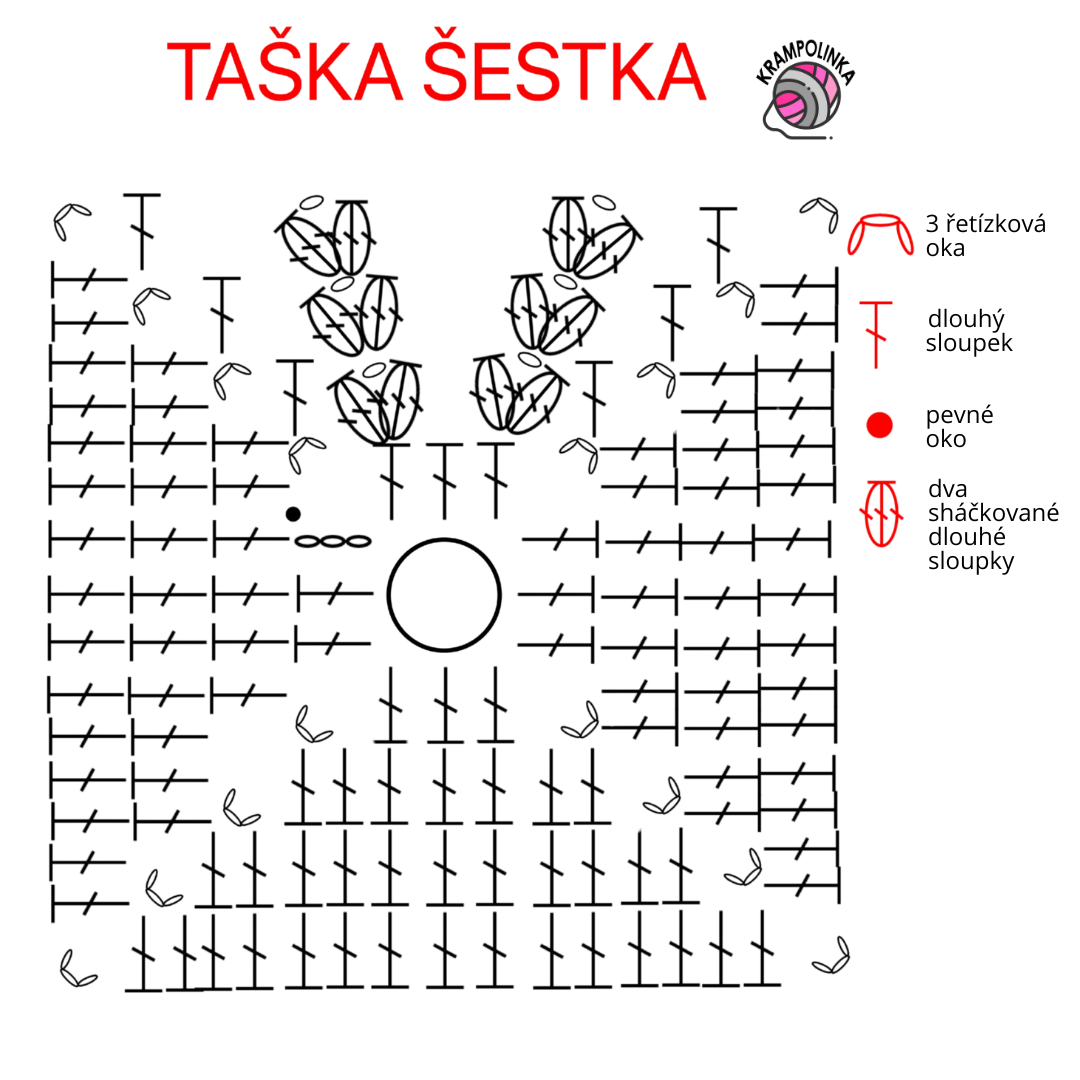
This bag is super simple to make. We’ll start by crocheting two panels – unfinished squares – which are worked in rows back and forth while simultaneously creating a decorative edge. The number of rows determines the overall size of the bag. We use double crochet stitches (US terms) and you can choose between working into the back loop only or both loops for texture.
Once the two panels are done, we crochet a long side strip, gradually increasing its width. The number of rows for the side strip depends on the total stitch count around three sides of the panel. For example, if one panel has 240 stitches across three sides, your strip should have 120 rows. Each chain space in the corners counts as one stitch – this is important if you’re making a bigger or smaller bag and need to recalculate.
TIPS FOR YOU: Use stitch markers when increasing the side strip – it helps keep track of the rows easily. Would you like to share your finished piece or inspire others? You can post your photos in the Krampolinka Facebook group . On Instagram, for easy searching, please use the tags #beachbagsestka, #taskasestka. PATTERN INSTRUCTION BEACH BAG SESTKA- Gradient cake Design Yarn “V Cascais” – available at Hravá Klubka
Yarn consumption: approx. 350g / 875 m
Hook size: 2.5 mm - Finished dimensions:
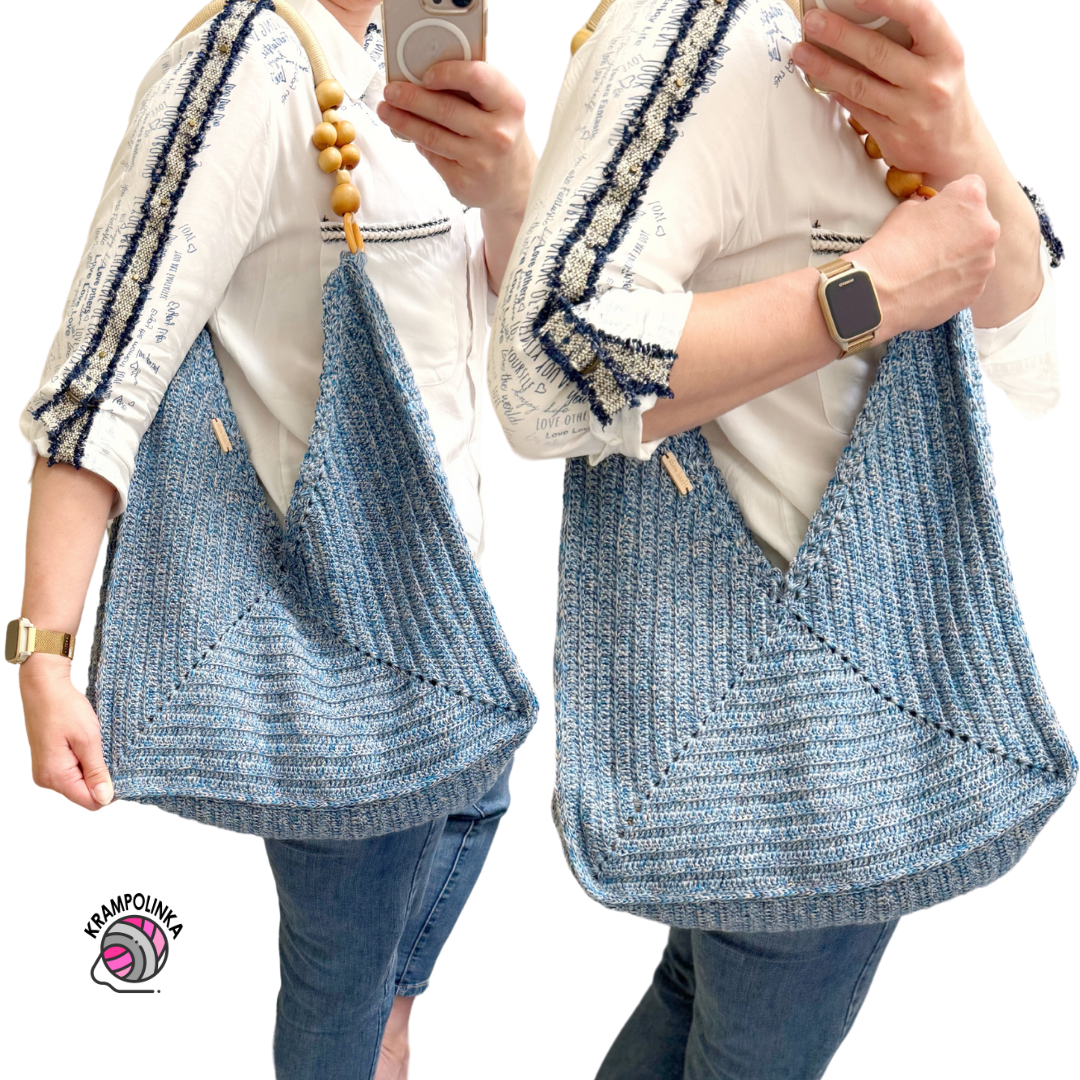
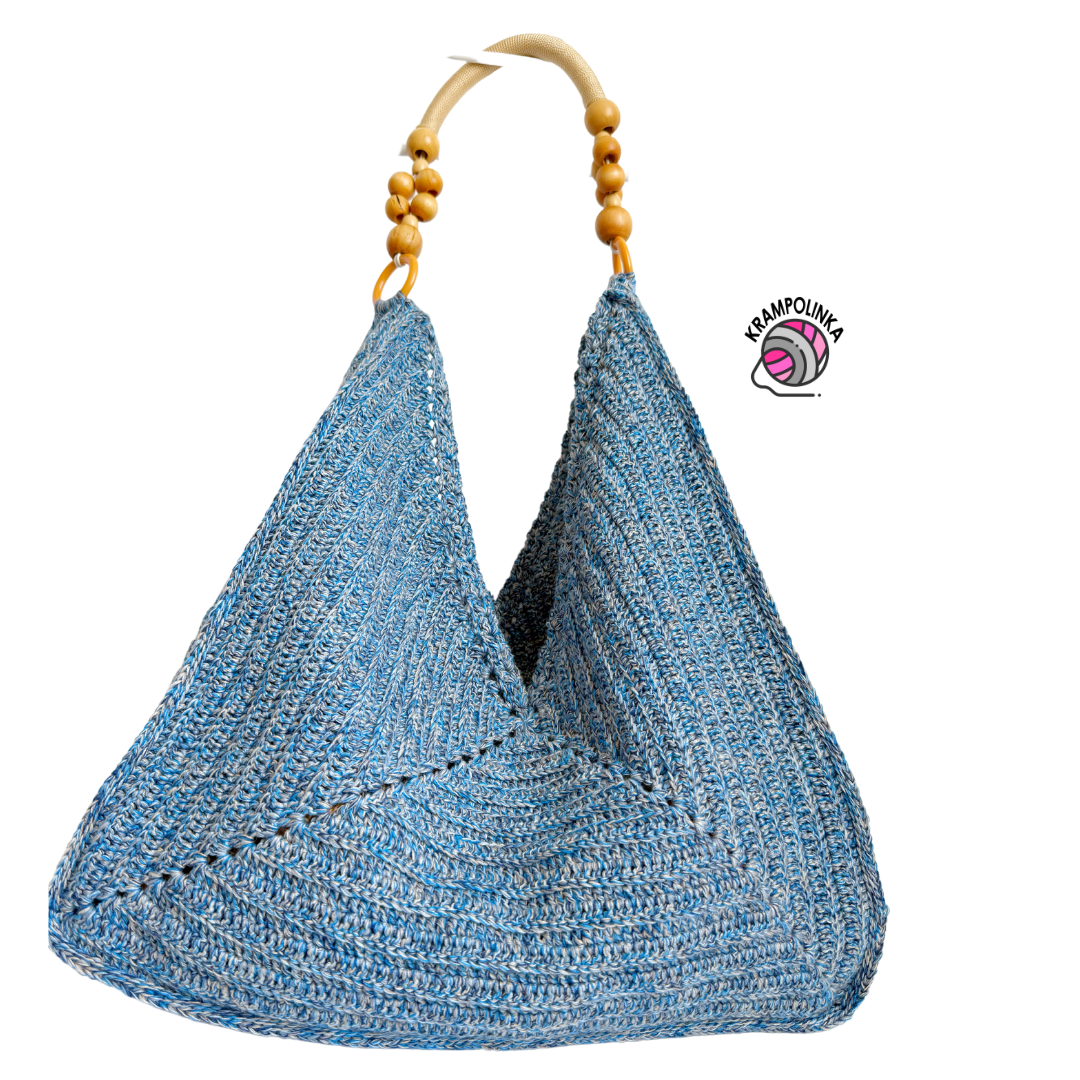
Width: 49 cm
Height: 45 cm
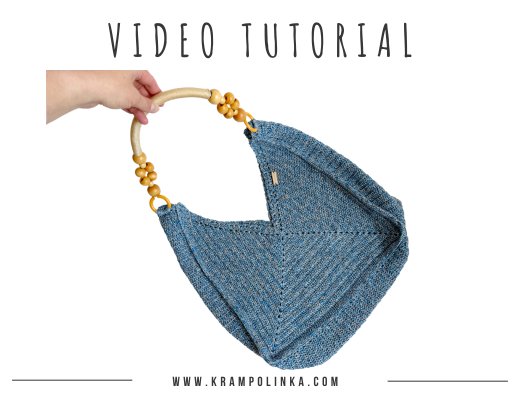
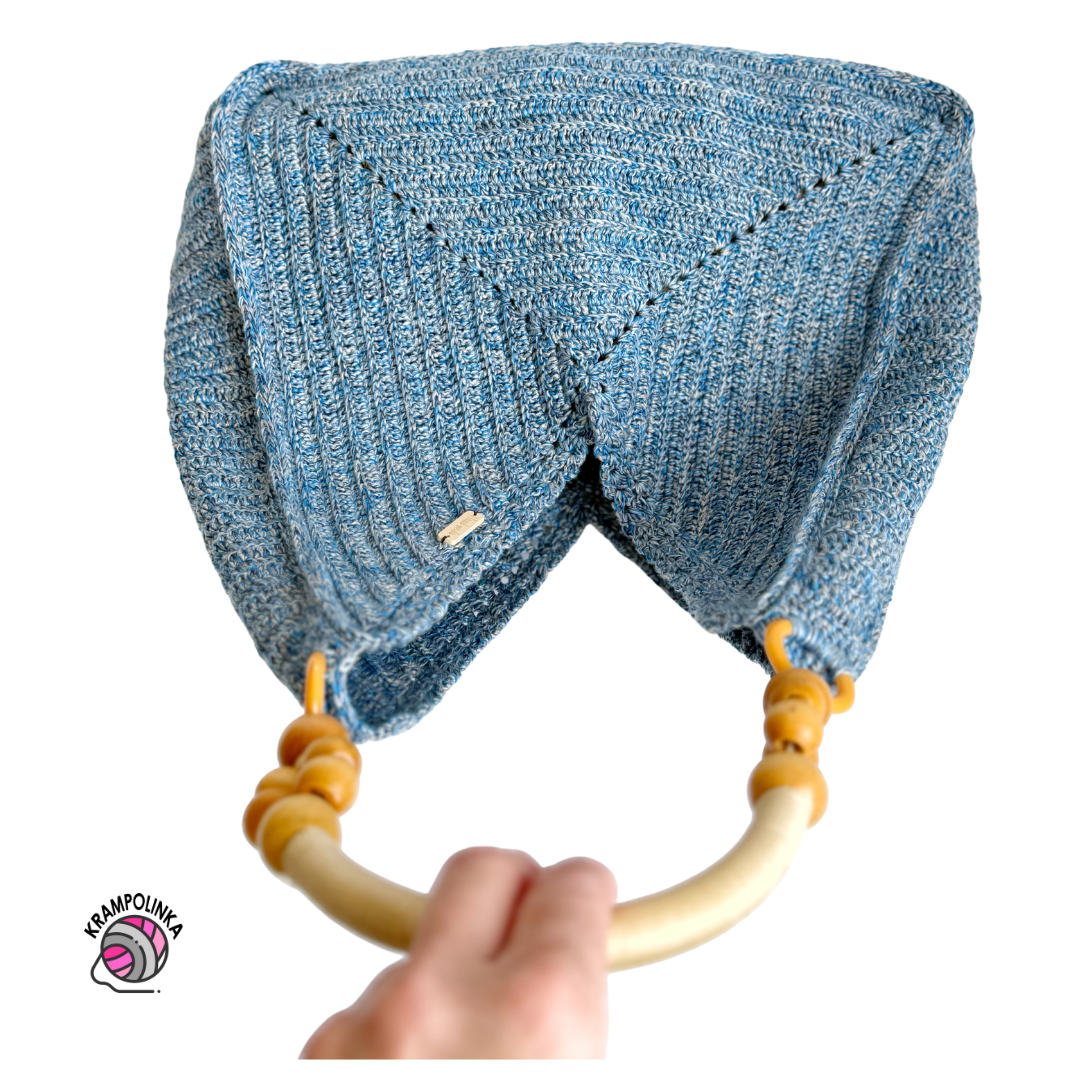
Total height including handle: 64 cm - Accessories:
Tapestry needle (large eye)
Wooden or metal tag for decoration
Bag handle – purchased via JOOM - Estimated time: ~50 hours
Skill level: Beginner-friendly
🔁 Abbreviations (US Terms)
| Czech Abbreviation | English | Description |
|---|---|---|
| ŘO | CH | Chain |
| PO | SL ST | Slip Stitch |
| DS | DC | Double Crochet |
| DSZN | BLO DC | Back Loop Only Double Crochet |
| KS | SC | Single Crochet |
| KSRK | SC (Herringbone) | Insert hook behind the previous SC and through the edge DC, yarn over, pull through both loops – see video for demo |
| MK | MR | Magic Ring |
| 2NDS | TR | Double Treble Crochet |
| Krajový vzor | Edge Pattern | 3 DC together, CH, 3 DC together |
Bag Panel – using a 2.5 mm hook
Row 1:
Begin by making a magic ring. Crochet three chain stitches to act as your first double crochet. Then, work two more double crochet stitches into the ring. Make three chain stitches to create the first corner space. Repeat the following sequence three times: work three double crochet stitches and then three chain stitches. Once you have four sets total, close the round with a slip stitch into the top of the initial chain stitch. You should now have a small square with four spaces at the corners.
Row 2:
Start by chaining three and turning your work. In the same stitch, crochet one double crochet, then one chain stitch, and then two double crochet stitches worked together. In the first corner space, work one double crochet, two chain stitches, and two double crochet stitches. Then, into the next three stitches, make one double crochet into the back loop of each. In the second corner, repeat the same as before: two double crochet stitches, two or three chain stitches (depending on preference), and two double crochet stitches. Continue this pattern around. In the last corner, crochet two double crochet stitches, two chain stitches, and one double crochet. Finish with the same edge stitch pattern as at the beginning. Turn your work.
Row 3:
Make one chain stitch, then slip stitch into the chain space from the edge pattern. Crochet three chain stitches, then one double crochet, one chain, and two double crochet stitches worked together. In the next corner space, crochet one double crochet, two chain stitches, and two double crochet stitches. In the side space between corners, make seven double crochet stitches. Repeat the same pattern in each corner. End the row with one final corner (two double crochet stitches, two chain stitches, one double crochet), then finish the edge pattern as before. Turn.
Row 4:
Make one chain stitch, then slip stitch into the edge space. Begin with the edge pattern. In each corner, crochet one double crochet, two chain stitches, and two double crochet stitches. Between corners, work eleven double crochet stitches into the back loop only. Repeat this pattern on each side. Finish the row with a corner and the edge stitch pattern. Turn.
Rows 5 to 23:
Repeat rows three and four alternately until you have twenty-three rows in total. With each row, your square grows by four stitches per side. Make sure to count stitches regularly so that each side remains even and the shape stays correct.
Make two panels using the same process.
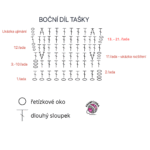
Side Strip – using a 2.5 mm hook
Foundation Row:
Start by making nine chain stitches.
Row 1:
Add four more chain stitches at the end to act as the first turning chain. Then, insert your hook into the fifth stitch from the hook and work one double crochet. Continue with one double crochet into each remaining chain stitch. You should have ten stitches in total. Turn.
Rows 2 to 5:
Chain three to begin the row. Work one double crochet into each stitch across the row. At the end, make a double crochet into the third chain from the previous row. You should maintain ten stitches in each row. Turn.
Row 6 (Increase Row):
Chain three. In the second stitch, make two double crochets into the same stitch. Continue with one double crochet in each stitch. In the second-to-last stitch, work two double crochets into the same space again. Finish the row with one double crochet into the turning chain. You now have twelve stitches. Turn.
Rows 7 to 10:
Work one double crochet into each stitch across. Maintain twelve stitches per row. Turn after each row.
Row 11 (Increase):
Chain three, then make two double crochets into the next stitch. Continue with one double crochet per stitch across. In the second-to-last stitch, make two double crochets into one stitch again. Finish with a double crochet into the turning chain. You now have fourteen stitches. Turn.
Rows 12 to 15:
Work straight rows with one double crochet in each stitch. Maintain fourteen stitches. Turn.
Continue with Gradual Increases
-
Rows sixteen to twenty: sixteen stitches per row
-
Rows twenty-one to twenty-five: eighteen stitches per row
-
Rows twenty-six to thirty: twenty stitches per row
-
Rows thirty-one to thirty-five: twenty-two stitches per row
Row 36 (Wider Increase):
Increase by adding three stitches in total — one at the beginning, one in the center, and one near the end — for a total of twenty-five stitches.
Rows 37 to 74:
Continue working straight rows with twenty-five stitches.
Begin Decreasing
Row 75:
After the first stitch, crochet the next two stitches together as a decrease. Continue across the row, and decrease again by crocheting the second-to-last and third-to-last stitches together. End the row with one double crochet. You now have twenty-three stitches. Turn.
Rows 76 to 114:
Work straight rows with twenty-three stitches each.
Final Decreases
-
Rows one hundred fifteen to one hundred nineteen: twenty-one stitches
-
Rows one hundred twenty to one hundred twenty-four: nineteen stitches
-
Rows one hundred twenty-five to one hundred twenty-nine: seventeen stitches
-
Rows one hundred thirty to one hundred thirty-four: fifteen stitches
-
Rows one hundred thirty-five to one hundred thirty-nine: thirteen stitches
Row 140:
Make three decreases in this row — one at the beginning, one in the middle, and one at the end. You should now have ten stitches.
Rows 141 to 144:
Work straight rows with ten stitches. Do not fasten off — continue to the edging.
Edging the Side Strip
Row 1 (Edging):
Make one chain stitch to begin. Work along the long edge of the strip. For every horizontal row, make two single crochet stitches using the herringbone technique. This involves inserting the hook behind the previous single crochet and also under the row edge, pulling the yarn through both loops, and finishing the stitch. Repeat along the edge. Do not cut the yarn.
Joining the Bag
Attach the First Panel:
With the remaining yarn, join the side strip to the first panel. Work on the front side. Insert the hook through the back loop of the panel’s double crochet and the front loop of the strip’s single crochet. Continue around three sides.
Attach the Second Panel:
Repeat the same joining process with the second panel, attaching it to the remaining edge of the strip.
Finishing the Bag
-
Weave in all ends using a yarn needle.
-
Sew or attach handles to the sides.
-
Add a tag or label as decoration if desired.
Usage and Permissions
This pattern is intended for personal use only. If you would like to use it for commercial purposes, please contact me first. Always include the source link: www.krampolinka.cz when sharing your projects online. The pattern is specifically written for the yarn, hook size, and tension used in this sample. If you use a different yarn or hook, your final bag size and shape may vary.
Enjoy this free pattern and you can follow my latest projects, tutorials, ideas, reviews, video podcasts, tips, and tricks:- Krampolinka YouTube videos (subtitled since 2024)
- Krampolinka Instagram
- Krampolinka FB group
-

- Crochet beach bag Sestka
-

- Interesting shape
-
- Wooden handle

-

- Perfekt for summer time
-

- Unusuall shape
-
- Elegant and trendy bag

-
- Crochet strap

-

- Crochet bag diagram

No Comments